Pocket-sized innovative gadgets wonders are quietly remapping our daily routines. Miniature hardware packed with mighty software is turning once-bulky tech into sleek, unobtrusive tools that fit in your hand — or ear — and do heavy lifting. These tiny inventions are rewriting the rulebook on convenience, making tasks faster, safer, and more delightful.
Cellphones and headphones have become extensions of ourselves. The latest smartphones do everything from high-resolution photography to health monitoring, yet they’re thinner and lighter than ever. Foldables collapse into pocketable squares, then unfurl to the size of a small tablet — offering a big-screen experience without the bulk. Under the hood, powerful processors and efficient batteries keep them running all day, while features like haptic feedback and adaptive refresh rates make interactions smoother and more intuitive.
Headphones, meanwhile, have evolved from simple audio tools to intelligent companions. Truly wireless earbuds now boast active noise cancellation that rivals over-ear models, along with personalized sound profiles that adapt to your ear shape and listening habits. Some buds include spatial audio for immersive, movie-theater-level sound; others incorporate sensors to monitor fitness metrics or alert you when traffic approaches. The trend is clear: smaller audio devices are doing more than ever, blending comfort with advanced functionality.
Cameras and computers are following the same miniaturization thread. Mirrorless cameras now pack full-frame sensors into bodies that are compact enough for street photography or travel. Computational photography — sophisticated algorithms working alongside optics — produces stunning images even in low light, removing the need for large lenses or complex setups. Action cams and drone cameras deliver cinematic footage from impossible angles, while stabilization tech keeps footage buttery-smooth.
On the computing front, ultraportable laptops and mini PCs are redefining mobility. Lightweight carbon-fiber laptops with long-lasting batteries let you work from a café, a train, or the park. At the same time, tiny desktop boxes and single-board computers can power entire smart-home hubs or creative studios, often costing a fraction of traditional workstations. ARM-based chips and efficient cooling designs are enabling sustained performance in slimmer forms, so you don’t compromise power for portability.
Home security and appliances have embraced intelligence on a miniature scale too. Compact smart cameras and doorbell cams deliver crystal-clear footage to your phone, and cloud-based analytics can differentiate between a person, animal, or vehicle — reducing false alarms. Smart locks fit seamlessly into existing doors, letting you grant temporary access to guests or get alerts if a door is left ajar. Sensors the size of a matchbox monitor windows, pipes, and smoke, sending instant notifications when something’s off.
Appliances are getting a tiny-tech makeover as well. Robot vacuums quietly navigate and map rooms, handling daily cleanup so you don’t have to. Smart fridges optimize energy use, suggest recipes based on what’s inside, and even order groceries when supplies run low. Compact countertop appliances — think convection toaster ovens with app control or tiny sous-vide devices — bring professional cooking techniques into small kitchens.
The overarching theme is efficiency: more capability in less space, with seamless interplay between devices. These innovations free up time, reduce friction, and make everyday life just a bit easier — sometimes in ways you only notice when they’re missing. Small but potent, today’s gadgets are proof that size isn’t the measure of impact; design, connectivity, and clever engineering are.
Think of the hidden gems gadgets that make life feel like science fiction: sleek, silent, and secretly brilliant. Beyond the mainstream launches and viral unboxings there’s a quieter revolution—little-known devices that blend clever engineering with real-world use. From phones that harvest sunlight to washers that talk to your wardrobe, these are the hidden gems reshaping daily tech.
Cellphones and headphones have always been showpieces for innovation, but the next wave favors durability, autonomy, and sensory smarts. Imagine a smartphone with a microscopic solar layer stitched into the chassis so short walks and coffee breaks top up your battery, or a modular handset with plug-and-play camera modules so you can swap a telephoto for a macro in seconds. Smaller companies are shipping niche beasts: e-ink secondary displays for notifications and battery savings, satellite backup radios for travelers, and phones built to be repairable for a decade. Audio is getting personal too. Bone-conduction headphones have matured beyond sports use, delivering clear, open-sounding audio while keeping ears free and aware. Meanwhile, earbuds now pack adaptive active-noise-cancellation that maps your ear canal and ambient field to sculpt silence precisely, and some even monitor heart rate and stress through tiny sensors—health tracking disguised as a soundtrack.
Cameras and computers are converging into hybrid tools designed for creators on the go. Modern mirrorless cameras borrow computational tricks from phones—real-time stacking, AI-powered autofocus that recognizes gestures and expressions, and on-device RAW processing that hands you publish-ready files minutes after a shoot. There’s also a resurgence of pocket cinema cameras with interchangeable lenses and cinema-grade codecs that used to be studio-only. On the computing side, modular mini-PCs let you snap in extra GPU or storage bricks without replacing the whole machine, and lightweight laptops now include dedicated AI co-processors to accelerate editing, transcription, and creative tools offline. Foldable displays and detachable keyboards mean a device can be a tablet in the morning, an editing workstation by lunch, and a presentation machine by afternoon.
Home security and appliances are quietly becoming smarter and less obtrusive. Contemporary security cams run sophisticated AI on-device to avoid cloud uploads and false alarms—recognizing pets, packages, or suspicious behaviors while preserving privacy. Smart locks are moving beyond codes and keys with encrypted one-time access and biometric privacy safes for deliveries. In the kitchen, fridges with spectral sensors can flag food spoilage before odor sets in, and countertop appliances learn recipes and adjust heat profiles automatically. Robotic home helpers are evolving too: vacuum systems that identify and avoid fragile objects, and laundry machines that sense fabric types and pick gentler cycles, extending wardrobe life while saving energy.
These gadgets are not just shiny novelties; they’re practical innovations quietly improving everyday life. Keep an eye on small makers and niche crowdfunding—often the best surprises come from teams obsessed with solving one problem exceptionally well. Subscribe to newsletters that highlight indie hardware, attend local maker fairs, or follow hardware-focused podcasts—these channels often surface breakthrough gadgets before big media do, giving you first dibs on genuinely useful innovations and enjoy.
The First-Timer’s Buying Guide to Luxury Watches for Women
Choosing your first luxury watch is an incredible experience! It’s more than just buying something to tell time; it’s about investing in a piece of art, a marvel of engineering, and a personal statement that will last a lifetime. The world of luxury watches for women is filled with breathtaking designs, rich history, and amazing craftsmanship. It’s a journey into a hobby that combines style, precision, and passion.
But let’s be honest, it can also feel a little overwhelming. With so many brands, styles, and technical terms, where do you even begin. That’s exactly why we created this guide. We’re here to walk you through every step, from understanding what makes a watch ‘luxury’ to picking the perfect model that feels like it was made just for you.
Get ready to feel excited, confident, and inspired.
What to Know
It’s All About the Movement: The ‘movement’ is the engine of the watch. Luxury timepieces often feature mechanical movements (either automatic or manual-wind), which are celebrated for their intricate craftsmanship and artistry.
Materials Matter Greatly: High-end watches for women use premium materials like 316L stainless steel, 18k gold, platinum, and scratch-proof sapphire crystal. These materials ensure durability and a beautiful finish.
Brand Heritage is Key: A significant part of a luxury watch’s value comes from the brand’s history of innovation, design excellence, and horological significance. You’re buying into a legacy.
Style is Personal: The best luxury watch is one that reflects your personal style and fits your lifestyle. Consider everything from case size to dial color and bracelet type to find your perfect match.
What Truly Makes a Woman’s Watch “Luxury”?
When you hear the term “luxury watch,” it’s easy to think it’s just about a high price tag or a famous name. While those are often part of the equation, the real definition goes so much deeper. True luxury in horology is a combination of artistry, heritage, and uncompromising quality. It’s about the hundreds of hours of skilled labor that go into creating a single timepiece.
At its core, a luxury watch is defined by its craftsmanship. We’re talking about watchmakers who have dedicated their lives to mastering the assembly of minuscule, intricate components. Many high-end watches for women feature hand-finished details, from polished screws to elegant engravings on the movement, that you might not even see without a magnifying glass. This dedication to perfection is what sets them apart from mass-produced accessories.
Then there’s the heart of the watch: the movement. While highly accurate quartz movements have their place, the pinnacle of luxury watchmaking is the mechanical movement. These are tiny, complex engines powered by springs and gears, operating without any electronics. An automatic mechanical movement, for example, is powered by the motion of your own body.
This connection between wearer and watch is something truly special and a hallmark of traditional horology.
Finally, the materials used are second to none. Luxury watchmakers use materials chosen for both their beauty and their resilience. Cases are often crafted from corrosion-resistant 316L stainless steel, lustrous 18k gold, or lightweight titanium. The “glass” covering the dial is almost always sapphire crystal, a synthetic material that is virtually impossible to scratch.
It’s this fusion of masterful craftsmanship, mechanical artistry, and superior materials that elevates a watch from a simple accessory to a true piece of luxury.
Key Features to Look For in High-End Watches for Women
Navigating the features of designer watches for her can be exciting once you know what to look for. These details are what make each watch unique and help you find the one that perfectly suits your needs and tastes. Let’s break down the most important features to consider.
The Movement: The Heart of the Watch
This is the most critical component. You’ll generally choose between two main types:
Mechanical: These are the traditional movements prized by collectors. They can be manual-wind, meaning you need to wind the crown periodically, or automatic (self-winding), which uses a rotor powered by your wrist’s movement to wind the mainspring. The sweeping motion of the seconds hand is a classic sign of a mechanical movement.
Quartz: These are battery-powered movements known for their exceptional accuracy and lower maintenance. They offer fantastic reliability and are often more affordable, making them a practical choice for an everyday luxury piece.
Case Size and Shape
Finding the right size is crucial for comfort and style. Women’s watch cases typically range from a delicate 26mm to a bolder 40mm or more. It’s a great idea to measure your wrist to get a sense of what might work best. Case shapes also vary, from the classic round to elegant oval, distinctive square (like the Cartier Santos), or rectangular (like the Jaeger-LeCoultre Reverso).
Dial Design and Legibility
The dial is the face of the watch and where much of its personality comes from. Do you prefer a clean, minimalist look with simple stick indices? Or perhaps something more ornate, like a mother-of-pearl dial with diamond hour markers? Consider the color, the style of the hands, and how easy it is to read the time at a glance.
The Bracelet or Strap
The band of the watch dramatically affects its look and feel. Metal bracelets, often made from stainless steel or gold, offer a classic, durable look that can be dressed up or down. Leather straps provide a more traditional and comfortable feel, available in countless colors and textures. For a sporty and modern vibe, high-quality rubber straps are an excellent, water-resistant option.
Pro Tip: Many luxury watches offer interchangeable straps, allowing you to completely change the look of your timepiece in seconds. This feature adds incredible versatility, making it feel like you have multiple watches in one!
How to Choose the Right Luxury Watch for Your Style
Finding the perfect women’s luxury watch is a deeply personal journey. The goal is to find a timepiece that not only looks beautiful but also feels like an extension of your personality and fits seamlessly into your life. The right watch will bring you joy every time you glance at your wrist!
First, think about your dominant personal style. Are you drawn to timeless, classic pieces that never go out of fashion. A simple, elegant watch with a leather strap and a clean dial might be perfect. If your style is more modern and bold, you might prefer a larger watch with a metal bracelet and a unique dial color.
For the sporty and active individual, a durable dive watch or a chronograph with a rubber strap combines functionality with high-end design.
Next, consider the primary use for your watch. Are you looking for an everyday companion that can take you from the office to a casual dinner. If so, versatility is key. A two-tone (steel and gold) watch or a stainless steel model with a classic design is often a fantastic choice.
These watches are durable enough for daily wear but sophisticated enough for almost any occasion.
On the other hand, you might be searching for a statement piece for special events. This is where you can explore more delicate designs, precious metals, and dazzling diamond embellishments. These are the watches that act as jewelry, designed to capture attention and celebrate significant moments. As you explore, don’t be afraid to try on different styles.
You might be surprised by what you fall in love with once it’s on your wrist.
Top Recommendations: Iconic Designer Watches for Her
The world of luxury watches is filled with legendary names. While this is by no means an exhaustive list, here are a few brands and styles that represent the pinnacle of design and quality, offering something for every taste.
The Icons: Rolex, Cartier, and Omega
These brands are often called the “Holy Trinity” of accessible luxury for a reason. Rolex is perhaps the most recognized luxury brand in the world, with the Datejust and Lady-Datejust models being timeless symbols of success and elegance. Cartier, originally a jeweler, brings a unique Parisian chic to its watches; the Tank and Panthère models are iconic for their sophisticated, non-traditional case shapes. Omega offers a fantastic blend of sporty functionality and refined design, with the Seamaster Aqua Terra and Constellation collections being incredibly popular choices for women who want a versatile, high-performance timepiece.
The Jeweler’s Touch: Chopard and Bulgari
For those who see a watch as a piece of fine jewelry, brands like Chopard and Bulgari are masters of the craft. Chopard’s Happy Sport collection, with its famous floating diamonds dancing on the dial, is playful yet incredibly luxurious. Bulgari’s Serpenti collection, which coils around the wrist like a serpent, is a bold and unmistakable statement of high fashion and Italian design.
The Accessible Swiss Powerhouse: LIV Swiss Watches
For those seeking the prestige and quality of a Swiss-made timepiece without the astronomical price tag of some heritage brands, LIV Swiss Watches presents a compelling option. They focus on creating durable, high-performance watches with a bold aesthetic, directly offering incredible value. You get the hallmarks of luxury—Swiss movements, sapphire crystals, and robust case construction—at a much more approachable price point.
Their collections often feature sporty chronographs and rugged designs that appeal to the modern woman who wants a watch that can keep up with her active lifestyle. If you appreciate meticulous engineering and a design that stands out from the crowd, exploring what LIV has to offer is a fantastic move. It’s a great way to enter the world of Swiss horology with a watch built to last.
Understanding Pricing: What Do Women’s Luxury Watches Cost?
The price of a luxury watch can range from a few thousand dollars to the price of a house, so understanding the different tiers is helpful for setting a realistic budget. The cost is determined by a combination of brand prestige, the complexity of the movement, the materials used, and the level of hand-finishing involved.
Entry-Level Luxury: $1,000 – $5,000
This is a fantastic price range to acquire a high-quality, Swiss-made timepiece from excellent brands. In this tier, you’ll find many watches with reliable quartz or robust automatic movements. Brands like Tissot, Longines, and TAG Heuer offer incredible options here. You can expect features like sapphire crystal, stainless steel cases, and solid water resistance. This is the perfect entry point for a first serious watch.
Mid-Tier Luxury: $5,000 – $15,000
This range is the sweet spot for many of the most iconic models from legendary brands. Here, you can purchase flagship watches from Omega, Cartier, and entry-level models from Rolex. You’ll see more in-house movements, precious metal accents (like gold bezels or hands), and more intricate dial work. The level of finishing on both the case and the movement takes a significant step up in this tier.
Haute Horlogerie: $15,000+
Welcome to the world of high watchmaking. In this category, you’ll find watches from the most prestigious brands like Patek Philippe, Audemars Piguet, and Vacheron Constantin. These timepieces are works of art, often featuring highly complex movements (known as complications), extensive use of precious metals and diamonds, and an extraordinary level of hand-finishing. These are investment-grade pieces and represent the absolute pinnacle of the craft.
The Pros and Cons of Investing in a Luxury Timepiece
Owning a high-end watch is a rewarding experience, but it’s wise to consider both the benefits and the responsibilities that come with it. It’s a significant purchase, and looking at the full picture ensures you make a decision you’ll be happy with for years to come.
Pros
Unmatched Quality and Longevity: A well-made luxury watch is built to last not just a lifetime, but for generations. With proper care, it can become a cherished family heirloom.
Value Retention: While not all watches are financial investments, many models from top-tier brands hold their value exceptionally well, and some even appreciate over time. This makes the initial cost feel more like a store of value than a simple expense.
A Statement of Personal Style: A beautiful watch is one of the most personal and expressive accessories you can wear. It communicates a sense of style, an appreciation for craftsmanship, and attention to detail.
The Joy of Ownership: There is a unique, tactile pleasure in owning a finely crafted mechanical object. The smooth sweep of the seconds hand, the feeling of the bracelet on your wrist—it’s a daily source of joy.
Cons
High Initial Cost: The most obvious drawback is the significant upfront investment required. It’s a purchase that requires careful budgeting and consideration.
Maintenance and Servicing: Mechanical watches are like high-performance cars; they need regular servicing to keep running perfectly. This typically needs to be done every 5-8 years and can cost several hundred to over a thousand dollars.
Risk of Damage or Theft: Wearing an expensive item on your wrist comes with inherent risks. You’ll need to be mindful of your surroundings and may want to consider getting your watch insured.
Frequently Asked Questions About Luxury Watches for Women
Here are answers to some of the most common questions people have when they start exploring the world of women’s luxury watches.
What are the best women’s luxury watches?
The “best” watch is highly subjective and depends on your personal style, budget, and what you value. However, some of the most consistently celebrated models include the Rolex Lady-Datejust for its timeless appeal, the Cartier Tank for its iconic design, and the Omega Seamaster Aqua Terra for its perfect blend of sportiness and elegance.
Which is the best brand for a woman’s watch?
Again, this depends on taste! For classic, investment-worthy pieces, Rolex and Cartier are unparalleled. For something with a rich history in performance and exploration, Omega is a top contender. For a fashion-forward, jewelry-focused design, brands like Bulgari or Chopard are fantastic choices. The best brand is the one whose story and design language resonate with you the most.
What is the best entry luxury watch?
For an entry into the world of Swiss luxury, brands like TAG Heuer, Longines, and Tissot offer exceptional value and quality. They provide the full luxury experience—Swiss movements, premium materials, and brand heritage—at a more accessible price point, typically in the $1,000 to $4,000 range. They are a perfect starting point for a new collector.
Which ladies’ watch holds its value?
Generally, watches from Rolex and Patek Philippe have the strongest value retention in the industry, with many models appreciating over time. Certain iconic models from Cartier (like the Tank or Crash) and Audemars Piguet (the Royal Oak) also perform very well on the secondary market. Stainless steel sports models tend to be the most sought-after.
What watches do female celebrities wear?
Female celebrities have diverse and incredible taste in watches! You’ll often see classic choices like the Rolex Day-Date or Datejust on stars like Jennifer Aniston and Rihanna. Victoria Beckham is known for her impressive collection, often sporting a Patek Philippe Nautilus. Meanwhile, Charlize Theron has been seen wearing a Rolex Deepsea, proving that women can rock larger, traditionally masculine watches with incredible style.
Final Thoughts: Your Journey into Horology Begins
Choosing a luxury watch is an adventure, a process of discovering what you love and finding a piece that speaks to you. It’s not about rushing into a decision; it’s about enjoying the hunt, learning about the rich history behind these amazing brands, and trying on different styles until you find “the one.” Remember, the perfect watch is out there waiting for you.
Whether you’re drawn to a timeless classic from a century-old brand or a bold, modern design from an innovative newcomer, the most important factor is the happiness it brings you. This timepiece will be your companion through countless moments, big and small, for years to come. Take your time, trust your instincts, and get ready to wear a true piece of art on your wrist.
If you’re looking for a great starting point into the world of high-quality Swiss watches that blend durability with standout design, the collection from LIV Swiss Watches offers incredible craftsmanship and is definitely worth exploring.
Wahoo Fitness Power Meter Review: Is the POWRLINK ZERO for You?
If you’re serious about getting faster on the bike, you’ve probably heard the mantra: train with power. It’s the single most effective way to measure your effort, track your progress, and structure your training for massive gains. That’s where a high-quality wahoo fitness power meter comes in, and today we’re diving deep into their flagship offering: the POWRLINK ZERO Speedplay pedals. This isn’t just another gadget; it’s a precision instrument designed to give you the data you need to smash your personal records.
Let’s get into it.
For years, Wahoo has been a dominant force in the indoor training world with their KICKR smart trainers, but their entry into the power meter market with the POWRLINK ZERO pedals has been incredible to watch. They took the beloved Speedplay pedal platform, known for its adjustability and dual-sided entry, and integrated their world-class power measurement technology directly into the spindle. The result is a seamless, accurate, and incredibly powerful training tool that feels like a natural extension of your bike.
Quick Summary
What It Is: The Wahoo POWRLINK ZERO is a pedal-based power meter system built on the iconic Speedplay pedal platform, offering precise power data directly from the source.
Key Feature – Accuracy: It boasts an impressive +/- 1% accuracy, putting it on par with the most precise power meters on the market, ensuring your training data is reliable.
Two Options: You can choose between a dual-sided system for independent left/right leg data or a more budget-friendly single-sided (left only) option that doubles the power reading.
Who It’s For: This system is perfect for serious road cyclists, triathletes, and data-driven athletes who already love or are open to the Speedplay pedal system and want top-tier power data.
Final Verdict: The Wahoo Fitness POWRLINK ZERO is a fantastic choice, combining the proven performance of Speedplay pedals with Wahoo’s reliable and accurate power measurement technology.
What Exactly is a Wahoo Fitness Power Meter?
The term “Wahoo fitness power meter” specifically refers to the Wahoo POWRLINK ZERO pedal system. Unlike crank-based or spider-based power meters that are more permanent fixtures on a bike, a pedal-based system offers incredible flexibility. You can easily swap them between your road bike, time trial bike, or even a travel bike in just a few minutes with a simple pedal wrench. This makes it a fantastic investment if you own multiple bikes.
At its core, a power meter measures the force you apply to the pedals and the speed at which you turn them (cadence) to calculate your power output in watts. This is the most direct and objective measure of your workload, unaffected by external factors like wind, hills, or drafting. While heart rate tells you how your body is responding to the effort, power tells you the actual work you’re doing. This distinction is crucial for effective training.
The Wahoo POWRLINK ZERO integrates this technology directly into the pedal spindle. Inside each spindle are strain gauges that precisely measure the microscopic flex caused by your pedaling force. This data, combined with cadence information from an internal accelerometer, is then transmitted via ANT+ and Bluetooth to your bike computer (like a Wahoo ELEMNT or Garmin Edge) or training app.
The Core Features and Benefits That Set It Apart
A great power meter is more than just a number on a screen. It’s about the reliability, accuracy, and user experience that surrounds that number. The Wahoo POWRLINK ZERO excels with a suite of features designed for serious cyclists.
Pinpoint Accuracy of +/- 1%
This is the headline feature and the most important one. The POWRLINK ZERO boasts a claimed accuracy of +/- 1%, which places it in the top tier of consumer power meters. Why does this matter so much. Consistent and accurate data is the foundation of power-based training.
It ensures that your FTP tests are reliable, your training zones are set correctly, and you can accurately track your fitness gains over time. Inaccurate data leads to flawed training, and Wahoo’s commitment to precision here is a massive win.
Left/Right Power Balance (Dual-Sided Model)
If you opt for the dual-sided version, you get one of the most powerful diagnostic tools available to a cyclist: independent left and right power measurement. This allows you to see exactly how much power each leg is contributing. You can identify imbalances that might be holding you back or even contributing to injuries. For example, you might discover your left leg produces only 47% of the power on hard efforts, a sign you need to focus on single-leg drills to improve strength and efficiency.
This level of insight is invaluable for targeted improvement.
Active Temperature Compensation
Ever started a ride on a cool morning only for the sun to come out and heat things up? Temperature fluctuations can cause the metal in strain gauges to expand or contract, which can throw off power readings. The POWRLINK ZERO features active temperature compensation, meaning it continuously adjusts its calibration to account for ambient temperature changes. This ensures your data remains accurate and consistent from the first pedal stroke to the last, whether you’re riding in the cold mountains or the summer heat.
The Legendary Speedplay Pedal System
Beyond the power meter tech, you’re getting a world-class pedal system. Speedplay pedals are famous for a few key reasons:
Dual-Sided Entry: No more fumbling to flip your pedal over to clip in. You can clip into either side, which is amazing for quick starts at traffic lights or in a race. * Incredible Adjustability: The cleats offer three-axis adjustment (fore-aft, side-to-side, and rotational float).
You can dial in your fit with a level of precision that other pedal systems can’t match, which is a huge benefit for preventing knee pain. * Low Stack Height: The distance between your foot and the pedal axle is very small, leading to better power transfer and a more connected feel.
Rechargeable Battery and Seamless Connectivity
Forget swapping tiny coin-cell batteries. The POWRLINK ZERO uses a convenient rechargeable battery with a claimed life of up to 75 hours. The charging clips snap on easily and magnetically, making top-ups a breeze. With both ANT+ and Bluetooth connectivity, it pairs effortlessly with virtually any modern head unit, watch, or indoor training app on the market.
It just works.
How to Choose: Single-Sided vs. Dual-Sided Power
One of the first decisions you’ll face when buying a Wahoo cycling power meter is whether to go for the single-sided (POWRLINK ZERO Single) or dual-sided (POWRLINK ZERO Dual) option. This choice significantly impacts both the price and the data you’ll receive, so it’s important to understand the difference.
The Single-Sided Option: Power on a Budget
The single-sided system places a power meter only in the left pedal. To calculate your total power, it simply measures the power from your left leg and doubles it. For many cyclists, this is a perfectly acceptable and highly effective way to start training with power. It provides a consistent and reliable total power number that you can use for FTP testing, setting training zones, and pacing your efforts.
Who is it for? The single-sided option is ideal for budget-conscious athletes who want the core benefits of power training without the higher cost of a dual-sided system. If you’re new to power or primarily focused on tracking your overall effort and fitness progression, this is an excellent starting point.
The Dual-Sided Option: The Ultimate Data Deep Dive
The dual-sided system, as the name implies, has power meter technology in both the left and right pedals. This provides true, independent measurement of each leg’s power output. Instead of estimating your total power, it adds the real power from each leg together for a more accurate total. More importantly, it unlocks advanced metrics like Left/Right Balance.
Who is it for? The dual-sided system is for the data-driven cyclist, competitive racer, or anyone recovering from a unilateral (one-sided) injury. If you want the most accurate total power number and are keen to analyze your pedal stroke, identify and correct muscular imbalances, or get every possible performance edge, the investment in the dual-sided model is absolutely worth it.
Comparison Table: POWRLINK ZERO Single vs. Dual
Feature
POWRLINK ZERO Single
POWRLINK ZERO Dual
Power Measurement
Left Leg Power x 2
True Left + Right Power
Key Metric
Total Power, Cadence
Total Power, Cadence, L/R Balance
Accuracy
+/- 1% (of estimated total)
+/- 1% (of true total)
Best For
Budget-conscious riders, new to power
Data-driven athletes, racers, injury rehab
Price
More Affordable
Premium Price
Pro Tip: If you start with the single-sided version, Wahoo offers an upgrade path. You can purchase the right-sided power pedal later to convert your system to a full dual-sided setup. This is a great way to spread out the cost while keeping your options open for the future.
In-Depth Review: Riding with the Wahoo POWRLINK ZERO
So, what’s it actually like to install, set up, and ride with the Wahoo Fitness POWRLINK ZERO pedals? In a word: fantastic. The experience lives up to the hype, blending Wahoo’s user-friendly ecosystem with the proven performance of the Speedplay platform.
Installation and Setup
Installation is as simple as screwing in a standard pair of pedals. All you need is an 8mm Allen key. Once they’re on the bike, the setup process is managed through the Wahoo Fitness app. The app quickly finds the pedals, allows you to pair them, and prompts you to enter your crank length for the most accurate readings.
The whole process, from unboxing to being ready to ride, takes less than 15 minutes. It’s incredibly straightforward.
After installation, you’ll perform a zero-offset (calibration) through your head unit or the app. This is a standard procedure for all power meters and should be done before your first ride and periodically thereafter to ensure continued accuracy. Wahoo makes this a simple, one-button process.
On the Road Performance
Once you start riding, the power data is instant and stable. The numbers appear on your head unit without delay and react immediately to changes in effort, whether you’re launching into a sprint or settling into a steady climb. The data feels solid and reliable, with no strange spikes or dropouts. This is where that +/- 1% accuracy and temperature compensation really shine—you can simply trust the numbers you’re seeing.
For those coming to Speedplay for the first time, the dual-sided entry is a revelation. Clipping in is effortless. The large, stable platform feels secure underfoot during hard efforts, and the adjustable float is a dream for dialing in a comfortable and efficient pedal stroke. If you’ve ever struggled with knee pain from other pedal systems, the customizability of Speedplay might be the solution you’ve been looking for.
Pricing and Value Proposition
Let’s talk about the investment. A high-quality power meter is one of the most significant upgrades you can make to your cycling, but it does come at a cost. The pricing for the Wahoo POWRLINK ZERO system is competitive within the premium pedal-based power meter market.
Typically, you’ll find two main price points:
POWRLINK ZERO Single-Sided: This is the more accessible option, providing an excellent entry into the world of power-based training.
POWRLINK ZERO Dual-Sided: This version comes at a higher price, reflecting the additional technology required for independent left/right measurement.
Prices can fluctuate, so it’s always best to check the current price on Amazon for the most up-to-date information. When you consider what you’re getting—a top-tier power meter and a pro-level pedal system in one package—the value is exceptional. You’re not just buying a data device; you’re also upgrading a critical contact point on your bike.
Compared to competitors like the Garmin Rally or Favero Assioma pedals, Wahoo’s pricing is right in the same ballpark. The choice between them often comes down to pedal system preference. If you’re a fan of the Speedplay ecosystem with its unique float and dual-sided entry, the POWRLINK ZERO is the obvious and best choice. If you prefer a Look Keo-style pedal, you might lean towards the other options.
However, the seamless integration with the Wahoo ecosystem (ELEMNT computers, KICKR trainers) gives the POWRLINK ZERO a distinct advantage for anyone already invested in Wahoo products.
Wahoo Power Meter: The Pros and Cons
No product is perfect, and a balanced review requires an honest look at both the strengths and weaknesses. The Wahoo POWRLINK ZERO gets a lot right, but there are a few considerations tied to the Speedplay platform that are worth mentioning.
Pros
Excellent Accuracy: With +/- 1% accuracy and temperature compensation, the data is reliable and trustworthy, which is the most important factor for a power meter.
Dual-Sided Entry: The ease of clipping into either side of the pedal is a massive quality-of-life improvement you’ll appreciate on every single ride.
Highly Adjustable Fit: The three-axis cleat adjustment allows for a customized fit that can help optimize comfort, prevent injury, and improve pedaling efficiency.
Easy Installation and Swapping: You can move the pedals between bikes in minutes, making it a versatile investment for cyclists with multiple rides.
Seamless Wahoo Ecosystem Integration: If you already use a Wahoo ELEMNT computer, the pairing and user experience are incredibly smooth.
Rechargeable Battery: The 75+ hour battery life is excellent, and the magnetic chargers are convenient and easy to use.
Cons
Cleat Maintenance: The Speedplay cleats are more complex than SPD-SL or Look Keo cleats. They can be prone to getting clogged with dirt and require occasional lubrication to function smoothly.
Walkability: While Wahoo provides walkable cleat covers, walking in Speedplay cleats is generally less comfortable and stable than in other road pedal systems. They are designed for riding, not for walking around a coffee shop.
Platform Specificity: If you’re deeply committed to another pedal system (like Look or Shimano), switching to Speedplay requires a change in cleats for all your cycling shoes.
Frequently Asked Questions (FAQ)
Let’s tackle some of the most common questions cyclists have about the Wahoo power meter and power training in general.
How accurate is the Wahoo power meter?
The Wahoo POWRLINK ZERO power meter is highly accurate, with a claimed accuracy of +/- 1%. This puts it in the elite category of power meters, alongside other top-end models from brands like SRM, Quarq, and Garmin. This level of precision is more than enough for even professional cyclists and ensures that your training data is consistent and reliable for tracking progress.
Does Wahoo have a power meter?
Yes, absolutely! Wahoo’s power meter offering is the POWRLINK ZERO, a pedal-based system built on the Speedplay platform. They offer both a dual-sided version that measures left and right leg power independently and a single-sided version that measures left leg power and doubles it to estimate your total output.
What are the disadvantages of Speedplay?
The main disadvantages of the Speedplay pedal system are related to the cleats. First, they can be more susceptible to getting jammed with mud or debris compared to other systems, which can make clipping in difficult. Second, they aren’t the best for walking. While the included covers help, they are less stable and comfortable for walking than an SPD-SL or Look cleat.
Finally, the cleats require a tiny bit of dry lube periodically to keep them functioning smoothly.
Do I really need a power meter on my bike?
Need. No. But if your goal is to become a faster, stronger, and more efficient cyclist in the most effective way possible, then a power meter is the single best tool for the job. It allows you to precisely measure your efforts, structure your training with specific power targets, pace yourself perfectly in races or long events, and objectively track your fitness gains over time.
It takes the guesswork out of training.
Why did Wahoo sue Zwift?
This is a common question in the cycling tech world. The lawsuit between Wahoo and Zwift was related to smart trainer technology, specifically patents concerning the Wahoo KICKR and the Zwift Hub trainer. It was a business dispute over intellectual property in the indoor training space and is not directly related to Wahoo’s power meter pedals.
Which power meter is most accurate?
Most modern, high-end power meters from reputable brands like Wahoo, Garmin, Quarq, and Shimano are incredibly accurate, typically within a +/- 1% to 1.5% range. The Wahoo POWRLINK ZERO’s +/- 1% accuracy places it among the most accurate options available to consumers. At this level, the consistency of a device is often more important than marginal differences in claimed accuracy, and Wahoo’s device has proven to be very consistent.
Final Thoughts: Is the Wahoo Fitness Power Meter Worth It?
After a deep dive into the features, performance, and user experience, the verdict is clear: the Wahoo POWRLINK ZERO is an outstanding power meter system. It successfully combines Wahoo’s proven expertise in creating accurate, reliable, and user-friendly training technology with the beloved features of the Speedplay pedal platform. The result is a powerful training tool that feels completely integrated with your bike.
If you are a data-driven cyclist looking to take your training to the next level, this is an investment that will pay dividends in your performance. The choice between the single-sided and dual-sided models allows you to enter the ecosystem at a price point that works for you, with a clear upgrade path available for the future.
For current Speedplay users, upgrading to the POWRLINK ZERO is a no-brainer. For cyclists on other pedal systems, the unique benefits of dual-sided entry and incredible adjustability make a compelling case for making the switch. If you’re ready to stop guessing and start training with precision, the Wahoo Fitness POWRLINK ZERO is one of the best tools you can buy to achieve your cycling goals. It’s a top-tier product that delivers on its promises.
The Only 5 Travel Packing Checklist Printables You Need (For Any Trip!)
That tiny, nagging feeling in the back of your mind as you lock the front door… “Did I forget something?” It’s a universal travel anxiety that can sour the start of even the most exciting trip. But what if you could eliminate that stress entirely. You absolutely can, and the solution is beautifully simple. Using a travel packing checklist printable is the single best way to ensure you have everything you need, transforming chaotic packing into a calm, organized, and even enjoyable process.
Forget the last-minute panic; it’s time to pack with confidence.
This isn’t just about listing items. It’s about creating a system for peace of mind. We’re going to walk you through everything you need to know about creating and using the perfect packing list. Plus, we’re giving you five incredible, free, and downloadable checklists tailored for every kind of adventure you can dream of.
Let’s get you packed and ready for your next amazing journey.
What You’ll Learn
Stress-Free Packing is Possible: A printable packing list is your secret weapon against pre-trip anxiety, ensuring you never forget an essential item again.
One Size Doesn’t Fit All: The best travel checklist is one customized to your specific trip’s duration, destination, and activities. We’ll show you how.
Different Trips, Different Lists: We provide five unique, free downloadable checklists for every travel style, from minimalist carry-on trips to full-blown family vacations.
Smart Packing Tools are Key: Using your checklist with organizational aids like packing cubes can maximize luggage space and keep you organized on the road.
Physical vs. Digital: While digital lists are convenient, a physical, printable checklist offers a satisfying, distraction-free way to track your progress.
What Exactly is a Travel Packing Checklist Printable? (And Why You Absolutely Need One!)
A travel packing checklist printable is a physical document that itemizes everything you need to pack for a trip. It can be a pre-filled template covering common categories like clothing, toiletries, and documents, or a blank one you customize from scratch. Think of it as your personal travel assistant, a roadmap that guides you from an empty suitcase to a perfectly packed bag without any of the usual guesswork or stress.
But it’s so much more than just a piece of paper. It’s a powerful tool for externalizing memory. Instead of trying to juggle a mental list of hundreds of items—from socks and phone chargers to passports and medications—you offload that entire mental burden onto the checklist. This frees up your brain to focus on the excitement of the trip itself, rather than the logistics of preparation.
The simple, tactile act of ticking a box provides a satisfying sense of accomplishment and builds confidence that you are truly prepared.
In a world of digital apps, the printable format holds a special power. It doesn’t need a charged battery, it won’t get lost in a sea of notifications, and it can be easily viewed by the whole family. It’s a straightforward, effective system that has stood the test of time for one simple reason: it works flawlessly.
The Incredible Benefits of Using a Printable Packing List
Adopting a printable packing list into your travel routine isn’t just a small tweak; it fundamentally improves your entire travel experience, starting long before you leave the house. The benefits are immediate, tangible, and will make you wonder how you ever traveled without one.
First and foremost, it dramatically reduces stress and anxiety. The mental load of remembering every single item is immense. A comprehensive list eliminates the fear of forgetting something critical, like prescription medication or your child’s favorite toy. This peace of mind is invaluable, allowing you to start your vacation feeling relaxed and in control.
Second, it saves you precious time and money. With a list, you pack methodically and efficiently, avoiding frantic, last-minute searches for misplaced items. More importantly, it prevents the need to buy forgotten essentials at your destination, where they are often sold at inflated tourist prices. Forgetting a $5 phone charger can easily turn into a $30 airport purchase.
Finally, a well-crafted packing guide for trips helps you avoid overpacking. When you pack without a plan, it’s easy to throw in “just in case” items that you never use. A checklist forces you to be intentional, packing only what you truly need for the activities you have planned. This results in a lighter suitcase that’s easier to carry and manage, making your journey that much smoother.
How to Choose the Perfect Travel Checklist PDF for Your Trip
Not all trips are created equal, so your packing list shouldn’t be either. Choosing or creating the right travel checklist PDF is about matching the tool to the adventure. A generic list is a good starting point, but a truly great list is tailored to the specifics of your journey. Here’s how to pick the perfect one.
Consider Your Trip’s DNA:
Duration: A weekend getaway requires a vastly different set of items than a two-week international expedition. Look for a list that aligns with the length of your stay. * Destination & Climate: Are you heading to a tropical beach, a snowy mountain, or a bustling city. Your clothing, footwear, and even toiletries will change dramatically based on the weather and environment.
Planned Activities: A checklist for a business conference will look nothing like one for a hiking and camping trip. Be sure your list includes specific gear for your planned activities, whether it’s a swimsuit, hiking boots, or a formal outfit. * Travel Style: Are you a minimalist who lives out of a carry-on, or are you packing for a family of four. Your approach to packing will dictate the level of detail you need.
Pre-filled vs. Blank Templates:
Pre-filled checklists are fantastic because they do most of the thinking for you. They often include items you might not have considered. They are perfect for standard vacations and for travelers who want a quick, comprehensive solution.
Blank checklists offer ultimate flexibility. They are ideal for frequent travelers who have their packing system down, for unconventional trips with unique gear, or for people who simply enjoy the process of creating a list from scratch.
Ultimately, the best option is often a hybrid: start with a comprehensive, pre-filled template and then customize it by adding or removing items to perfectly suit your unique travel plans.
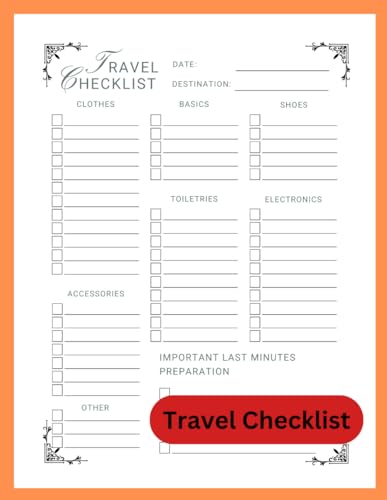
Our Top 5 FREE Travel Packing Checklist Printables for Every Adventure!
Ready to get packing? We’ve created five distinct, beautifully designed, and completely free printable packing lists. Find the one that best fits your next trip, click the link to download the PDF, print it out, and enjoy the most organized packing session of your life!
1. The Ultimate Master Checklist (For Long International Trips)
This is the big one! Designed for trips of one week or longer, this comprehensive list covers everything from travel documents and multiple climates to essential electronics and a first-aid kit. It’s your command center for complex trips, ensuring no detail is overlooked.
Health & Safety: Personal medications, basic first-aid kit (band-aids, pain relievers, antiseptic wipes), hand sanitizer. * Miscellaneous: Daypack, reusable water bottle, travel pillow, books, journal.
Pro Tip: Always pack a copy of your passport and important documents separately from the originals. Keep a digital copy in a secure cloud service or your email for emergencies.
2. The Weekend Warrior Checklist (For Quick Getaways)
Heading out for a quick 2-3 day trip? This streamlined list is for you. It focuses on efficiency and packing light, helping you fit everything into a weekend bag or carry-on so you can get on with your adventure.
Key Categories:
Essentials: ID, wallet, keys, phone, charger. * Clothing (2-3 Outfits): 2x tops, 1x bottom, 1x versatile jacket/sweater, underwear, socks, pajamas. * Shoes: One pair to wear, one extra pair (e.g., comfortable walking shoes and one nicer option). * Toiletries (Travel-Size Only): Toothbrush, toothpaste, deodorant, and any other absolute must-haves.
Activity-Specific: Swimsuit for a beach trip, a nice shirt for dinner, etc.
3. The Family Vacation Checklist (Kid-Friendly & Stress-Free)
Traveling with kids is a whole different ballgame! This list includes everything from the parent essentials to all the kid-specific gear that keeps them happy, safe, and entertained. It’s broken down by family member to make it even easier to delegate and track.
Key Categories:
For the Parents: All items from the Weekend or Master list. * For the Kids (Clothing): Daily outfits + 2 extra, pajamas, socks, shoes, jacket. * For the Kids (Gear): Favorite toy/blanket, books, travel games, tablet/headphones, car seat/stroller. * Feeding & Health: Snacks, sippy cups/bottles, kid-friendly medications, diaper bag essentials (diapers, wipes, cream).
Safety: Childproofing items for hotel rooms, night light, child ID bracelets.
4. The Adventure Seeker’s Checklist (For Hiking & Camping)
Built for the great outdoors, this checklist focuses on technical gear, safety equipment, and practical clothing. Whether you’re hitting the trails for a day hike or setting up camp for the night, this list ensures you’re prepared for the elements.
5. The Minimalist’s Checklist (For Carry-On Only Travel)
For the traveler who values freedom and mobility, this list is your guide to packing everything you need into a single carry-on bag. It’s all about multi-purpose items, smart organization, and leaving the non-essentials behind.
Key Categories:
The Bag: A high-quality, maximum-size carry-on backpack is essential. When you’re aiming for carry-on only, every inch counts. A backpack designed for maximum organization and space, like the Tortuga, is your best friend. It opens like a suitcase for easy access and has compartments to keep everything in its place.
Clothing (The 5-4-3-2-1 Rule): 5x tops, 4x bottoms, 3x accessories (dresses/jackets), 2x pairs of shoes, 1x swimsuit. All items should be mix-and-match. * Toiletries: Solid toiletries (shampoo bars, conditioner bars) are your best friend to avoid the 3-1-1 liquid rule. Pack the rest in travel-size containers.
Electronics: Phone, charger, power bank, and a single universal adapter. * Everything Else: Packable daypack, reusable water bottle, one good book (or an e-reader).
Making Your Checklist Work for You: Pro Packing Tips & Tricks
Having a great checklist is the first step. The second is packing everything in a way that maximizes space and minimizes hassle. These pro tips will take your organization game to the next level.
1. Master the Art of Rolling: Forget folding. Tightly rolling most clothing items (like t-shirts, pants, and dresses) saves a surprising amount of space and helps prevent deep-set wrinkles. For bulkier items like sweaters or jackets, use compression bags.
2. Packing Cubes are Essential: This is the single best way to organize your suitcase. They group like items together, compress clothing, and make finding what you need a breeze. This is where organization tools like Bagsmart packing cubes become indispensable.
You can have one cube for tops, one for bottoms, and another for underwear and socks. It transforms your suitcase from a chaotic pit into a neat set of drawers.
3. Know the 3-1-1 Liquid Rule: For carry-on luggage, all liquids, aerosols, gels, creams, and pastes must be in containers of 3.4 ounces (100 milliliters) or less. All of these containers must fit into a single, clear, quart-sized, zip-top bag. Knowing this rule is non-negotiable for air travel.
4. Pack Your First 24 Hours in Your Carry-On: Even if you plan to check a bag, always pack a change of clothes, basic toiletries, and any essential medications in your carry-on. If your checked bag gets delayed, you’ll be incredibly grateful you did.
Free vs. Paid Checklists: Is it Ever Worth Paying?
With so many excellent free resources available (like the ones above!), you might wonder if there’s ever a reason to pay for a packing list. For the vast majority of travelers, the answer is no. A free, well-designed travel checklist PDF is more than sufficient.
However, there are a few scenarios where a paid option might be appealing. You can find highly specialized, beautifully designed checklists on platforms like Etsy. These might cater to niche travel like a destination wedding, a ski trip with complex gear, or a multi-week backpacking trip across a specific continent. You’re often paying for the aesthetic design and the curation of a very specific list.
Additionally, some travel apps offer packing list features as part of a paid subscription. These digital lists can be convenient, syncing across devices and sometimes integrating with your trip itinerary. If you are a hyper-organized digital native who manages your entire life on your phone, the small cost for a premium app might be worth the convenience and extra features it provides.
The Pros and Cons of Digital vs. Printable Checklists
The debate between a physical list and a digital one comes down to personal preference. Both have clear advantages and disadvantages. Understanding them can help you decide which method—or combination of methods—works best for your travel style.
Feature
Printable Checklist
Digital Checklist (App)
Accessibility
No battery or internet needed.
Requires a charged device.
Usability
Simple, tactile, and satisfying to check off.
Easily editable, searchable, and shareable.
Distractions
Zero. It’s a single-task tool.
Can get lost among other notifications and apps.
Durability
Can be lost, torn, or get wet.
Safe on your device, but the device can be lost or broken.
Customization
Easy to jot down notes and additions by hand.
Can be customized endlessly and saved for future trips.
Pro Tip: Use a hybrid approach for the best of both worlds. Plan your master list in a digital app or spreadsheet where you can easily edit and save it. Then, print out the final, customized version for your specific trip to use during the actual packing process.
Frequently Asked Questions
What is the most forgotten item when packing?
While it varies from person to person, some of the most commonly forgotten items are surprisingly basic. Topping the list are phone chargers, toothbrushes, socks, sunglasses, and sunscreen. These are often items used right up until the moment of departure, making them easy to overlook in the final sweep of the house.
How far in advance should I start packing for a trip?
For a major trip, it’s a great idea to start the process about a week in advance. This doesn’t mean filling your suitcase, but rather, starting your checklist. Lay out the clothes and items you plan to take. This gives you plenty of time to do laundry, purchase any missing items without rushing, and pack thoughtfully over a few days instead of in one frantic evening.
What is the 5-4-3-2-1 packing rule?
This is a popular guideline for minimalist packing, especially for a week-long trip, designed to fit everything into a carry-on. The rule is typically: 5 sets of socks and underwear, 4 tops, 3 bottoms, 2 pairs of shoes, and 1 hat. You can adapt the specific items (e.g., swapping a hat for a swimsuit or a dress), but the core concept is to pack a limited, versatile, mix-and-match wardrobe.
Should I pack for “just in case” scenarios?
This is a delicate balance. It’s wise to pack a simple first-aid kit and perhaps one versatile sweater for unexpected cold fronts. However, avoid packing for every conceivable, unlikely scenario (e.g., a formal gown on a camping trip “just in case”). A good rule of thumb is to pack for the trip you are planning to have, not the 100 other trips you could possibly have.
If an unlikely need arises, you can almost always buy or rent what you need at your destination.
Final Thoughts: Never Forget a Thing Again!
Packing doesn’t have to be a chore you dread. By embracing the simple, powerful tool of a travel packing checklist printable, you can transform the entire experience. You’ll trade stress for serenity, chaos for control, and the fear of forgetting for the confidence of being perfectly prepared. It’s the key to starting your vacation on the right foot, with a clear mind and a lighter suitcase.
So go ahead, download the checklist that fits your next adventure, and get excited. The world is waiting, and now, you’ll be ready for it. Happy travels!
HDMI Cable for Dual Monitor Setup: A Gamer’s Buying Guide (2026)
Are you ready to elevate your gaming and productivity to a whole new level. Expanding to a dual monitor setup is one of the most satisfying upgrades you can make. Suddenly, you have the power to game on one screen while managing your stream, Discord, or walkthroughs on the other. But before you can bask in that glorious screen real estate, there’s one crucial step: figuring out the right hdmi cable for dual monitor setup.
It sounds simple, but this is where many people get stuck, tangled in a web of cables, ports, and confusing adapters. Don’t worry, we’re here to cut through the noise.
This guide is your ultimate resource for connecting two monitors with HDMI. We’ll break down exactly what you need, from the different types of cables to the adapters that can save the day when you’re short on ports. Get ready to unlock that dream setup, because by the end of this, you’ll be a dual-display pro!
What to Know
It’s a Setup, Not a Single Cable: There’s no single “dual monitor HDMI cable.” A dual monitor setup typically requires two separate cables connecting each monitor to a distinct port on your computer’s graphics card.
Check Your Ports First: The most critical step is to identify the available video output ports on your PC or laptop (e.g., HDMI, DisplayPort, USB-C) and the input ports on your monitors. This determines everything.
Splitters Mirror, They Don’t Extend: A common mistake is buying an HDMI splitter. A simple splitter will only duplicate (mirror) your primary display onto a second screen. To extend your desktop across two monitors, you need a different solution like a docking station or a USB-C adapter.
Cable Version Matters for Performance: For high-resolution and high-refresh-rate gaming (like 4K at 120Hz), you’ll need an HDMI 2.1 cable. For standard 1080p or 4K at 60Hz, an HDMI 2.0 cable is sufficient.
The Truth About an ‘HDMI Cable for Dual Displays’
Let’s clear up the biggest misconception right away: there isn’t a magical, single cable called a “dual monitor HDMI cable” that splits into two and extends your desktop. When people search for this, they’re really asking, “What combination of cables and hardware do I need to run two monitors using HDMI?” The answer is all about the setup, not a single product.
The standard and most reliable method is to connect each monitor to your computer individually. This means running one HDMI cable from your first monitor to one HDMI port on your graphics card, and a second HDMI cable from your second monitor to another video port on your graphics card. This gives your PC two distinct video signals, allowing it to treat each monitor as a separate, extendable workspace.
But what if you don’t have two HDMI ports. This is an incredibly common issue, especially with laptops. This is where the world of adapters, hubs, and docking stations comes into play. These devices act as an external expansion of your computer’s video capabilities, taking a signal from a single port (like USB-C or DisplayPort) and converting it into multiple video outputs, including two HDMI ports.
So, while you might start your search looking for a specific HDMI for two monitors, you’ll quickly find the solution often involves more than just the cables themselves.
Why a Dual Monitor Setup is a Must-Have: Key Benefits
Upgrading to a dual monitor setup is more than just a cool aesthetic; it’s a massive boost to your efficiency and immersion. Once you experience the freedom of multiple displays, you’ll wonder how you ever managed with just one. The benefits are immediate and impactful, especially for gamers and multitaskers.
First and foremost is the incredible leap in productivity. Imagine writing a report on one screen while having your research and data open on the other—no more constant alt-tabbing. For streamers, it’s essential: you can have your game running full-screen on your primary monitor while your streaming software, chat, and alerts are perfectly organized on the second. This command-center view keeps you in control without interrupting your gameplay.
For gaming, the immersion is on another level. While you might keep the game itself on your main high-refresh-rate monitor, the second screen becomes your strategic hub. You can have interactive maps, build guides from Zygor Guides, or your favorite Discord channel open and visible at all times. It transforms your gaming session from a simple activity into a fully integrated experience.
This is why high-performance gaming machines, like those from ORIGIN PC, are built with powerful graphics cards featuring multiple outputs—they are designed from the ground up to support these expansive, multi-display battle stations.
How to Choose the Right HDMI Solution for Your Setup
Choosing the right HDMI cable for dual monitor setup is a process of matching your hardware’s capabilities with your performance goals. It’s not about finding the most expensive cable, but the correct one. Let’s walk through the decision-making process step-by-step so you can buy with confidence.
Step 1: The Golden Rule – Check Your Ports!
Before you buy anything, stop and look at the back of your computer and your monitors. This is the most important step. What video output ports does your PC’s graphics card or your laptop have? What input ports do your monitors have?
On Your PC/Laptop: Look for HDMI, DisplayPort (DP), DVI, and USB-C (specifically with Thunderbolt or DisplayPort Alt Mode support). A modern gaming PC will likely have one HDMI port and three DisplayPort outputs.
On Your Monitors: Most modern monitors have both HDMI and DisplayPort inputs. Older or budget models might only have HDMI or even just DVI/VGA.
Your available ports dictate your path forward. If you have two matching ports (e.g., two DisplayPorts on your PC and two on your monitors), your job is easy!
Step 2: Match Cables to Your Monitor’s Specs
Not all HDMI cables are created equal. The version of the cable determines its bandwidth, which directly impacts the maximum resolution and refresh rate it can support. Using the wrong cable can bottleneck your expensive monitor!
HDMI Version
Max Resolution/Refresh Rate
Best For
HDMI 1.4
4K at 30Hz, 1080p at 120Hz
Older devices, basic 1080p monitors. Avoid for modern gaming.
HDMI 2.0 (High Speed)
4K at 60Hz, 1440p at 144Hz
The standard for most gamers. Great for 1080p/1440p high refresh rates.
HDMI 2.1 (Ultra High Speed)
4K at 120Hz+, 8K at 60Hz
Essential for next-gen consoles (PS5, Xbox Series X) and high-end PC gaming on 4K 144Hz monitors.
For a dual monitor setup, you need to consider the specs of both monitors. If one is a 4K 144Hz beast and the other is a 1080p 60Hz utility screen, you’ll need an HDMI 2.1 cable for the gaming monitor and a standard HDMI 2.0 cable for the secondary one.
Step 3: Solving the Port Shortage Problem
What if you only have one HDMI port but want two monitors? Welcome to the most common dual monitor challenge! Here are your solutions:
Use a Different Port: The easiest fix is to use another available video port. If your PC has one HDMI and one DisplayPort, simply use an HDMI cable for one monitor and a DisplayPort cable for the other. If one monitor only has HDMI input, you can use a simple and inexpensive DisplayPort-to-HDMI cable or adapter.
USB-C to Dual HDMI Adapter: This is the go-to solution for many modern laptops. A single USB-C port (that supports video out) can be connected to an adapter that provides two separate HDMI outputs. This is a true desktop extension, not just mirroring.
Docking Station: A full docking station is the most powerful option. It connects to your laptop via USB-C/Thunderbolt and provides a huge array of ports, including multiple HDMI and DisplayPort outputs, USB-A ports, Ethernet, and more. It essentially turns your laptop into a full desktop rig.
Pro Tip: When buying a USB-C adapter or dock, check the specs carefully! Some cheaper hubs only support one external monitor, or they might mirror the two outputs instead of extending them. Look for explicit support for dual extended displays at your desired resolution and refresh rate.
Top Recommendations: Cables, Adapters, and Hubs
Now that you know what to look for, let’s talk about what to buy. Instead of recommending specific brands that can change over time, we’ll focus on the types of products you should seek out for different scenarios. This empowers you to find the best option available when you’re ready to purchase.
For the High-Performance PC Gamer
If you’re running a powerful rig with a top-tier graphics card, your priority is performance. You need cables that won’t hold back your hardware.
What to Buy: Certified Ultra High-Speed HDMI 2.1 Cables.
Why: These are the only cables guaranteed to deliver the massive bandwidth needed for 4K at 120Hz or even 8K at 60Hz. They also support features like Variable Refresh Rate (VRR) and Auto Low Latency Mode (ALLM), which are crucial for a smooth, tear-free gaming experience.
Setup Tip: Your primary gaming monitor should be connected via HDMI 2.1 or DisplayPort 1.4 to get the best performance. Your secondary monitor for Discord or web browsing can be connected with a standard High-Speed HDMI 2.0 cable, as it doesn’t need the extra bandwidth.
For the Everyday Multitasker or Casual Gamer
If your setup is more about productivity, streaming, or playing games at 1080p or 1440p, you don’t need to overspend on the latest and greatest cables.
What to Buy: High-Speed HDMI 2.0 Cables.
Why: These cables are affordable, widely available, and have more than enough bandwidth for 4K at 60Hz or 1440p at up to 144Hz. For the vast majority of users, HDMI 2.0 is the sweet spot for price and performance.
Setup Tip: Even if your PC has multiple DisplayPorts and only one HDMI, don’t hesitate to use a DisplayPort to HDMI adapter for one of your monitors. They are passive, reliable, and won’t impact performance for these use cases.
For the Laptop Warrior
Laptop users have the unique challenge of limited ports. Your best friend is a high-quality hub or adapter.
What to Buy: A USB-C to Dual 4K HDMI Adapter or a Thunderbolt Docking Station.
Why: These devices are designed to solve the port problem. A good adapter will take a single USB-C input and give you two independent HDMI outputs, allowing you to extend your desktop. A docking station does this and adds a ton more connectivity.
Setup Tip: When choosing a second screen for a laptop, something like The Portable Monitor can be a fantastic, flexible option. It’s designed for easy connection, often via a single USB-C cable or mini-HDMI, perfectly complementing a laptop-centric dual-display setup.
Cost vs. Benefit: A Quick Pricing Comparison
Budget is always a factor, and thankfully, setting up a dual monitor system doesn’t have to break the bank. The cost can vary wildly depending on the solution you need, from just a few dollars for a simple cable to over a hundred for a feature-rich docking station. Here’s a general idea of what to expect.
Solution Type
Typical Cost Range
Best For
Standard HDMI 2.0 Cable
$5 – $15
Most users, 1080p/1440p gaming, 4K at 60Hz.
Certified HDMI 2.1 Cable
$15 – $30
High-end PC gamers, PS5/Xbox Series X owners, 4K 120Hz+ displays.
DisplayPort to HDMI Adapter
$10 – $20
Connecting a DP output on a PC to an HDMI input on a monitor.
USB-C to Dual HDMI Adapter
$25 – $60
Laptop users needing to extend their desktop to two HDMI monitors.
Thunderbolt/USB-C Docking Station
$100 – $300+
Power users who need multiple monitor outputs plus extra USB ports, charging, and networking.
As you can see, a direct connection using standard cables is by far the cheapest route. The price increases as you need more specialized hardware to adapt to a lack of ports. However, investing in a good quality docking station can be a huge quality-of-life improvement for laptop users, turning a single-cable connection into a full desktop experience.
Pros and Cons of Different Connection Methods
Every setup has its trade-offs. The best method for you depends on your hardware, budget, and technical needs. Let’s weigh the pros and cons of the most common approaches to using an HDMI for two monitors.
Method 1: Direct Connection (Two Cables, Two Ports)
This is the gold standard: one cable per monitor, each plugged into its own port on the graphics card.
Pros:
Maximum Performance: Provides a dedicated, full-bandwidth connection to each monitor, ensuring no compromises on resolution or refresh rate.
Utmost Reliability: It’s a simple, direct link with the fewest points of failure. There are no extra electronics or drivers to worry about.
Cost-Effective: You only need to buy the cables, which are relatively inexpensive.
Cons:
Requires Sufficient Ports: This method is only possible if your computer has at least two available video output ports.
Method 2: Using a Docking Station or USB-C Hub
This is the premier solution for laptops and computers with limited native video outputs.
Pros:
Solves the Port Problem: The primary reason to use one. It turns a single USB-C/Thunderbolt port into a multi-display powerhouse. * Incredible Convenience: A single cable can connect your laptop to monitors, power, peripherals, and the internet. Perfect for hybrid work.
Adds Functionality: Provides extra USB ports, SD card readers, and other useful connections.
Cons:
Higher Cost: A quality docking station is a significant investment compared to just buying cables.
Potential Performance Limits: Some hubs may not support the highest refresh rates on both outputs simultaneously. You must read the specifications carefully.
Can Require Drivers: Some models may need specific drivers to function correctly.
Pro Tip: Look for the term “MST” (Multi-Stream Transport) when shopping for DisplayPort or USB-C hubs. MST is the technology that allows a single port to drive multiple independent, extended displays. Hubs without MST support will likely only mirror the displays.
Frequently Asked Questions (FAQ)
Navigating the world of display cables can bring up a lot of questions. Here are detailed answers to some of the most common ones we see.
What HDMI cable do I need for dual monitors?
There isn’t one specific “dual monitor” cable. You typically need two separate cables. The type of cable depends on your monitor’s capabilities. For a standard 1080p or 4K 60Hz monitor, a High-Speed HDMI 2.0 cable is perfect.
If you have a high-performance gaming monitor (e.g., 4K at 120Hz or 144Hz), you must use an Ultra High-Speed HDMI 2.1 cable to get the full performance you paid for.
The most important factor is your computer’s available ports. If you have two video outputs (like one HDMI and one DisplayPort), you’ll need one cable for each. If you only have one port, like on a laptop, you’ll need a docking station or a USB-C to Dual HDMI adapter to create the two connections you need.
Does it matter if I plug into HDMI 1 or 2?
On most computer monitors, it makes no difference at all. The ports are typically identical in capability, and you can plug into either one. The monitor will automatically detect the active input. You simply select the corresponding source (HDMI 1 or HDMI 2) using the monitor’s on-screen menu.
Where it can matter is on some televisions. A TV might label one HDMI port as “ARC” (Audio Return Channel) or with a specific 4K@120Hz icon. The ARC port is designed for connecting soundbars, while the high-spec port is the only one that might support the TV’s maximum gaming performance. For computer monitors, however, this is rarely a concern.
How do I connect 2 screens to 1 HDMI port?
This is a common point of confusion. You cannot connect two extended desktop screens to a single HDMI port with a simple splitter cable. A standard HDMI splitter only duplicates the signal, showing the exact same image on both screens (mirroring). This is useful for presentations but not for creating a larger workspace.
To properly run two extended displays from a single port, you need a port that supports multiple video streams, like USB-C with Thunderbolt or DisplayPort with MST. You then connect a special adapter or docking station to that port, which provides two separate HDMI outputs. The adapter is what does the magic of creating two independent video signals.
Do you need an HDMI splitter for dual monitors?
No, you almost certainly do not want an HDMI splitter for a typical dual monitor setup. As mentioned above, a splitter’s job is to take one video source and send that identical signal to multiple displays. It mirrors your desktop.
What you likely need is a way to extend your desktop, creating one large, continuous workspace across both screens. For this, you need two separate video signals from your computer. This is achieved either by plugging each monitor into a separate port on your PC or by using a docking station or USB-C adapter that is specifically designed to create two extended displays.
Final Thoughts
Building an awesome dual monitor setup is an exciting upgrade that will absolutely transform how you work and play. While the cabling can seem intimidating at first, it all boils down to a simple process: check your ports, understand your performance needs, and choose the right cables or adapters to bridge the gap. Don’t fall into the common trap of buying a simple splitter and expecting it to extend your desktop.
Remember to match your cable’s version (HDMI 2.0 or 2.1) to your monitor’s resolution and refresh rate to avoid leaving performance on the table. For laptop users, a quality USB-C hub or docking station is your ticket to a clean, powerful, and versatile multi-display workspace. You’ve got this!
Now that you’re armed with the right knowledge, you’re ready to create the battle station of your dreams. If you’re starting from scratch and want a PC built to handle multiple high-performance displays without breaking a sweat, explore the customizable options available from ORIGIN PC. They come equipped with the powerful graphics cards and plentiful ports you need to make your dual monitor vision a reality.
How to Clean Camera Lenses: A Pro’s Guide for Spotless Shots
There’s nothing more heartbreaking for a photographer than capturing the perfect moment—the perfect light, the perfect expression—only to find it ruined by a blurry smudge or a distracting dust spot right in the middle of the frame. That tiny speck of dust becomes a giant monster in your final image! Learning how to clean camera lenses isn’t just a chore; it’s one of the most crucial skills you can master to protect your investment and guarantee every shot is as crisp and clear as you envisioned it. It’s the secret handshake of photographers who consistently produce stunning, professional-quality work.
This guide is your new best friend! We’re going to walk through everything, from the essential tools you absolutely need in your bag to the professional, step-by-step techniques that remove grime without harming your precious glass. Get ready to say goodbye to frustrating smudges and hello to flawlessly clean lenses. Let’s make every click count!
Quick Summary
Start with the Safest Method First: Always clean your lens in a specific order: air blower first to remove loose dust, then a soft brush for stubborn particles, and finally a microfiber cloth for smudges.
Use the Right Tools for the Job: Never use your t-shirt, paper towels, or household cleaners. Stick to dedicated gear like a rocket blower, a camel hair brush, optical-grade microfiber cloths, and a proper lens cleaning solution.
Apply Cleaning Fluid Correctly: Never, ever spray or drop cleaning solution directly onto your lens. Apply a drop or two to your microfiber cloth first to prevent liquid from seeping into the lens barrel.
Master the Cleaning Motion: When using a cloth, wipe gently in a circular motion, starting from the center of the lens and spiraling your way to the edges. This pushes debris outward instead of grinding it into the glass.
Prevention is Better Than Cure: Keep your lens cap on whenever you’re not shooting. This simple habit is the number one way to prevent dust, fingerprints, and scratches.
Why a Spotless Lens is Your Secret Weapon for Amazing Photos
Think of your camera lens as the eye of your camera. If that eye is dirty, smudged, or dusty, the world it sees—and the photos it captures—will be compromised. Knowing the best way to clean camera lenses is fundamental because it directly impacts your final product in ways you might not even realize. It’s not just about removing an obvious fingerprint; it’s about maintaining the peak performance of your gear.
A clean lens ensures maximum sharpness and contrast. Even a thin layer of dust or haze can scatter light as it enters the lens, subtly reducing the crispness and vibrancy of your images. This can make your photos look slightly soft or dull, forcing you to overcompensate with editing software, which is never as good as getting it right in-camera. Furthermore, smudges and grease are notorious for causing unwanted lens flare, especially when shooting into a light source.
Those cool, artistic flares are great when you want them, but a greasy fingerprint can create ugly, distracting blobs of light that ruin a shot.
Beyond image quality, proper cleaning is about protecting your investment. Camera lenses are coated with delicate, multi-layered chemical compounds that reduce reflections and improve color transmission. Using the wrong materials—like a rough t-shirt or a harsh chemical like Windex—can permanently scratch or strip these coatings, irreversibly damaging your lens and tanking its resale value. Regular, gentle cleaning removes abrasive dust particles that could otherwise get dragged across the glass and cause micro-scratches.
It’s an essential maintenance routine that extends the life of your gear and gives you the confidence that your equipment is always ready to perform at its best.
Assembling Your Ultimate Camera Lens Cleaning Toolkit
Walking into a camera store or browsing online can present you with a dizzying array of cleaning gadgets. But you don’t need to buy everything. A truly effective kit is built on a few high-quality essentials. Choosing the right tools is the first step in mastering how to clean lenses properly and safely.
Let’s break down what you absolutely need and what can take your cleaning game to the next level.
The Non-Negotiables: Must-Have Tools
These are the core items every single photographer should have in their camera bag. Don’t leave home without them!
Air Blower: This is your first line of defense. A rocket-style air blower lets you blast away loose dust and sand without ever touching the glass. It’s the most non-abrasive cleaning method possible. Look for one with a one-way valve so it doesn’t suck dusty air back in.
Soft-Bristled Brush: For particles that the blower can’t dislodge, a super-soft brush is next. A retractable brush with camel hair bristles is a fantastic choice because the bristles are incredibly gentle and the retractable design keeps the brush clean when not in use.
Microfiber Cloths: Not all cloths are created equal. You need optical-grade, lint-free microfiber cloths specifically designed for lenses and glasses. They are woven to trap oils and dirt without scratching delicate coatings. Have several clean ones on hand and wash them regularly (separately, without fabric softener).
Lens Cleaning Solution: For stubborn smudges and oily fingerprints, a cleaning fluid is necessary. Always choose a solution formulated specifically for multi-coated optical lenses. These are typically alcohol-and-ammonia-free, ensuring they won’t damage your lens coatings.
The Next-Level Upgrades: Tools for Pros
Once you have the basics covered, these tools can offer more convenience and specialized cleaning power.
Lens Pen: This is a brilliant, all-in-one tool. One end typically has a retractable soft brush, while the other has a carbon-based cleaning tip. This carbon compound is amazing at absorbing and lifting away oily residue from fingerprints without any liquids. Many photographers, like those on the r/Nikon subreddit, swear by them for quick, effective field cleaning.
Pre-Moistened Lens Wipes: For ultimate convenience, single-use, pre-moistened wipes (like those from Zeiss) are fantastic. They are individually sealed, ensuring they are always clean, and have the perfect amount of cleaning solution. They are perfect for travel or quick clean-ups on a shoot.
The Step-by-Step Professional Method to Clean Camera Lenses
Alright, you’ve got your tools ready to go. Now it’s time for the main event. Following this specific order is absolutely critical to ensure you don’t accidentally scratch your lens by grinding in a piece of dirt. This process moves from the least invasive method to the most, tackling different types of grime at each stage.
It’s the same method professionals use to keep their gear in pristine condition.
Step 1: The Air Assault – Banish Loose Dust
Before you even think about touching the glass, you need to remove any loose particles. This is the most important step!
Hold your lens facing downward to let gravity help. Grab your rocket blower and, holding it a few inches from the lens surface, give it several strong puffs of air. Work your way across the entire surface. This will dislodge most of the dust, lint, and other large debris that could cause a scratch in the later steps.
Crucially, never use your breath—it contains moisture and acids that are bad for coatings—and never use canned air, as the powerful propellants can freeze and damage your lens.
Step 2: The Gentle Sweep – Brush Away Stubborn Particles
Sometimes, a few stubborn particles will cling to the lens even after a good blowing. This is where your soft brush comes in.
Use a gentle, sweeping motion with the brush. Don’t apply pressure; you’re just lightly flicking the particles off the surface. Start from the middle and sweep outwards. If you have a retractable brush, make sure the bristles are fully extended.
The goal is simply to dislodge anything the blower missed. Once you’re done, retract the brush to keep it clean for next time.
Step 3: The Microfiber Magic – Tackling Smudges and Fingerprints
Now that all the abrasive dust is gone, it’s safe to make contact with the glass. This step is for removing the oily stuff: fingerprints, grease, and smudges.
First, take a clean, dry microfiber cloth and gently wipe the lens. Use that classic circular motion, starting from the center and spiraling out to the edges. Often, this is all you need. If the smudges persist, it’s time for the cleaning solution.
Do not apply the solution directly to the lens! Put one or two small drops on your microfiber cloth, then use the damp part of the cloth to clean the lens with the same center-outward spiral. Follow up immediately with a dry part of the cloth (or a second, dry cloth) to polish away any streaks.
Step 4: The Carbon Tip Takedown – Using a Lens Pen
If you have a Lens Pen, this can replace or supplement Step 3. After brushing away dust, uncap the carbon tip. Using the same gentle, circular motion, go over the lens surface. You’ll be amazed at how the carbon tip lifts oils right off the glass, leaving a perfectly clear surface.
It’s a dry cleaning process, so it’s incredibly fast and effective for fingerprint removal in the field.
Pro Tip: When washing your microfiber cloths, never use fabric softener. Fabric softeners leave behind a chemical residue that is designed to stick to fabrics. This residue will transfer to your lens and create a streaky, hazy mess that’s even harder to clean off than the original smudge.
Common Lens Cleaning Disasters and How to Avoid Them
Knowing how to clean your lens is half the battle; knowing what not to do is the other, equally important half. Many well-intentioned photographers have accidentally damaged their expensive gear by using the wrong materials or techniques. These are the cardinal sins of lens cleaning. Avoid them at all costs!
The “DON’T EVER DO THIS” List
Don’t Use Your T-Shirt or Breath: This is the most common mistake. Your shirt is full of abrasive fabric fibers and embedded dust that will scratch your lens coatings. Your breath coats the lens in a fine mist of acidic saliva, which can degrade coatings over time. It’s a definite no-go.
Don’t Use Household Cleaners: Window cleaners like Windex, alcohol-based wipes for electronics, or any other household chemical are a recipe for disaster. They often contain ammonia, alcohol, and other harsh solvents that will strip the delicate anti-reflective coatings right off your lens, causing permanent damage.
Don’t Use Canned/Compressed Air: While it seems like a good idea, the propellants in canned air can shoot out as a freezing liquid, causing thermal shock that can crack the lens element or damage coatings. The force can also blast dust into the internal mechanics of the lens.
Don’t Apply Cleaning Fluid Directly to the Lens: This is a huge risk. Excess fluid can easily seep around the edge of the front element and get inside your lens. Once inside, it can cause fungus to grow, damage electronics, or leave residue on internal elements that requires a costly professional disassembly to clean.
Don’t Use Too Much Pressure: Your lens surface is delicate. Grinding a cloth into the glass, even a microfiber one, can drag any missed microscopic particles across the surface and cause scratches. A light, gentle touch is all you need.
The “ALWAYS DO THIS” List
Always Start with a Blower: Make it a reflex. Blower first, always. This removes the scratchy stuff before you touch the glass.
Always Use Clean Microfiber Cloths: A dirty cloth just moves grease around and can re-introduce abrasive particles. Keep your cloths in a small plastic bag to protect them from dirt in your camera bag.
Always Work in a Clean, Well-Lit Environment: Trying to clean a lens in a dusty, dark environment is asking for trouble. Find a clean spot with good light so you can see what you’re doing.
Always Put Your Lens Cap Back On: The best way to keep a lens clean is to prevent it from getting dirty in the first place. When you’re done shooting, cap it up!
Advanced Camera Lens Cleaning Tips for Tough Situations
Sometimes you’ll face cleaning challenges that go beyond a simple fingerprint. From sudden fogging to sticky residue from a sea breeze, here’s how to handle some of the trickier situations you might encounter.
How to Get Rid of Foggy Camera Lenses
This is a classic problem when moving from a cold, air-conditioned space to a warm, humid outdoor environment (or vice-versa). The lens glass is cold, and moisture from the warm air instantly condenses on its surface. The fix is simple: patience.
Do not try to wipe the condensation away. You’ll just smear the moisture and it will immediately fog up again. The best solution is to let your gear acclimate. Leave your lens cap on and let the camera sit for 10-20 minutes until it reaches the ambient temperature.
The fog will disappear on its own. To prevent this, you can place your camera in a sealed plastic bag before moving between temperature extremes. This allows the condensation to form on the outside of the bag, not your lens.
Dealing with Haze and Fungus (The Photographer’s Nightmare)
If you clean the front and back elements of your lens and it still looks cloudy or you see tiny, web-like patterns inside, you may have a bigger problem. Haze can be caused by the breakdown of lubricants inside the lens, while fungus is a living organism that can grow between lens elements if stored in a damp environment. Fungus will permanently etch the glass coatings if left untreated.
This is not a DIY job. If you suspect you have internal haze or fungus, take your lens to a reputable camera repair shop immediately. They have the tools and expertise to safely disassemble, clean, and reassemble the lens. Trying to do it yourself will almost certainly result in permanent damage.
Removing Sticky Residue (Like Salt Spray or Soda)
If you’ve been shooting near the ocean, you’ll inevitably get a fine mist of salt spray on your lens. If left to dry, it can be corrosive. Similarly, an accidental splash from a sugary drink can leave a sticky mess. For this, you’ll need a bit more than a dry cloth.
Start by using your blower and brush to remove any loose particles. Then, take a clean microfiber cloth and dampen a small section with a few drops of distilled water. Gently wipe the sticky area to dissolve the salt or sugar. Follow up immediately with a dry part of the cloth.
If water isn’t cutting it, you can then move on to your dedicated lens cleaning solution, which is formulated to break down more stubborn grime.
Building Your Kit on a Budget: Cost and Recommendations
Keeping your lenses clean doesn’t have to be expensive. While you can certainly buy premium kits, a highly effective setup can be assembled for less than the price of a pizza. The key is to invest in quality basics rather than a huge collection of unnecessary gadgets. Here’s a look at what you can expect to spend.
The DIY Starter Kit (Under $20)
You can get all the absolute essentials for a fantastic price. This is the perfect starting point for any photographer.
Rocket Air Blower: A high-quality Giotto’s Rocket Blower or a similar model typically costs around $10-$15. This is the single most important tool, so it’s worth getting a good one.
Microfiber Cloths: A multi-pack of six or more high-quality, optical-grade cloths can be found for about $5-$8. This gives you plenty of clean cloths to rotate through.
Retractable Brush: A simple, effective lens brush can often be found for under $5.
With these three items, you can handle over 95% of all lens cleaning tasks safely and effectively for a total investment of around $20.
The Enthusiast’s All-in-One Kit ($20 – $50)
If you prefer the convenience of a pre-packaged kit, there are many excellent options available. These often provide great value and include a few extra tools.
Brands like Altura Photo, Zeiss, and CamKix offer popular kits in this price range. A typical kit will include a blower, a retractable brush, a Lens Pen, a spray bottle of cleaning solution, multiple microfiber cloths, and sometimes single-use wipes. These kits are great because they bundle everything you need into a convenient carrying case, making it easy to toss in your camera bag.
Is it Worth Making a Homemade Lens Solution?
This is a question that pops up frequently in photography forums. The short answer is: probably not. While you technically can make a lens cleaner with a specific mixture of 99% pure isopropyl alcohol and distilled water, the risks often outweigh the benefits. Using the wrong type of alcohol (like 70% rubbing alcohol) can leave a residue from its impurities, and getting the ratio wrong can be too harsh for lens coatings.
Considering a bottle of professionally formulated, coating-safe lens cleaning solution costs only $5-$10 and will last for years, buying a dedicated solution is the safest and most practical choice. It removes all the guesswork and ensures you’re using a product designed to be gentle on your expensive gear.
Frequently Asked Questions About Cleaning Camera Lenses
Navigating the world of lens care can bring up a lot of questions. Here are clear, direct answers to some of the most common queries photographers have.
What is the best thing to clean camera lenses with?
The best cleaning system involves a multi-step approach. Start with a rocket air blower to remove loose dust without contact. Follow with a soft, camel hair brush for more stubborn particles. For smudges and fingerprints, use a clean, optical-grade microfiber cloth, and if needed, a drop of cleaning solution specifically formulated for multi-coated lenses.
Is rubbing alcohol good for cleaning camera lenses?
Generally, you should avoid standard rubbing alcohol (typically 70% isopropyl). It contains a high percentage of water and impurities that can leave streaks and residue on your lens. While some professionals use a solution with very high-purity (99%+) isopropyl alcohol heavily diluted with distilled water, it’s risky for beginners. It’s much safer to buy a pre-made optical cleaning solution designed to be safe for lens coatings.
How do you clean fingerprints off a camera lens?
First, use a blower and brush to remove any abrasive dust. Then, breathe a short, gentle puff of warm air onto the lens to create a bit of condensation (this is one of the few times your breath is okay!). Immediately wipe the fingerprint away with a clean microfiber cloth or a Lens Pen, using a gentle, circular motion from the center outwards. If the fingerprint is particularly oily, use one drop of lens solution on the cloth.
What can ruin a camera lens?
Several things can permanently ruin a lens. Physical impact from dropping it is the most obvious. Scratches from improper cleaning (using abrasive materials like a t-shirt) can damage the front element and coatings. Using harsh chemicals like Windex or ammonia-based cleaners will strip the coatings.
Finally, storing a lens in a damp, dark environment can lead to the growth of internal fungus, which can etch the glass itself.
How do professionals clean lenses?
Professionals use the exact same tools and methods outlined in this guide: blower, brush, microfiber, and proper solution. The main difference is their experience and discipline. They make cleaning a regular habit and understand the importance of a gentle touch. For internal problems like dust, haze, or fungus inside the lens, they send their gear to a certified technician for professional servicing, which involves disassembling the lens in a dust-free environment.
Final Thoughts: Make Lens Cleaning a Habit, Not a Chore
Your camera lens is a masterpiece of optical engineering, and keeping it clean is an essential part of the art of photography. It’s a simple routine that pays huge dividends, protecting your gear and ensuring every photo you take is as sharp, clear, and vibrant as possible. By investing in a few basic tools and mastering the simple, safe techniques we’ve covered, you’re taking control of your image quality from the very first step.
Don’t let a stray piece of dust or an accidental fingerprint stand between you and a perfect shot. Embrace the process, make it a regular part of your pre-shoot checklist, and carry your cleaning kit with you everywhere. Your photos will thank you for it, and you’ll have the peace of mind that comes from knowing your gear is always ready to capture the next incredible moment, flawlessly.
The way we carry power and possibility in our pockets has never been more jaw-dropping. In 2026, pocket sized powerhouse gadgets devices pack outsized intelligence, turning everyday moments into polished experiences. Here’s a fast tour of the pocket-sized powerhouses you’ll want to keep close this year.
Cellphones and headphones: Phones have evolved from sleek communicators into personal AI hubs. Expect devices that blend ultra-efficient processors, always-on neural engines, and advanced battery chemistry to deliver multi-day life plus rapid top-ups. Foldables and rollables have matured, offering tablet-sized screens that fold into truly pocketable forms. Cameras in phones are smarter too — multi-sensor arrays, periscope zooms, and computational photography that reads the scene and applies cinematic grading in real time. Connectivity is seamless: 5G and satellite fallbacks keep you online, while privacy features let you control what your phone shares.
Headphones are no longer passive audio containers. True wireless earbuds now offer adaptive noise control that profiles environments and personal hearing curves, spatial audio that maps sound around your head, and on-device AI to transcribe or translate conversations live. Battery life stretches further without bulking up; fast wireless charging gives you hours of juice in minutes. And with health sensors tucked into earpieces, your earbuds can monitor vitals, posture, and stress markers while you listen.
Cameras and computers: The separation between standalone cameras and smartphones is shrinking but still meaningful. Mirrorless cameras have become more compact, swapping mechanical pieces for computational assists that stabilize, focus, and stack exposures silently. Hybrid models prioritize video performance, offering high-frame-rate capture, log profiles, and real-time LUTs for creators on the move. Even action cams and pocket drones now shoot cinema-grade footage, thanks to better codecs and smarter onboard processing.
Computers have gone nimble without sacrificing power. Ultralight laptops and detachable tablets run desktop-class chips built for efficiency, delivering pro-level photo and video editing on battery for hours. Cloud-assisted workflows are commonplace: offload heavy renders to remote GPUs, sync projects instantly, and pick up where you left off on any screen. For creators and professionals, that means a tiny machine can replace a room of gear, with docks and modular expansions supplying extra ports when needed.
Home security and appliances: The smart home of 2026 is less about gimmicks and more about orchestration. Security systems integrate local AI for immediate threat detection while keeping footage private on encrypted home hubs. Cameras analyze behavior, not identities — flagging unusual activity like forced entries or glass breaks and sending concise alerts so you can act fast. Doorbells, locks, and sensors form a responsive network that understands routines and adapts to reduce false alarms.
Appliances are finally smart in ways that matter. Refrigerators track inventory and suggest recipes; ovens learn to cook your go-to meals with precise temperature curves; washers optimize cycles for fabric and water usage. Energy management is integrated: appliances schedule heavy use during off-peak hours, and smart outlets report consumption at a glance. Voice assistants are more helpful, blending local controls with cloud services to protect both convenience and privacy.
Small, powerful, and increasingly considerate of privacy and sustainability—2026’s gadgets make everyday life smoother, more creative, and surprisingly delightful. Whether you’re chasing the perfect shot, escaping with immersive audio, or turning your home into a smarter sanctuary, the pocket-sized tools of today punch way above their weight.
There’s a quiet revolution humming through our pockets from wearables to home robots, hanging off our wrists, and patrolling our floors — a wave of clever, useful gadgets that most people haven’t noticed yet. These aren’t the headline-grabbing flagship phones or robot vacuums you see in every commercial. They’re the little innovations and niche devices that quietly make life smoother, more creative, and sometimes a lot more fun. Let’s take a quick tour of some of the coolest tech you probably haven’t met.
Cellphones and headphones have stopped being just phones and sound machines. Beyond the glossy flagships are compact foldables that behave like mini tablets, letting you multitask without juggling multiple apps. Modular prototypes let you swap camera modules and batteries in seconds — imagine upgrading your phone’s zoom without buying a whole new device. Audio has gone beyond better speakers: bone-conduction headphones deliver music while keeping your ears open to the world, and hybrid noise-canceling earbuds adapt to your environment in real time, blocking subway roar but letting through your barista’s call. There are even smart earbuds that translate languages on the fly — not perfect yet, but astonishingly close.
Cameras and computers are walking further into each other’s territory. Mirrorless cameras now pack computational tricks borrowed from smartphones: burst-mode stacking, AI-assisted autofocus, and instant multi-exposure blending for dreamy night shots. Tiny action cameras with interchangeable lenses are unlocking cinematography for people who don’t want a camera bag full of gear. On the computing side, compact desktops and ultra-small form-factor PCs are proving you don’t need a tower to have workstation power. ARM-based laptops offer all-day battery life without throttling, and modular mini-PCs let you slide in GPU or storage upgrades like cartridges. For creators, portable devices that pair a camera brain with a pocket-sized computer are enabling instant editing and live streaming from remote locations.
Home security and appliances have been quietly smartening up, too. New-generation smart locks use biometric patterns and temporary digital keys, making lost keys a thing of the past. Mesh sensor networks monitor air quality, humidity, and motion without sending everything to the cloud — privacy-friendly and responsive. Video doorbells now run on-device analytics to distinguish a package from a person or a stray cat, cutting false alerts dramatically. In the kitchen and beyond, appliances have grown anticipatory: ovens that recognize what you’ve placed inside and suggest cooking cycles, refrigerators that track inventory and nudge you before produce spoils, and washers that tailor cycles to fabric types automatically.
And then there are home robots that do more than sweep. Some robots map gardens and trim lawns in tidy paths; others are social companions that help with reminders, play, or basic monitoring for elders. Pantry-scanning devices can tally groceries and suggest recipes. Robots that zoom around cleaning windows or sanitizing high-touch surfaces make maintenance less of a chore. The trend is toward cooperative automation — small, single-purpose machines that together handle the mundane so you can focus on the meaningful.
If you love tinkering or simply like gadgets that solve real problems, the next few years will be delightful. Keep an eye on niche makers and emerging categories; they’re where the most interesting ideas first show up. Try one tiny upgrade — a smarter pair of earbuds, a pocketable camera, or a sensor that finally lets you sleep without checking the thermostat — and enjoy the satisfaction of being among the first to notice what’s coming next.
Wahoo Fitness TICKR Review: The Best Heart Rate Monitor for Athletes?
If you’re serious about your training, you know that data is king. Guesswork just doesn’t cut it when you’re chasing personal bests. That’s where a reliable heart rate monitor becomes your most valuable training partner, and for years, one name has consistently dominated the conversation. This comprehensive wahoo fitness tickr review will explore why this device is a favorite among cyclists, runners, and fitness enthusiasts everywhere.
We’re going to break down everything you need to know about the entire Wahoo TICKR lineup, from its incredible accuracy to its user-friendly design.
Whether you’re a seasoned athlete or just starting your fitness journey, understanding your heart rate is fundamental to training smarter, not just harder. The Wahoo TICKR series promises to deliver that crucial data with simplicity and precision. We’ll look at the different models, compare their features, and help you decide if this is the missing piece of gear you need to elevate your performance.
In a Nutshell
Pinpoint Accuracy & Connectivity: The TICKR series is celebrated for its highly accurate heart rate tracking and dual-band ANT+/Bluetooth technology, allowing you to connect to your phone, GPS watch, and bike computer all at once.
A Model for Every Athlete: Wahoo offers three distinct versions—the standard TICKR for all-around performance, the TICKR X for data-rich running analytics, and the TICKR Fit armband for those who prefer not to wear a chest strap.
Exceptional Comfort & Design: Featuring a slim, lightweight pod and a soft, adjustable strap, the TICKR is designed for comfort during even the most intense and lengthy workouts, minimizing chafing and slippage.
Incredible Battery Life: The standard TICKR and TICKR X models boast an impressive battery life of over 500 hours from a simple coin cell battery, while the TICKR Fit offers a convenient 30+ hours of rechargeable power.
What Exactly is the Wahoo TICKR and Why is Everyone Talking About It?
The Wahoo TICKR isn’t just another piece of fitness tech; it’s a dedicated heart rate monitoring system designed to give you the most accurate, real-time data about your cardiovascular effort. Unlike wrist-based monitors found on many smartwatches, which use optical sensors that can be prone to inaccuracies during intense movement, the TICKR chest straps use electrocardiography (ECG) technology. This method measures the electrical signals of your heart, which is widely considered the gold standard for consumer-grade heart rate tracking.
Its popularity stems from a simple formula: it just works. Athletes love it because it’s reliable, easy to use, and connects effortlessly to the vast ecosystem of fitness apps and devices they already use. From Zwift and Peloton to Strava and TrainerRoad, the TICKR is universally compatible. This seamless integration removes technical headaches, letting you focus purely on your workout.
This isn’t just a gadget; it’s a training tool. By providing precise beats-per-minute (BPM) data, it allows you to train in specific heart rate zones. This is crucial for various training goals, whether you’re building an aerobic base, pushing your lactate threshold, or performing high-intensity interval training (HIIT). A proper wahoo fitness tracker review must emphasize that this device empowers you to train with purpose.
Unpacking the Core Features: What Makes the TICKR Stand Out?
At first glance, a heart rate monitor might seem simple, but Wahoo has packed the TICKR with thoughtful features that make a huge difference in day-to-day use. These details are what elevate it from a good device to a fantastic one.
Dual-Band ANT+ and Bluetooth Connectivity
This is arguably the TICKR’s most powerful feature. Wahoo was a pioneer in including both ANT+ and Bluetooth Smart technologies, and the latest generation allows for up to three simultaneous Bluetooth connections. What does this mean for you. You can have your TICKR sending data to your Wahoo ELEMNT bike computer, your Garmin watch, and your favorite training app on your phone or tablet at the same time.
No more choosing which device gets your heart rate data. This versatility is a massive win for athletes who use multiple devices in their training ecosystem.
Real-Time Heart Rate and Calorie Tracking
Of course, the primary job of the TICKR is to measure your heart rate, and it does so with exceptional accuracy. The data is broadcast in real-time, so you see instantaneous feedback on your connected device. This allows you to adjust your effort on the fly to stay within your target training zone. Wahoo’s algorithms also provide a highly accurate estimate of calories burned based on your heart rate data, giving you a much better picture of your total energy expenditure than generic estimates.
Visible Connection & Status LEDs
This is a small feature that you will absolutely love. The TICKR pod has two small LED lights on the top. A blue light flashes to confirm a Bluetooth connection is active, and a red light flashes to confirm that it has detected your heart rate. This simple visual confirmation takes all the guesswork out of pairing.
You’ll never have to wonder, “Is it working?” before you start your workout again. It’s a brilliant, user-friendly touch.
Comfortable and Secure Design
The second-generation TICKR features a slimmer pod and an integrated strap design that is both comfortable and secure. The soft, flexible material of the strap moves with you and is designed to minimize chafing, even on long, sweaty runs or rides. The snap-on connection for the pod is simple and secure, ensuring it stays in place no matter how hard you push yourself.
The TICKR Family: Which Wahoo Heart Rate Monitor is Right for You?
Wahoo understands that different athletes have different needs. That’s why they offer three distinct models in the TICKR family. Choosing the right one depends on your primary activities, your desire for data, and your personal comfort preferences. Let’s break them down.
Feature
Wahoo TICKR (Gen 2)
Wahoo TICKR X (Gen 2)
Wahoo TICKR Fit
Sensor Type
ECG (Chest Strap)
ECG (Chest Strap)
Optical (Armband)
Connectivity
ANT+, 3x Bluetooth
ANT+, 3x Bluetooth
ANT+, Bluetooth
Battery Type
CR2032 Coin Cell
CR2032 Coin Cell
Rechargeable Lithium-Ion
Battery Life
500+ Hours
500+ Hours
30+ Hours
Internal Memory
No
Yes (up to 50 hours)
No
Advanced Dynamics
No
Yes (Running & Cycling)
No
Best For
All-around athletes, cyclists, runners
Data-focused runners, triathletes
Users who dislike chest straps
Wahoo TICKR (Gen 2): The Gold Standard for Most Athletes
The standard Wahoo Fitness TICKR is the workhorse of the lineup and the perfect choice for the vast majority of athletes. It delivers everything you need—unbeatable accuracy, dual-band connectivity, and a comfortable design—without any extra features you might not use. It’s the definition of a simple, reliable, and effective training tool.
This is the go-to monitor for cyclists who want to pair a sensor with their bike computer, runners who connect to a GPS watch, and anyone who takes classes at a gym with ANT+ compatible equipment. With over 500 hours of battery life from a standard CR2032 coin cell, you can train for more than a year without ever thinking about the battery. For its price and performance, it’s one of the best values in fitness technology.
Pros
Extremely accurate ECG heart rate data.
Excellent value for the price.
Incredible 500+ hour battery life.
Slim, comfortable, and lightweight design.
Cons
Lacks the advanced metrics of the TICKR X.
Some users report strap durability issues over the long term.
Wahoo TICKR X: For the Data-Driven Runner and Cyclist
The TICKR X takes everything great about the standard TICKR and adds a suite of advanced features for athletes who crave more data. The biggest additions are internal memory and advanced motion analytics. The internal memory allows you to record a workout—up to 50 hours worth—without carrying your phone or watch. This is perfect for team sports, swimming, or just enjoying a phone-free run.
For runners, the TICKR X is a powerhouse. It tracks advanced running dynamics, including cadence, vertical oscillation, and ground contact time, giving you valuable insights to improve your running form and efficiency. For indoor cyclists, it can even track your cadence when you’re on a spin bike. If you’re an athlete who loves to analyze every aspect of your performance, the TICKR X is built for you.
Pro Tip: To get the most out of the TICKR X’s running dynamics, make sure to calibrate it in the Wahoo Fitness app. This quick process ensures the data it provides on your running form is as accurate as possible.
Pros
All the benefits of the standard TICKR.
Internal memory for phone-free workouts.
Provides advanced running dynamics to improve form.
Indoor cycling cadence tracking.
Cons
More expensive than the standard model.
Advanced features may be unnecessary for casual users.
Wahoo TICKR Fit: The Ultimate in Armband Comfort
For many people, chest straps are just not comfortable. The Wahoo TICKR Fit is the perfect solution. Instead of an ECG sensor on a chest strap, it uses an optical heart rate sensor on a soft, breathable armband that you can wear on your forearm or bicep. While optical sensors are sometimes viewed as less accurate than ECG, the TICKR Fit is one of the best on the market, providing data that is very close to a chest strap for most activities.
It’s an amazing option for workouts where a chest strap might get in the way, like weightlifting or certain yoga poses. It’s also fantastic for anyone who experiences chafing from chest straps. The TICKR Fit is rechargeable via a simple magnetic USB cable and offers over 30 hours of battery life, which is plenty for a week or two of training for most people. If comfort is your absolute top priority, this is the one to get.
Pros
Supremely comfortable armband design.
Highly accurate for an optical sensor.
Easy to put on and take off.
Rechargeable battery is convenient.
Cons
Battery life is significantly shorter than chest strap models.
Can experience slight delays in tracking rapid heart rate changes during HIIT.
Pricing and Value: How Much Does a Wahoo TICKR Cost?
When it comes to pricing, the Wahoo TICKR series offers fantastic value across the board. While prices can fluctuate, the standard TICKR is generally one of the most affordable premium heart rate monitors available. It provides the same level of accuracy and connectivity as competitors that often cost significantly more.
The TICKR X comes in at a higher price point, which is justified by its advanced analytics and internal memory. If you’re a runner who would otherwise buy a separate running pod for dynamics data, the TICKR X combines both into one device, representing a solid value. The TICKR Fit is typically priced between the standard and X models, reflecting its premium optical sensor technology and the convenience of the armband design.
Compared to the market, Wahoo has positioned the TICKR family very competitively. They deliver top-tier performance and features without the top-tier price tag of some other brands. For the latest pricing and availability, it’s always best to check the current price on Amazon.
Wahoo TICKR Pros and Cons: An Honest Breakdown
No product is perfect, and a trustworthy tickr fitness review needs to be balanced. After extensive use and analysis, here’s a straightforward summary of where the Wahoo TICKR series shines and where it has room for improvement.
The Awesome Stuff (Pros)
Rock-Solid Accuracy: For the chest strap models, the ECG accuracy is top-of-the-line, providing reliable data you can trust to structure your training.
Flawless Connectivity: The dual-band ANT+ and multi-device Bluetooth is a huge advantage, offering unmatched versatility to connect to all your gear simultaneously.
Superb Comfort: The slim pod and soft strap design make the TICKR and TICKR X easy to wear for hours without discomfort.
Incredibly User-Friendly: From the simple snap closure to the status LEDs, every aspect of the TICKR is designed to be intuitive and hassle-free.
A Model for Everyone: With three distinct options, Wahoo ensures there’s a TICKR that fits your specific needs and comfort preferences.
The Not-So-Awesome Stuff (Cons)
Strap Durability: This is the most common complaint found in user forums like this Reddit discussion. While the pod is very durable, the strap itself can wear out over time, especially with heavy sweat and improper care. Replacement straps are available, however.
TICKR Fit Battery: While 30 hours is respectable for a rechargeable device, it pales in comparison to the 500+ hours of the coin cell models. You’ll need to remember to charge it regularly.
Optical Sensor Lag: The TICKR Fit, like all optical sensors, can sometimes have a slight delay in detecting very rapid changes in heart rate during intense interval workouts compared to an ECG chest strap.
Pro Tip: To maximize the life of your TICKR chest strap, make it a habit to rinse it with fresh water after every single workout and let it air dry completely. This prevents the buildup of salt and sweat, which can degrade the materials and the electrodes over time.
Frequently Asked Questions About the Wahoo TICKR
Here are answers to some of the most common questions people have about the Wahoo TICKR series.
Is the Wahoo Tickr fit accurate?
Yes, the entire Wahoo TICKR line is known for its accuracy. The TICKR and TICKR X chest straps use ECG technology, which is the gold standard for consumer heart rate monitors and is extremely accurate. The TICKR Fit armband uses a high-quality optical sensor that is also very accurate, especially for steady-state cardio. For activities with rapid heart rate spikes like HIIT, a chest strap will always be slightly more responsive, but the TICKR Fit is among the best optical sensors available.
Can Wahoo Tickr be used in a gym?
Absolutely. The Wahoo TICKR is perfect for the gym. Its dual-band connectivity means it can connect to many modern treadmills, ellipticals, and spin bikes that are ANT+ compatible. At the same time, you can have it connected via Bluetooth to your phone to record your workout in the Wahoo Fitness app or another third-party app.
It’s a versatile tool for both indoor and outdoor training.
How long does a Wahoo Tickr battery last?
This depends on the model. The Wahoo TICKR and TICKR X use a standard CR2032 coin cell battery that provides an incredible 500+ hours of use. For most people, that’s well over a year of training. The Wahoo TICKR Fit has a rechargeable battery that lasts for over 30 hours on a single charge.
How does Wahoo compare to Garmin?
Both Wahoo and Garmin make excellent heart rate monitors. Wahoo is often praised for its simplicity, open platform (easily connecting to anything), and user-friendly app. Garmin’s HRM-Pro and HRM-Pro Plus offer similar features to the TICKR X, sometimes with additional metrics for the Garmin ecosystem. The choice often comes down to brand preference and which ecosystem you are more invested in.
However, the TICKR’s ability to connect to three Bluetooth devices at once is a key advantage over many Garmin models.
What is the life expectancy of a heart monitor?
The electronic pod of a Wahoo TICKR is very durable and can last for many years. The life expectancy of the device is usually determined by the strap itself. With proper care (rinsing after use, gentle hand washing), a strap can last for a year or two of heavy use. Since the straps are replaceable, you can extend the life of your TICKR indefinitely by simply replacing the strap when it wears out.
Final Verdict: Is the Wahoo TICKR Worth Your Money in 2026?
After a thorough review of the Wahoo Fitness TICKR family, the answer is a resounding yes. This isn’t just a good heart rate monitor; it’s an exceptional training tool that offers an unbeatable combination of accuracy, comfort, and connectivity. It punches well above its weight class, delivering premium performance that rivals and often exceeds that of more expensive competitors.
The beauty of the TICKR lineup is its thoughtful segmentation. The standard Wahoo Fitness TICKR is the perfect, no-fuss choice for 90% of athletes who just need reliable, accurate data. The TICKR X is a fantastic upgrade for data-hungry runners and triathletes who will genuinely use its advanced metrics. And the TICKR Fit provides a wonderfully comfortable and accurate solution for anyone who simply can’t stand wearing a chest strap.
If you’re ready to stop guessing and start training with precision, the Wahoo TICKR is one of the smartest investments you can make in your fitness journey. It’s a reliable, powerful, and easy-to-use device that will help you understand your body better and unlock your true athletic potential. It’s a top-tier product that earns our highest recommendation.
To provide the best experiences, we use technologies like cookies to store and/or access device information. Consenting to these technologies will allow us to process data such as browsing behavior or unique IDs on this site. Not consenting or withdrawing consent, may adversely affect certain features and functions.
Functional
Always active
The technical storage or access is strictly necessary for the legitimate purpose of enabling the use of a specific service explicitly requested by the subscriber or user, or for the sole purpose of carrying out the transmission of a communication over an electronic communications network.
Preferences
The technical storage or access is necessary for the legitimate purpose of storing preferences that are not requested by the subscriber or user.
Statistics
The technical storage or access that is used exclusively for statistical purposes.The technical storage or access that is used exclusively for anonymous statistical purposes. Without a subpoena, voluntary compliance on the part of your Internet Service Provider, or additional records from a third party, information stored or retrieved for this purpose alone cannot usually be used to identify you.
Marketing
The technical storage or access is required to create user profiles to send advertising, or to track the user on a website or across several websites for similar marketing purposes.
To provide the best experiences, we use technologies like cookies to store and/or access device information. Consenting to these technologies will allow us to process data such as browsing behavior or unique IDs on this site. Not consenting or withdrawing consent, may adversely affect certain features and functions.