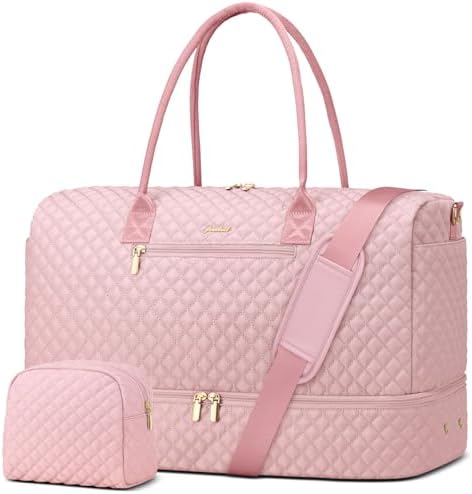
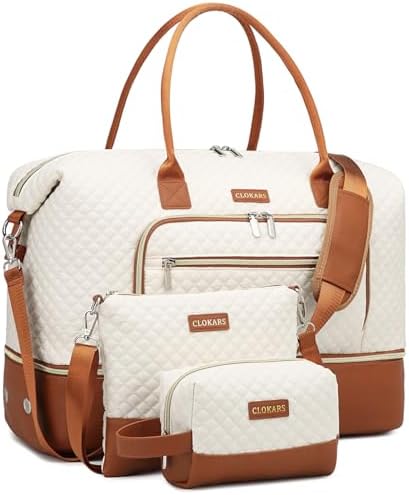
- Spacious & Durable Duffle Bag for Travel – This large duffle bag for travel is made of heavy-duty 600D polyester with a …
- ersatile Travel Duffle Bag for Men & Women – A stylish yet rugged duffel bag for traveling, designed with removable shou…
- Extra Large Duffle Bag with Smart Storage – This big duffle bag includes a foldable design for compact storage when not …

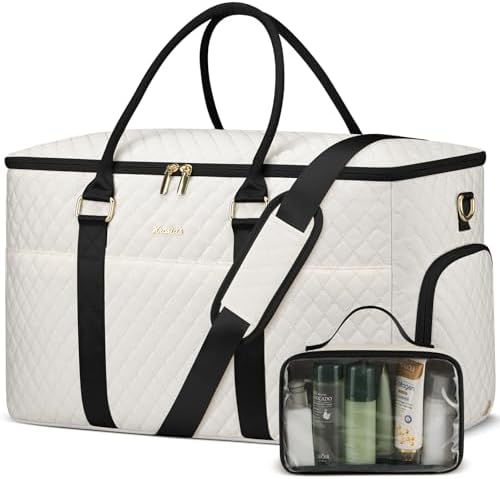
- 【Unique 180-Degree Opening】: Experience hassle-free packing with our travel bag novel opening method, allowing full acce…
- 【Independent Shoe Compartment】: Separate side compartment can hold your shoes or dirty clothes for easy separation from …
- 【Organized and Accessible】: Our overnight bag features a large main compartment with 1 visual mesh pocket and 3 open poc…


- AIRPLANE APPROVED TRAVEL BAG WITH SHOE COMPARTMENT – In the right side of the overnight bags, a separate shoe compartmen…
- FREE TOILETRY BAG + SEPARATED WET AND DRY GYM BAG HOSPITAL BAG – The carry on duffel bag comes with 1 toiletry bag to st…
- LARGE CAPACITY WEEKENDER BAG OVERNIGHT BAG – This weekend bag has total 13 pockets to keep your personal items organized…
Carry On Travel Duffel Bags: A Buyer’s Guide for Savvy Travelers
There’s an incredible sense of freedom that comes with packing light and moving fast. For many adventurers, the key to that freedom is finding the perfect carry on travel duffel bag. Unlike rigid suitcases, these versatile bags can be squished into tight overhead bins, slung over a shoulder for a sprint through the terminal, or tossed in the back of a car for a spontaneous road trip. They represent a more flexible, ready-for-anything approach to travel that’s simply exhilarating!
But choosing the right one isn’t just about grabbing the first bag you see. The best carry on duffel bags blend durability, smart organization, and comfort into one stylish package. This guide will walk you through everything you need to know to find the duffel that will become your trusted travel companion for years to come.
What to Know
- Size and Compliance are Crucial: Most airlines limit carry-on luggage to around 22 x 14 x 9 inches. Always check your airline’s specific rules, but a duffel around 40-45 liters is generally a safe bet.
- Material Matters Most: The bag’s fabric determines its durability, weight, and weather resistance. Cordura and ballistic nylon are tough and rugged, while canvas and leather offer a more classic, stylish look.
- Organization is Your Best Friend: Look for thoughtful features like separate shoe compartments, padded laptop sleeves, and multiple pockets. These prevent your bag from becoming a chaotic mess.
- Comfortable Straps are Non-Negotiable: You’ll be carrying this bag! Padded shoulder straps, grab handles, and convertible backpack straps can make a huge difference in your travel comfort.
The Ultimate Checklist: Top Features for Carry-On Travel Duffel Bags


Finding the perfect travel duffel bag feels like unlocking a new level of travel efficiency. It’s not just a bag; it’s your mobile base of operations. To make the right choice, you need to look past the color and focus on the features that truly count. Think of this as your pre-flight checklist for buying the best possible bag.
Material and Durability
First and foremost, a duffel bag for travel must be tough. It’s going to be shoved, dropped, and exposed to the elements. The fabric is your first line of defense. High-denier fabrics like Ballistic Nylon or Cordura are industry standards for a reason—they offer exceptional resistance to tears, scuffs, and abrasion. For adventurers heading off the beaten path, materials with a TPU (Thermoplastic Polyurethane) coating provide excellent water resistance, keeping your gear dry during unexpected downpours.
Alternatively, materials like waxed canvas or full-grain leather offer a timeless aesthetic that ages beautifully. While often heavier, they provide a classic look for city breaks or stylish getaways. Don’t forget to check the stitching, especially around the straps and handles, as this is where the bag is under the most stress.
Zippers and Hardware
Zippers are the most common point of failure on any piece of luggage. A broken zipper mid-trip is a nightmare! Look for bags that use reputable brands like YKK or RiRi. These zippers are known for their reliability and smooth operation. Larger zipper teeth (size #8 or #10) on the main compartment are generally more durable than smaller ones. Also, consider lockable zippers for an added layer of security when you have to part with your bag.
Straps and Carry Options
Comfort is king. A great duffel should offer multiple ways to carry it. A detachable, padded shoulder strap is standard, but the best carry on duffel bags often include convertible backpack straps. This feature is fantastic for covering longer distances on foot, freeing up your hands, and distributing weight more evenly across your back. Sturdy, padded grab handles on the top and sides are also essential for easily pulling the bag from an overhead bin or car trunk.
Pockets and Organization
While the beauty of a duffel is its large, open main compartment, a complete lack of organization can lead to chaos. The best designs offer a smart balance. Look for an external “quick-access” pocket for your passport, phone, and keys. An internal, padded laptop sleeve is a must for digital nomads and business travelers. One of the most popular features is a separate, ventilated shoe compartment or a pocket for dirty laundry, which keeps your clean clothes fresh and organized.
Best Brands Redefining Duffel Bags for Travel
Certain brands have truly mastered the art and science of creating exceptional duffel bags for travel. They understand that modern travelers need more than just a sack to hold their clothes; they need a thoughtfully designed piece of gear. These brands consistently deliver on quality, innovation, and style.
For the traveler who prioritizes organization above all else, Tortuga stands out. They design luggage with the mindset of a backpacker but the needs of a city traveler. Their bags are renowned for their clamshell openings (like a suitcase), dedicated tech compartments, and comfortable harness systems. The Tortuga Travel Duffel is a prime example of a bag built for serious, one-bag travel, making it easy to live out of without ever unpacking fully.
On the other end of the spectrum, offering incredible functionality at an accessible price point, is Bagsmart. This brand excels at creating stylish and practical bags with clever organizational features. The Bagsmart Carry-On Duffel often includes features like multiple compartments, trolley sleeves for sliding over a suitcase handle, and water-resistant materials, making it a favorite for weekend trips and gym-to-office days.
Of course, no discussion of travel duffels is complete without mentioning icons like Patagonia and The North Face. The Patagonia Black Hole and The North Face Base Camp duffels are legendary for their bombproof construction and are trusted by adventurers worldwide. They are built from ultra-durable, weather-resistant materials and can withstand almost any abuse you throw at them. While their organization can be more basic, their sheer toughness is unmatched.
Pack Like a Pro: How to Efficiently Organize Your Duffel Bag
The wide-open main compartment of a duffel is both its greatest strength and its potential weakness. Without a strategy, it can quickly become a jumbled mess. But with a few simple techniques, you can turn that space into a perfectly organized travel pod. It’s all about creating your own structure.
-
Embrace Packing Cubes: This is the single most effective way to organize a duffel. Use different colored or sized cubes for different categories of clothing: one for shirts, one for pants, one for underwear and socks. They compress your clothes, saving space and making it incredibly easy to find what you need without tearing your entire bag apart.
-
Roll, Don’t Fold: Rolling your clothes is generally the best method for packing cubes and duffel bags. It minimizes wrinkles and allows you to fit more items into a compact space. For items like blazers or dress shirts, a careful fold might be better, but for most travel apparel, rolling is the way to go.
-
Master Weight Distribution: Place your heaviest items, like shoes or a toiletry bag, at the bottom and center of the duffel. This creates a stable base and makes the bag more comfortable to carry, preventing it from feeling lopsided or awkward against your body.
-
Use Every Nook and Cranny: Stuff socks, chargers, or other small items inside your shoes to maximize every inch of space. The small pockets on the inside and outside of your duffel are perfect for items you need to access quickly, like headphones, a portable charger, or travel documents.
Pro Tip: Keep a dedicated “arrival kit” in an easily accessible packing cube or pocket. This should contain everything you need immediately upon reaching your destination, like a change of clothes, basic toiletries, and any necessary chargers. This saves you from having to dig through your entire bag after a long day of travel.
Duffel Bag vs. Rolling Suitcase: Which Is Right for Your Trip?
The age-old debate for travelers: the flexible duffel or the structured rolling suitcase? Both are excellent choices, but they excel in different scenarios. The right choice depends entirely on your travel style and destination. As one Reddit user on r/travel noted, a duffel’s main advantage is its ability to be crammed into any available overhead bin space, a huge plus on crowded flights.
Here’s a breakdown to help you decide:
| Feature | Carry On Travel Duffel Bag | Traditional Rolling Suitcase |
|---|---|---|
| Mobility | Excellent. Easy to carry up stairs, over cobblestones, or through crowds. | Good. Perfect for smooth airport floors and sidewalks, but struggles on uneven terrain. |
| Flexibility | Excellent. Soft sides allow it to be squeezed into tight spaces. | Poor. The rigid frame means its size is fixed. |
| Packing | Good. Large main compartment is versatile but requires organization (e.g., packing cubes). | Excellent. Clamshell design with built-in dividers and straps makes packing easy. |
| Protection | Fair. Offers less protection for fragile items compared to a hardshell case. | Excellent. Hardshell and structured cases provide superior protection for contents. |
| Weight | Excellent. Generally lighter than a suitcase of the same size. | Fair. The frame, wheels, and handle add significant weight. |
Choose a duffel bag if: You value mobility and flexibility. You’re navigating multiple forms of transport, walking on varied terrain, or need to pack light and fast. They are perfect for road trips, adventure travel, and weekend getaways.
Choose a rolling suitcase if: You prioritize organization and protection. You’ll be moving through large airports and staying in one place for a while. They are ideal for business trips or vacations where you want to unpack and feel settled.
Choosing Your Companion: The Right Duffel for Every Destination
Not all trips are created equal, and your duffel bag should reflect that. A bag that’s perfect for a beach vacation might not be the best choice for a business conference. Matching your bag’s features to your destination is the key to a smooth journey.
The Urban Explorer & Weekend Getaway
For a weekend trip to a new city, you need a bag that is stylish, compact, and easy to carry. Look for duffels in the 35-45 liter range made from materials like canvas, leather, or sleek nylon. Key features include a quick-access pocket for your phone and wallet, a padded laptop sleeve, and comfortable straps for navigating subway stations and busy streets. A trolley sleeve to slide over a larger suitcase handle is also a huge bonus if you’re extending a longer trip.
The Adventure Seeker
If your trip involves hiking, camping, or rugged landscapes, durability is your top priority. Choose a duffel made from high-denier, water-resistant materials like TPU-coated nylon or polyester. Convertible backpack straps are essential here, as you’ll likely be carrying your bag for longer periods. Look for reinforced seams, beefy zippers, and external compression straps or lash points to attach extra gear like a jacket or sleeping pad.
The Business Traveler
For business trips, a duffel can be a surprisingly sophisticated choice. Opt for a structured duffel with a clean, minimalist design in a material like leather or ballistic nylon. The most important feature is organization. A dedicated, well-padded compartment for your laptop and tablet is non-negotiable. Look for internal pockets to organize documents, chargers, and pens. Some innovative designs, often called garment duffels, even unzip completely to lay flat, with a special compartment to keep a suit or dress wrinkle-free.
Keeping Your Gear in Top Shape: Duffel Bag Care and Maintenance


Your travel duffel is an investment that, with a little care, can last for a decade or more. Proper maintenance not only keeps it looking great but also ensures it won’t fail you when you’re thousands of miles from home. Most of the care is simple and just requires a bit of attention after each trip.
First, always empty your bag completely after you return. Shake it out to remove any sand, dirt, or crumbs. For most nylon and polyester bags, spot cleaning is the best approach. Use a cloth with mild soap and water to gently scrub away any stains.
Avoid using harsh detergents or bleach, as they can damage the fabric and any water-resistant coatings.
For tougher materials like waxed canvas, you may need to re-wax the bag every few years to maintain its water resistance. Leather duffels require a bit more care; they should be cleaned with a dedicated leather cleaner and conditioned periodically to prevent the material from drying out and cracking. Never submerge a leather bag in water.
Pay attention to the zippers. If a zipper starts to stick, you can run a graphite pencil or a specialized zipper lubricant along the teeth to help it glide smoothly. Finally, store your duffel in a cool, dry place. Keep it unbuckled and loosely packed to help it maintain its shape and prevent creases from setting in the fabric.
Travel in Style: Finding a Fashion-Forward Duffel Bag
Who says practical can’t be stylish? Your luggage is an extension of your personal style, and a beautiful carry on duffel bag can make a statement. Today, there are more fashionable and sophisticated options than ever before, proving that you don’t have to sacrifice aesthetics for function. These bags are designed to look just as good in a hotel lobby as they do in an airport terminal.
Materials play a huge role in the style of a duffel. Full-grain leather is the classic choice for a luxurious, timeless look that develops a rich patina over time. Waxed canvas offers a rugged yet refined heritage vibe, perfect for a rustic weekend escape. For a more modern and minimalist aesthetic, look for bags made from high-quality nylon or innovative technical fabrics in clean, simple silhouettes and neutral colors.
Many designer and direct-to-consumer brands now specialize in creating duffel bags that are both beautiful and smart. They focus on details like premium hardware, elegant leather accents, and thoughtfully designed interiors. As shown in the video below, a well-crafted leather duffel can elevate your entire travel ensemble.

When choosing a stylish duffel, consider how it will pair with your typical travel wardrobe. A sleek black duffel is incredibly versatile, while a rich brown leather or olive canvas bag can add a touch of personality. Ultimately, the best stylish duffel is one that you feel excited and confident to carry.
Amazing Value: The Best Budget-Friendly Travel Duffels Under $100
Traveling on a budget doesn’t mean you have to settle for a low-quality bag that will fall apart after one trip. Thanks to competitive online marketplaces and innovative brands, it’s entirely possible to find fantastic, durable, and feature-rich carry on duffel bags for under $100. You just need to know what to look for.
In this price range, you’ll primarily find bags made from durable polyester or nylon. While you might not get the premium feel of Cordura, these materials are more than capable of handling regular travel. Look for bags with reinforced stitching at key stress points, like where the handles and shoulder strap connect to the body of the bag. This is a key indicator of quality at a lower price point.
Brands like Bagsmart have built a reputation for delivering exceptional value. Their bags often include features typically found on more expensive models, such as separate shoe compartments, multiple pockets for organization, and water-resistant fabrics. The Bagsmart Carry-On Duffel is a perfect example of a bag that punches well above its weight class, offering style and smart features without breaking the bank.
When shopping on a budget, read reviews carefully. Pay attention to comments about zipper quality and long-term durability. A little research can help you find a hidden gem that will serve as a reliable travel partner for many adventures to come.
Beyond the Basics: Innovative and Unique Duffel Bag Designs
The classic duffel design is simple and effective, but modern bag designers are constantly pushing the boundaries with clever and innovative features. These unique designs solve specific travel problems and cater to niche needs, making travel more convenient and organized than ever before.
One of the most popular innovations is the garment duffel. As seen with brands like Halfday, these bags look like a standard duffel from the outside, but they completely unzip to lie flat, revealing a garment bag interior. This allows you to pack a suit, dress, or blazer with minimal wrinkling, and then zip it back up, creating a spacious duffel compartment in the center for the rest of your clothes. It’s a brilliant solution for business travelers and wedding guests.
Another major trend is the convertible backpack duffel. We’ve touched on this, but brands like Tortuga perfect it. They aren’t just duffels with flimsy straps tacked on; they are engineered with comfortable, stowable harness systems that make carrying them as a backpack a genuine pleasure. This versatility is perfect for travelers who might face a mix of airports, city streets, and unpaved paths all in one trip.
We’re also seeing bags with highly specialized features. As one user on Instagram raved about, some duffels now include insulated pockets for snacks and drinks, external straps for carrying a jacket or yoga mat, and even removable internal divider systems. These thoughtful additions show that designers are listening to the real-world needs of travelers and creating smarter, more adaptable bags.
Pro Tip: When considering an innovative bag, think about your actual travel habits. A garment duffel is fantastic, but only if you regularly travel with suits. Choose features that solve problems you consistently face on the road.
From Sailors to Skies: A Brief History of the Travel Duffel
The humble duffel bag has a surprisingly rich history that dates back centuries. Its story begins in the 17th century in the town of Duffel, Belgium. This town was known for producing a thick, coarse woolen cloth that was incredibly durable. Sailors in the Spanish and Portuguese navies began using this tough fabric to create simple, cylindrical sea bags to hold their belongings on long voyages.
These early bags were rugged, practical, and could be easily stowed in the tight quarters of a ship. The design’s popularity grew, and the term “duffel bag” became synonymous with any cylindrical bag made of thick fabric with a drawstring or top closure. Its military use solidified its place in history, becoming standard issue for soldiers, sailors, and airmen in World War II to carry their gear.
After the war, these surplus army duffels became popular with civilians, especially students, surfers, and anyone looking for an inexpensive and durable way to carry their stuff. Over the decades, the design evolved. Zippers replaced drawstrings, new materials like nylon and canvas were introduced, and features like shoulder straps and pockets were added. The duffel transformed from a simple military sack into the versatile and sophisticated travel companion we know today, a perfect symbol of readiness and adventure.
Frequently Asked Questions
Got a few more questions? You’re not alone! Here are answers to some of the most common queries about using duffel bags for carry-on travel.
What size duffel bag is allowed for carry-on?
While it varies slightly by airline, the most common maximum size for carry-on luggage in the United States is 22 inches long x 14 inches wide x 9 inches high (56 x 36 x 23 cm). A duffel bag with a capacity of around 40 to 45 liters will typically fall within these dimensions. However, the best advice is to always check the specific carry-on restrictions for the airline you are flying with before you travel. The soft-sided nature of a duffel gives you a slight advantage, as it can often be compressed to fit if it’s not overpacked.
What is the best carry-on duffel bag?
The “best” bag is highly subjective and depends on your personal needs and travel style. For rugged durability, the Patagonia Black Hole or The North Face Base Camp are top contenders. For exceptional organization and comfort, a brand like Tortuga is hard to beat. For travelers seeking great style and value, the Bagsmart duffel is an excellent choice.
The best bag for you will have the right combination of size, material, features, and price for your specific trips.
Will a duffel bag be considered a carry-on?
Yes, absolutely. As long as the duffel bag meets the airline’s size and weight restrictions for carry-on luggage, it is treated just like any other carry-on, such as a rolling suitcase or a backpack. You can place it in the overhead bin or, if it’s small enough, under the seat in front of you. The type of bag doesn’t matter, only its dimensions and weight.
What size bag is TSA approved for carry-on?
The TSA (Transportation Security Administration) does not actually set the size limits for carry-on bags; the individual airlines do. The TSA is primarily concerned with security and screening the contents of your bag. As long as your bag fits through the X-ray scanner and meets your airline’s size requirements, it is fine from a TSA perspective. You can find more information on prohibited items and packing rules on the official TSA website.
Final Thoughts
Choosing the right carry on travel duffel bag is about more than just carrying your things—it’s about investing in smoother, more flexible, and more enjoyable journeys. By focusing on the key features of material, organization, and comfort, you can find a bag that perfectly matches your travel style, whether you’re a weekend warrior, an adventure enthusiast, or a stylish globetrotter.
Remember to consider the types of trips you take most often and choose a bag with features that will genuinely make your life easier on the road. A well-chosen duffel is a reliable, versatile companion that will be ready for any adventure you can dream up.
If you’re looking for a bag that masterfully blends organization with travel-ready comfort, the Tortuga Travel Duffel is an outstanding choice for the serious traveler. For those who want a fantastic combination of modern style, smart features, and incredible value, the Bagsmart Carry-On Duffel is a decision you won’t regret.