We live in pockets and palms these days—powerful tools that replace entire rooms of high tech gadgets from a decade ago. If you want to pare down and upgrade without cluttering your life, focus on the few high-tech essentials that truly deliver: phones and headphones that keep you connected and sane, cameras and computers that capture and create, and smart home security and appliances that quietly improve daily life.
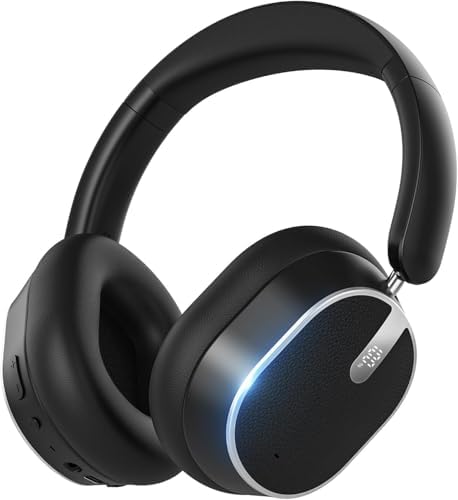
Cellphones and headphones have become inseparable partners. Modern smartphones are pocket computers: lightning-fast processors, pro-level cameras, and battery lives that last a full day under real use. Look for models with robust ecosystems and frequent updates; longevity matters more than chasing the flashiest spec sheet. Pair that phone with noise-cancelling wireless headphones. Whether you commute, grind through meetings, or crave immersive music, active noise cancellation transforms noisy spaces into focused zones. True wireless earbuds with solid codecs give you both convenience and high-quality sound; choose ones that emphasize fit and battery endurance, because comfort and all-day power are what you’ll actually notice.
When it comes to cameras and computers, don’t make the mistake of thinking one device must do everything. A mirrorless camera or a high-end compact can still outshoot most phones in low light and deliver that creamy bokeh and dynamic range photographers crave. Choose a compact system if you want portability without sacrificing image quality. For computers, prioritize a balance of power, portability, and battery life. A lightweight laptop with a high-resolution display and a competent CPU will cover everything from photo editing to casual gaming. If your workflow is creative or code-heavy, consider a machine with more cores and faster storage; responsiveness while multitasking is a night-and-day difference.
Smart home security and smart appliances are where convenience and safety finally meet. Modern security systems are modular: doorbell cameras, window sensors, and discreet indoor cameras that stream to your phone and alert you only when something actually matters. Opt for systems with local storage options and strong encryption so your footage remains private. On the appliances side, the latest smart fridges, washers, and ovens aren’t about gimmicks; they’re about saving time. Sensors that detect load imbalance, refrigerators that monitor food freshness, and ovens you can preheat from the grocery line all shave minutes from routines and reduce waste. Integration matters—choose devices that play well with your existing ecosystem and let you automate chores without micro-managing.
At the end of the day, the best high-tech gadgets are the ones you use every day without thinking about them. They fit in your pocket, enhance your creativity, and protect your home. Buy fewer, buy the right ones, and let technology do the heavy lifting so you can get back to living. Start by picking one upgrade this season—a durable phone, stellar earbuds, a compact camera, or a smart lock—and build outward. Small, thoughtful choices compound into a smoother, safer life. Technology should save you time and spark joy; when it does, it feels less like gear and more like an extension of your self.
We live in a moment when high tech gadgets are less “nice to have” and more “can’t imagine life without.” From slim wearables that monitor our sleep to autonomous home robots that tidy our floors, choosing the right tech can simplify routines, boost creativity and even protect what matters most. Here’s a quick tour of high-tech investments that deliver value now—and will keep paying off.
Cellphones and headphones
A modern smartphone is the Swiss Army knife of tech: communication hub, camera studio, fitness coach and portable workstation. Flagship phones pack impressive image sensors, computational photography and fast 5G connectivity, so you can shoot professional-looking photos, edit them on the phone and upload instantly. When picking a phone, prioritize camera versatility, battery longevity and software support—regular OS updates extend a device’s useful life far beyond its specs.
Headphones have evolved from simple audio playback to essential wellness and productivity tools. Active noise cancellation transforms noisy commutes into quiet focus sessions. True wireless earbuds are now small, powerful and smart—spatial audio, adaptive EQ and multipoint connections make them perfect for calls, music and gaming. Look for models with reliable ANC, long battery cycles and codecs that match your listening habits (AAC or LDAC for higher-fidelity wireless audio).
Cameras and computers
Dedicated cameras still outshine phones for creative control. Mirrorless cameras with fast autofocus, high-resolution sensors and compact bodies are ideal for enthusiasts and content creators. Lens ecosystems matter—investing in a couple of high-quality lenses pays dividends in image sharpness and creative flexibility. If video is your priority, prioritize cameras with good in-body stabilization and log profiles for color grading.
On the computer side, the lines between laptop and desktop blur as chips get more efficient. Ultrabooks deliver impressive power in sleek, lightweight shells; workstations and gaming rigs give you heavy lifting for editing, rendering and 3D work. Consider processors, RAM and—crucially—storage speed. NVMe SSDs dramatically improve boot and app load times. Also evaluate ports and display quality: a color-accurate screen and Thunderbolt connectivity make a laptop far more versatile.
Home security and appliances
Smart home tech is about convenience and peace of mind. A robust home-security setup combines smart locks, doorbell cameras and motion sensors tied to a central hub or a trustworthy cloud service. Choose devices with strong encryption, local storage options and a clear privacy policy—security without privacy is a bad trade-off.
Smart appliances are getting genuinely helpful: fridges that monitor groceries, ovens that preheat on voice command and washers that optimize cycles for fabric and water use. Robot vacuums and mopping bots are now smarter and quieter, mapping rooms and avoiding obstacles with surprising precision. Investing in devices from brands that commit to software updates ensures compatibility and new features over time.
Buy with intention: prioritize devices that integrate well with each other, offer reliable updates and focus on core features you’ll actually use. A thoughtful blend of portable power, creative tools and smart home solutions can transform daily life—not with gimmicks, but with targeted, lasting improvements.
Weighted Vest Fitness Gear: The 2026 Buyer’s Guide for All Levels
Ready to transform your bodyweight workouts from routine to remarkable? If you’ve hit a plateau or you’re just craving a new challenge, incorporating weighted vest fitness gear into your regimen is one of the most effective ways to accelerate your results. This single piece of equipment can amplify everything from your daily walk to your most intense HIIT session, turning up the intensity and forcing your body to adapt, grow, and get stronger. It’s like giving your fitness journey a massive upgrade!
But with so many options out there, how do you choose the right one. It’s not just about picking the heaviest vest you can find. The perfect weighted workout vest depends on your goals, your current fitness level, and the types of exercises you love. This guide will walk you through everything you need to know to select the ideal vest that will feel like a natural extension of your body and push you toward your peak performance.
Let’s get started.
What to Know
Weight Selection is Crucial: Don’t go too heavy too soon! A great starting point is a vest that’s 5-10% of your total body weight. This provides enough resistance to challenge you without compromising your form or risking injury.
Fit is Non-Negotiable: A vest that bounces, shifts, or chafes is a workout killer. Look for adjustable straps on both the shoulders and waist to create a snug, secure fit that moves with you, not against you.
Material and Design Matter: The construction of your vest impacts comfort and durability. Breathable materials like neoprene are great for comfort, while rugged options like Cordura nylon offer maximum longevity for intense use.
Adjustability Equals Versatility: An adjustable weighted fitness vest with removable weight blocks is an incredible investment. It allows you to start light and progressively increase the load as you get stronger, making it a tool that grows with your fitness journey.
What Exactly Is Weighted Vest Fitness Gear?
At its core, weighted vest fitness gear is a wearable garment, similar to a vest or tactical plate carrier, designed to hold extra weight securely against your torso. This simple concept is rooted in a fundamental principle of fitness: progressive overload. By adding external resistance to your body, you force your muscles, bones, and cardiovascular system to work harder than they’re used to. This increased demand is the catalyst for change, stimulating muscle growth, boosting endurance, and burning more calories.
Unlike ankle or wrist weights, which can alter your natural biomechanics and potentially strain your joints, a weighted vest distributes the load evenly across your core and upper body. This makes it a much safer and more effective tool for a wide range of activities. It integrates the resistance into your center of gravity, making movements feel challenging yet natural. Whether you’re doing push-ups, squats, lunges, or even just walking, the vest adds a consistent, hands-free challenge.
There are two primary types of vests you’ll encounter. Fixed-weight vests come with a set amount of weight sewn into the garment, offering simplicity and a streamlined profile. Adjustable-weight vests, on the other hand, feature pockets or sleeves for removable weight blocks (often sandbags or solid metal ingots), allowing you to customize the load for different exercises or as your strength improves. This versatility makes the adjustable fitness vest gear a popular choice for those serious about long-term progress.
The Incredible Benefits of a Weighted Workout Vest
So, why is everyone from elite athletes to everyday fitness enthusiasts suddenly strapping on a weighted workout vest? The benefits are massive and can supercharge almost any fitness goal. It’s about working smarter, not just longer, and the results speak for themselves!
Amplify Strength and Muscular Endurance
Adding weight to bodyweight exercises like pull-ups, push-ups, and squats forces your muscles to recruit more fibers to perform the movement. This increased load directly translates to faster gains in strength and power. Over time, your body adapts to this new normal, so when you take the vest off, regular bodyweight movements feel significantly easier, and your endurance will be on a whole new level.
Turbocharge Your Calorie Burn
This is a big one! Wearing a weighted vest increases the metabolic cost of any activity. Your body has to work harder to move the extra mass, which means it burns more calories. Studies have shown that walking with a vest weighing 15% of your body weight can increase calorie expenditure by over 12%. Imagine applying that boost to a run, a hike, or a high-intensity circuit—you’re essentially getting more fat-burning benefit out of the exact same workout time.
Improve Bone Density and Strength
Weight-bearing exercise is critical for building and maintaining strong bones. A weighted vest is a powerful tool for this, as it increases the load on your skeletal system in a safe, controlled way. This stimulus encourages your body to lay down new bone tissue, increasing its density and making it more resilient to fractures. It’s a fantastic long-term investment in your health, especially as you age.
Unmatched Versatility in Training
Perhaps the best part about this fitness vest gear is its sheer versatility. It can be used to enhance almost any workout. Take it on a walk or run to boost your cardio. Wear it during your bodyweight strength circuits to build muscle. Use it for plyometrics to develop explosive power. It turns your local park into a high-intensity gym and makes your home workouts more challenging than ever before.
How to Choose the Perfect Weighted Fitness Vest: A Buyer’s Framework
Feeling pumped and ready to buy? Awesome! But before you click “add to cart,” let’s walk through the key factors that separate a great vest from a mediocre one. Following this framework will ensure you get a piece of gear you’ll love and use for years.
Step 1: Determine Your Ideal Weight
This is the most important decision you’ll make. The golden rule for beginners is to choose a vest that is approximately 5% to 10% of your body weight. For a 150-pound person, that’s a 7.5 to 15-pound vest. This range provides a meaningful challenge without overwhelming your body, allowing you to maintain perfect form, which is crucial for preventing injury.
If you’re more advanced or have a specific goal like training for a physically demanding job, you might work your way up to 15% or even 20% of your body weight. However, you should only increase the weight once you can comfortably complete your workouts with a lighter load and flawless technique. Answering the popular question, “How many lbs should a weighted vest be?” always starts with your own body weight and current fitness level.
Step 2: Prioritize Fit and Comfort
An ill-fitting vest is a disaster. If it bounces around while you run or shifts during push-ups, it will not only be distracting but can also cause painful chafing and throw off your balance. A secure, snug fit is absolutely non-negotiable.
Look for vests with multiple adjustment points. Padded, adjustable shoulder straps prevent digging into your traps and neck. More importantly, look for one or two adjustable belts or straps around the torso. These are what lock the vest in place and eliminate bouncing.
A good vest should feel like a firm hug, moving as one with your body.
Step 3: Fixed vs. Adjustable – Which is Right for You?
Your choice here depends on your goals and budget. Fixed-weight vests are simple and often more compact. They are perfect if you plan to use the vest for a single purpose, like adding 10 pounds to your daily walks. They are generally less expensive and easy to use right out of the box.
Adjustable-weight vests are the champions of versatility. They come with removable weight packs, allowing you to scale the resistance up or down. This is ideal for someone who wants to use the vest for different activities (e.g., a lighter weight for running, a heavier weight for squats) or for anyone focused on progressive overload. While they cost more upfront, their ability to grow with you makes them a smarter long-term investment for most people.
Pro Tip: When looking at adjustable vests, check the type of weights used. Solid iron or steel blocks are more compact and durable than sand-filled bags, which can sometimes leak or shift inside their pockets over time.
Step 4: Material and Durability
Your vest is going to see a lot of sweat and hard work, so it needs to be built to last. The material affects both comfort and longevity.
Neoprene: This soft, slightly stretchy material is very comfortable against the body and is a great choice for slimmer, lighter vests used for walking or jogging.
Nylon/Cordura: These are highly durable, abrasion-resistant fabrics often found on more heavy-duty, tactical-style vests. They can withstand years of intense use, making them perfect for CrossFit-style workouts or heavy strength training.
Also, consider breathability. Look for vests with mesh panels or moisture-wicking liners to help manage heat and sweat during those grueling sessions. Finally, check the stitching—double or triple stitching at stress points is a great sign of quality construction.
Top Weighted Vest Recommendations for 2026
To help you visualize the different options, here are a few examples of what to look for based on common fitness goals. While these are fictional examples, they represent the best features available in their respective categories.
Best Overall: The “Apex Performance Vest”
This vest represents the peak of versatility and durability. It’s designed for the serious athlete who does a bit of everything, from strength training to metabolic conditioning. It features a plate-carrier style that allows for excellent airflow and freedom of movement.
Features: Adjustable from 10-40 lbs using flat, cast-iron weight blocks. Made from rugged 1000D Cordura fabric with reinforced stitching. Padded, contoured shoulder straps and dual elastic waistbands for a zero-bounce fit.
Pros
Extremely durable and built for intense, long-term use.
Highly adjustable weight range accommodates progression.
Excellent, secure fit allows for dynamic movements like burpees and box jumps.
Cons
Can be more expensive than other models.
The tactical look may not appeal to everyone.
Best for Beginners & Walking: The “Aura Comfort Vest”
For those just starting or who primarily want to enhance walks, jogs, or bodyweight circuits at home, the Aura Comfort Vest is the perfect entry point. Its design prioritizes comfort and a slim profile over massive weight capacity.
Features: Fixed 12 lb weight or adjustable up to 15 lbs with small iron-sand packets. Made from soft, flexible neoprene with a full-front zipper for easy on-and-off. Reflective strips for visibility during early morning or evening walks.
Pros
Extremely comfortable and easy to wear for long periods.
Slim design can be worn discreetly under a hoodie.
Very affordable and user-friendly for beginners.
Cons
Limited weight capacity won’t be enough for advanced strength training.
Neoprene can hold moisture more than nylon.
Best on a Budget: The “Core Essentials Vest”
This vest proves you don’t have to break the bank to get a solid piece of fitness vest gear. It focuses on the fundamentals: a secure fit and adjustable weight, making it a fantastic value for home gym users.
Features: Adjustable up to 20 lbs using small sand-filled bags. Made from a durable nylon material with a simple, effective dual-strap closure system. Compact design that doesn’t restrict movement.
Pros
Excellent price point for an adjustable vest.
Simple, no-frills design is effective and easy to use.
Good starting weight range for most beginners and intermediates.
Cons
Sandbag weights can be bulkier and less durable than solid plates.
May lack the premium comfort features of more expensive models.
Weighted Vest Feature Comparison
Feature
Apex Performance Vest
Aura Comfort Vest
Core Essentials Vest
Weight Range
10-40 lbs (Adjustable)
12-15 lbs (Fixed/Adjustable)
Up to 20 lbs (Adjustable)
Material
1000D Cordura
Neoprene
Nylon
Best For
Serious Athletes, CrossFit
Walking, Jogging, Beginners
Budget-Conscious Users
Fit System
Dual Elastic Waistbands
Zipper & Single Belt
Dual Velcro Straps
Understanding Pricing: How Much Should You Spend?
Investing in weighted vest fitness gear can range from a small purchase to a significant one, so it’s helpful to know what your money gets you. Prices generally fall into three tiers, each catering to different needs and levels of commitment.
Entry-Level ($30 – $70): In this range, you’ll typically find fixed-weight vests or very basic adjustable models, often using sandbags for weight. The materials are functional but may not be the most durable. These are a great, low-risk option if you’re just curious about vest training or plan to use it exclusively for low-impact activities like walking.
Mid-Range ($80 – $150): This is the sweet spot for most people. Vests in this tier offer excellent value, featuring durable materials, comfortable padding, and reliable adjustable weight systems (often with solid metal weights). They provide the versatility and quality needed to support a consistent and progressing fitness routine without the premium price tag.
Premium ($150+): These are the top-of-the-line vests, built for maximum performance and durability. Expect to see materials like 1000D Cordura, laser-cut MOLLE webbing for attachments, and designs inspired by military plate carriers. They offer the most secure fit for high-impact movements and are designed to last a lifetime, making them the choice for dedicated athletes and fitness professionals.
The Pros and Cons of Training with Weighted Vest Fitness Gear
Like any powerful training tool, a weighted vest has incredible upsides and a few potential downsides to be aware of. Understanding both sides helps you use it safely and effectively.
The Advantages (A Quick Recap)
Workout Efficiency: Get more results in less time by increasing the intensity of every movement.
Versatility: Enhances cardio, strength, and endurance training with one piece of gear.
Hands-Free Resistance: Allows for natural movement patterns without needing to hold dumbbells or kettlebells.
Progressive Overload: Easily increase the challenge as you get stronger, preventing plateaus.
Potential Downsides and How to Avoid Them
Increased Risk of Injury: The biggest downside is using too much weight too soon, which can compromise your form and lead to injury. Solution: Start with 5-10% of your body weight and master the form of each exercise before adding more.
Stress on Joints: The extra weight does add more stress to your back, hips, and knees. Solution: Listen to your body. If you have pre-existing joint issues, consult a doctor or physical therapist first. Ensure you have a strong core foundation before adding heavy loads.
Chafing and Discomfort: A poorly fitting vest can rub your skin raw. Solution: Invest in a vest with a secure, adjustable fit. Wear a moisture-wicking shirt underneath to act as a barrier between the vest and your skin.
The BEST & WORST Weighted Vests (I Ranked All of Them!)
For a deep dive into some of the most popular models on the market, check out this fantastic video review from Garage Gym Reviews. It provides a great visual comparison and expert opinions on what makes a vest stand out.
Frequently Asked Questions (FAQ)
Let’s tackle some of the most common questions people have before buying and using a weighted vest.
Do weighted vests do anything for fitness?
Absolutely! They are a highly effective tool for increasing strength, boosting cardiovascular endurance, and burning more calories. By adding resistance to your body, they make every movement more challenging, forcing your body to adapt and become stronger. They are used by everyone from professional athletes to military personnel for a reason—they work.
Is walking 30 minutes with a weighted vest good?
Yes, it’s an excellent low-impact way to significantly boost the benefits of your walk. Walking for 30 minutes with a vest can increase your heart rate, improve your cardiovascular health, and burn substantially more calories than walking without one. It’s a simple and highly efficient way to make your daily walk a more powerful workout.
What will happen if I wear a weighted vest every day?
While it might be tempting, wearing a weighted vest every day, especially for long periods, isn’t recommended. Your body needs time to recover from the added stress on your muscles, joints, and bones. It’s better to incorporate it into your scheduled workouts 2-4 times per week rather than wearing it constantly, which could lead to overuse injuries.
Do weighted vests help lose belly fat?
Weighted vests can contribute to losing belly fat, but not by targeting it directly. You can’t spot-reduce fat. However, by increasing the overall intensity of your workouts, vests help you burn more total calories. When you are in a consistent calorie deficit, your body will lose fat from all over, including your belly.
Is a 20 lb weighted vest too much?
It depends entirely on the individual. For a 250-pound athlete, a 20 lb vest is less than 10% of their body weight and might be a perfect starting point. For a 120-pound beginner, a 20 lb vest is nearly 17% of their body weight and is likely too heavy, increasing the risk of injury. Always follow the 5-10% rule when you’re starting out.
What exercises pair well with a vest?
So many! A weighted vest is fantastic for bodyweight staples like air squats, lunges, push-ups, pull-ups, and planks. It’s also great for dynamic movements like burpees and box jumps (with a secure vest). Finally, it’s a perfect companion for cardio activities like walking on an incline, stair climbing, and running.
Is a weighted vest better than a backpack for walking?
A weighted vest is generally superior to a backpack for fitness purposes. A vest distributes weight evenly around your torso, maintaining your center of gravity and promoting good posture. A backpack pulls your shoulders back and can alter your gait, potentially leading to back and shoulder strain over time. For exercise, a vest is the safer, more ergonomic choice.
Final Thoughts: Is a Weighted Vest Right for You?
If you’re looking for a powerful, versatile, and incredibly effective tool to break through plateaus and elevate your fitness, the answer is a resounding YES! A weighted vest can reignite your motivation and push your body to achieve new levels of strength and endurance. It’s a serious upgrade for anyone committed to their fitness journey.
The key is to choose wisely. Focus on finding a vest that matches your current fitness level and your future goals. Prioritize a snug, comfortable fit above all else, and remember to start with a manageable weight. By following the guidance in this buyer’s guide, you’re well-equipped to find the perfect piece of weighted vest fitness gear that will serve you well for countless workouts to come.
Now go out there, gear up, and get ready to discover just how strong you can become. Your next level of fitness is waiting!
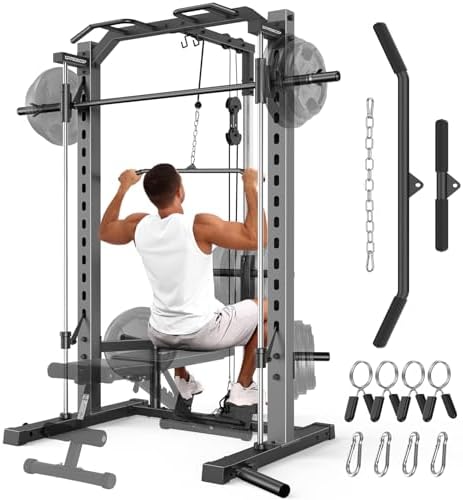
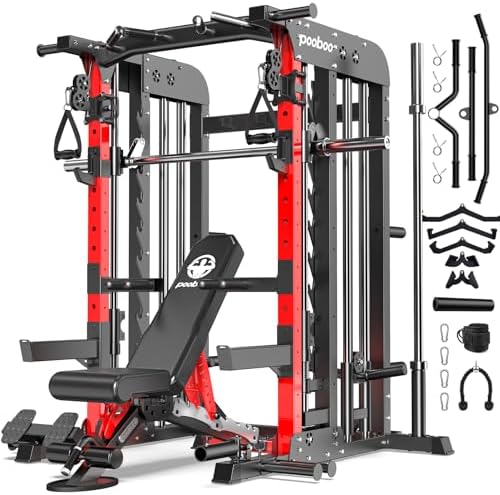
Fitness Gear Squat Rack Buying Guide: How to Choose for Your Home Gym
Building a home gym is one of the most exciting steps you can take on your fitness journey. No more commuting, waiting for equipment, or paying monthly fees! At the heart of any serious home gym is the undisputed king of strength training equipment: the squat rack. A high-quality piece of fitness gear like a squat rack isn’t just a frame of steel; it’s the foundation for building real strength, muscle, and confidence, safely and effectively, right in your own space.
Choosing the right one can feel overwhelming with all the options out there. From half racks to full power cages, the terminology alone can be confusing. But don’t worry, we’re here to break it all down. This guide will walk you through everything you need to know to select the perfect squat rack that fits your space, budget, and lifting goals.
Let’s get you ready to lift.
What to Know
Safety is Paramount: The primary function of a squat rack is to keep you safe. Features like adjustable J-hooks and sturdy spotter arms are non-negotiable for lifting heavy without a human spotter.
Measure Your Space: Before you even think about buying, measure your ceiling height, floor space, and the area around the rack. A rack that doesn’t fit is just an expensive coat hanger.
Versatility is Key: A good squat rack is more than just for squats. It’s a central hub for bench presses, overhead presses, pull-ups, and dozens of other exercises, making it an incredible value.
Weight Capacity Matters: Pay close attention to the rack’s weight rating. Choose one that can handle not just what you lift now, but what you plan to lift in the future.
Attachments Create a Full Gym: Look for racks with options for attachments like dip bars, lat pulldown systems, and landmine posts. These can transform a simple rack into a complete workout station.
What Exactly Is a Fitness Squat Stand or Rack?
A fitness squat stand or rack is a piece of strength training equipment designed to support a barbell during various exercises. At its core, it acts as your mechanical spotter, allowing you to safely perform heavy compound movements like squats, bench presses, and overhead presses without needing another person to assist you. It provides a stable platform to un-rack and re-rack heavy weight, and its safety features are there to catch the bar if you fail a lift.
But not all racks are created equal. They generally fall into three main categories, each with its own footprint and features:
Squat Stands: These are the most basic and space-efficient option. They consist of two independent upright posts, each with a J-hook to hold the barbell. While great for small spaces and lighter weights, they often lack the robust safety features of their larger cousins, like spotter arms.
Half Racks: A step up in stability, a half rack typically has two or four upright posts connected by a base and sometimes an overhead cross-member. They offer adjustable J-hooks and safety spotter arms that extend forward, providing a good balance of safety and a relatively compact footprint.
Power Racks (or Power Cages): This is the gold standard for safety and versatility. A power rack is a full cage with four upright posts, creating an enclosure you lift inside of. The safety pins or straps run from the front to the back posts, meaning the barbell is completely contained within the rack, offering the highest level of protection.
Ultimately, every type of gym squat rack serves the same fundamental purpose: to enable safe and effective progressive overload, which is the key to getting stronger over time.
The Awesome Benefits: Why Your Home Gym Needs One
Investing in squat rack equipment is one of the single best decisions you can make for your long-term fitness. The benefits go far beyond just being able to squat at home. It truly becomes the centerpiece of your training, unlocking a new level of intensity and consistency. Let’s break down why it’s such a critical piece of gear.
First and foremost is unparalleled safety. This is the big one. When you’re pushing your limits with heavy weight, the risk of failure is always there. Spotter arms or safety pins are designed to catch the barbell if you can’t complete a rep.
This safety net gives you the confidence to push for that extra rep or add another 5 pounds to the bar, which is where real progress happens. You can train hard, alone, without fear of getting pinned under a heavy bench press or failing a squat.
Next up is incredible versatility. A squat rack is a portal to a full-body workout. Of course, you can perform front and back squats, but that’s just the beginning. You can slide in a bench for flat, incline, and decline bench presses.
You can perform standing overhead presses, rack pulls for back development, and use the frame for inverted rows. Most racks come with a built-in pull-up bar, instantly adding a world of back and bicep exercises like pull-ups, chin-ups, and hanging leg raises.
Finally, it facilitates consistent progressive overload. The secret to getting stronger is consistently lifting more weight or doing more reps over time. A fitness gear squat rack makes this process simple and efficient. You have a stable base to work from, and the adjustable J-hooks allow you to set the bar at the perfect height for any lift, minimizing energy wasted on getting the bar into position.
This focused, safe environment is built for one thing: getting results.
How to Choose the Perfect Gym Squat Rack for You
Alright, you’re sold on the benefits. Now comes the fun part: picking the right one. Choosing the best gym squat rack for your home is a personal decision that depends on your space, goals, and budget. Getting this right means you’ll have a piece of equipment you’ll love and use for years.
Let’s walk through the key factors to consider.
Space and Footprint: Measure Twice, Buy Once!
This is the most critical first step. A rack is useless if it doesn’t fit in your room. Get out a tape measure and check three things: width, depth, and height. Remember to account for the barbell (a standard Olympic barbell is 7 feet long) and the space you’ll need to load weight plates on each side.
You’ll also need room to move around the rack comfortably.
Ceiling height is a common oversight. If you plan on doing pull-ups or overhead presses inside the rack, make sure you have enough clearance above your head at the top of the movement. A good rule of thumb is to have at least a foot of clearance above the rack’s total height.
Weight Capacity: Know Your Limits (and Goals!)
Every rack has a maximum weight capacity, which tells you how much weight it can safely hold. This number is a direct reflection of the steel’s thickness and the quality of the construction. For most home gym users, a rack rated for 700-1,000 lbs is more than enough. It provides a huge runway for future progress.
Don’t just think about what you lift today. Think about your goals for the next five years. Buying a rack that can grow with you is a much smarter investment than buying a cheaper, lower-capacity rack that you’ll outgrow in a year. A solid rack is a long-term purchase.
Safety Features: The Non-Negotiables
This is where you don’t want to compromise. The two most important safety features are the J-hooks (or J-cups) and the spotter arms. J-hooks are the attachments that hold the barbell on the uprights. Look for ones that are lined with a protective plastic (UHMW) to prevent scratching your barbell’s knurling.
Spotter arms (or pins/straps) are your lifeline. These should be easy to adjust and made from thick, solid steel. Pin-pipe systems are a common and reliable option, while safety straps are a premium feature that are quieter and gentler on the barbell if you have to drop it.
Pro Tip: Check the hole spacing on the uprights, often called Westside spacing. Racks with 1-inch spacing through the bench press zone allow for much finer adjustments, helping you set the J-hooks and safety pins at the perfect height for your body.
Steel Gauge and Construction
The thickness of the steel used in the frame is a key indicator of quality and durability. This is measured in gauge; the lower the number, the thicker the steel. For a home gym, look for racks made from at least 12-gauge steel. The industry standard for high-quality, commercial-style racks is 11-gauge steel.
Also, pay attention to the size of the uprights. Common sizes are 2″x2″, 2″x3″, and 3″x3″. Larger uprights generally mean a more stable rack and a wider variety of compatible attachments. The 3″x3″ size with 11-gauge steel is often considered the gold standard for serious lifters.
Attachments and Expandability
A basic rack is fantastic, but a rack that can grow with you is even better. Many modern racks are designed as modular systems. Think about what attachments you might want now or in the future. Common add-ons include:
Pull-Up Bar: Most racks include one, but some offer multi-grip options.
Dip Station: An attachment that lets you perform dips for chest and triceps.
Lat Pulldown/Low Row: A cable system that adds dozens of new exercises.
Landmine Attachment: A sleeve that holds one end of the barbell for rotational exercises.
Choosing a rack from a brand with a large ecosystem of compatible attachments ensures your initial investment can evolve into a complete home gym over time.
Top Squat Rack Recommendations for Every Lifter
Navigating the market can be tough, so we’ve broken down a few archetypes of what to look for based on your needs and budget. These represent common tiers you’ll find when shopping for squat rack equipment.
The Budget-Friendly Starter: The Foundation Rack
This type of rack is perfect for beginners or those on a tight budget. It focuses on the essentials: a sturdy frame, reliable J-hooks, and solid safety pins. It likely won’t have a lot of bells and whistles, but it will provide a safe environment to master the fundamental lifts.
Best For: New lifters, small spaces, budget-conscious buyers.
Typical Features: 12 or 14-gauge steel, 2″x2″ uprights, 500-700 lb capacity, basic pull-up bar.
Pros: Affordable, smaller footprint, gets the job done for essential lifts.
Cons: Lower weight capacity, fewer attachment options, may feel less stable with very heavy weight.
The All-Rounder Powerhouse: The Competitor Cage
This is the sweet spot for most serious home gym owners. It offers excellent quality, stability, and a wide range of attachment options without the commercial-grade price tag. This rack is built to handle heavy weight and will last a lifetime.
Best For: Intermediate to advanced lifters, those who want a long-term solution.
Typical Features: 11-gauge steel, 2″x3″ or 3″x3″ uprights, 1,000 lb+ capacity, multi-grip pull-up bar, wide attachment ecosystem.
Pros: Extremely stable and durable, highly versatile, great value for the price.
Cons: Larger footprint, higher initial cost, can be heavy and difficult to assemble.
The Premium Beast: The Pro-Series Rack
For those who want the absolute best, this is it. These racks are often commercial-grade, featuring the thickest steel, premium finishes, and innovative features. They are overbuilt for most users but offer an unparalleled lifting experience and peace of mind.
Best For: Advanced athletes, personal training studios, those who want zero compromises.
Typical Features: 11-gauge or even 7-gauge steel, 3″x3″ uprights, 1,500 lb+ capacity, premium features like safety straps, laser-cut numbers, and custom colors.
Pros: The most stable and durable option available, endless customization, looks incredible.
Cons: Very expensive, large and heavy, overkill for the average lifter.
Squat Rack Feature Comparison
Feature
The Foundation Rack
The Competitor Cage
The Pro-Series Rack
Price Range
$250 – $450
$500 – $900
$1,000+
Steel Gauge
12-14 Gauge
11-Gauge
11-Gauge or Thicker
Upright Size
2″x2″
2″x3″ or 3″x3″
3″x3″
Weight Capacity
~700 lbs
1,000+ lbs
1,500+ lbs
Attachments
Limited
Extensive
Unlimited
Making the Most of Your New Squat Rack
Once your awesome new fitness gear squat rack is assembled, it’s time to put it to work! To get the best results, you need a solid plan and a way to track your progress. A rack is a tool, and how you use it determines your success.
Essential Exercises to Master
Your rack is the perfect station to master the most effective strength-building exercises on the planet. Focus on perfecting your form with these foundational movements:
Barbell Back Squat: The king of leg exercises. Set the safety pins just below the bottom of your range of motion.
Barbell Bench Press: The ultimate chest builder. The safety pins will save you if you can’t press the weight back up.
Standing Overhead Press (OHP): A true test of shoulder strength. Set the J-hooks at shoulder height to easily get the bar into position.
Pull-Ups/Chin-Ups: Use the built-in bar to build a powerful back and arms.
Tracking Your Progress for Maximum Gains
Lifting weights is only half the battle. To ensure you’re consistently making progress, you need to track your workouts. This means logging your exercises, sets, reps, and the weight you used. But you can go deeper to truly optimize your training.
Monitoring your body’s response to these intense workouts provides invaluable feedback. Using a fitness tracker can show you how hard you’re working during a tough set of squats by monitoring your heart rate. This data helps you manage your rest periods and ensure you’re pushing hard enough to stimulate growth, but not so hard that you risk overtraining. For example, a device from Wahoo Fitness can give you real-time data on your effort, helping you make smarter decisions in every single workout.
Tracking this data over time shows you how your fitness is improving, which is incredibly motivating.
Pricing: What Should You Expect to Pay?
The cost of a gym squat rack can vary dramatically, from a couple of hundred dollars to several thousand. Understanding what you get for your money is key to making a smart purchase. Let’s break down the typical price brackets.
Entry-Level ($250 – $450): In this range, you’ll find basic squat stands and budget-friendly half racks. They will be made of thinner steel (12-14 gauge) with smaller 2″x2″ uprights. While perfectly functional for beginners, they may have lower weight capacities and lack the stability and attachment options of more expensive models.
Mid-Range ($500 – $900): This is the sweet spot for most home gym enthusiasts. Here you’ll find high-quality power racks and robust half racks made from 11-gauge steel with 2″x3″ or 3″x3″ uprights. These racks are built to last a lifetime, can handle very heavy weight, and typically have a large ecosystem of available attachments.
High-End ($1,000+): This category includes commercial-grade racks and premium, feature-rich models. You’re paying for the thickest steel, precision manufacturing (like laser-cut numbering), premium safety features like straps, and often customization options like colors. For most people, this is more than they need, but if you want the absolute best, this is where you’ll find it.
Pro Tip: Don’t forget to budget for shipping! Racks are heavy and can have significant shipping costs. Also, factor in the cost of a good barbell, weight plates, and an adjustable bench to complete your setup.
Pros and Cons of Owning a Squat Rack
Like any major purchase, it’s wise to weigh the good against the bad. While a squat rack is an amazing tool, it’s important to go in with realistic expectations.
Pros
Safety: The ability to push your limits with heavy weights without a human spotter is the single biggest advantage.
Convenience: Your gym is always open. You can work out whenever you want, for as long as you want, without any travel time.
Versatility: A single piece of equipment unlocks hundreds of exercise variations for a full-body workout.
Cost-Effective in the Long Run: While the upfront cost is high, it can be cheaper than years of commercial gym membership fees.
Cons
Space Requirement: Racks are large and require a significant amount of dedicated space, including high ceilings.
High Initial Cost: A quality rack, barbell, and weights represent a substantial upfront investment.
Assembly: These are heavy, bulky items that can be challenging to assemble. You’ll likely need a second person to help.
Can Be Noisy: Dropping weights can be loud, which might be an issue if you live in an apartment or have family members sensitive to noise.
Frequently Asked Questions
Here are some of the most common questions people have when they start shopping for a squat rack. Getting clear answers can help you make a more confident decision.
Can you bench press in a squat rack?
Absolutely. This is one of its primary functions. By sliding an adjustable bench inside the rack and setting the safety pins just above your chest, you can safely perform bench presses. The safety pins will catch the bar if you fail a rep, preventing serious injury.
This makes the squat rack an essential tool for training your chest safely at home.
What is the difference between a power rack and a squat rack?
The terms are often used interchangeably, but there’s a technical difference. A “squat rack” or “squat stand” usually refers to a more open design with two uprights (a half rack). A “power rack,” also called a power cage, has four uprights, creating a full cage you lift inside of. Power racks offer the highest level of safety because the barbell is fully contained.
Do I need to bolt my squat rack to the floor?
It depends on the rack and your type of training. Many high-quality racks are heavy and stable enough on their own for general lifting. However, if you plan on doing dynamic movements like kipping pull-ups or using band attachments that pull on the frame, bolting it down is highly recommended for maximum stability. Always check the manufacturer’s recommendations; some designs require it for safety.
How much weight can a typical home gym squat rack hold?
Weight capacity varies widely by model. A budget-friendly rack might be rated for around 500-700 pounds, which is plenty for most beginners and intermediates. A mid-range to high-end rack, typically made with 11-gauge steel, will often be rated for 1,000 pounds or more. Always choose a rack with a capacity well above your current and future lifting goals.
Final Thoughts
Choosing the right fitness gear squat rack is a game-changing decision for your home gym and your overall strength journey. It’s more than just a piece of metal; it’s an investment in your health, safety, and potential. By carefully considering your space, goals, and budget, you can find the perfect rack that will serve as your trusted training partner for years to come.
Remember to prioritize safety features, check the weight capacity, and measure your space before you buy. Whether you choose a compact half rack or a fully-loaded power cage, you’re taking a massive step toward building the home gym of your dreams. Now go out there, lift smart, lift safe, and get strong!
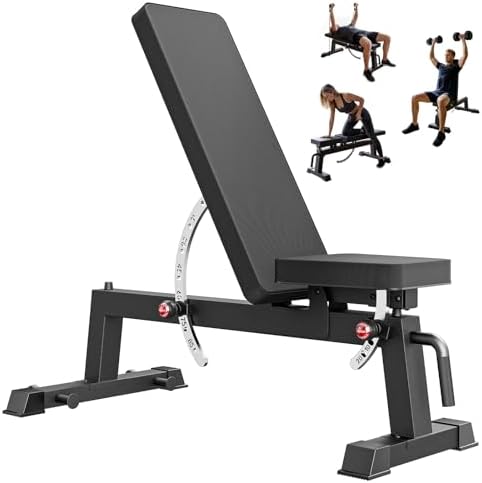
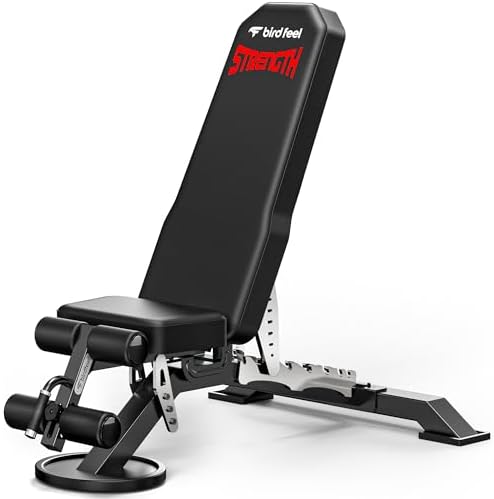
Fitness Gear Adjustable Weight Bench: A Buyer’s Guide for Home Gyms
Are you ready to seriously elevate your home workouts. If you’re building a space to crush your fitness goals, there’s one piece of equipment that stands above the rest as the true heart of the gym: a high-quality fitness gear adjustable weight bench. This isn’t just a place to sit; it’s the versatile foundation for countless exercises that will build strength, sculpt muscle, and transform your physique. Forget flimsy, wobbly setups—a solid bench is your ticket to safer, more effective training sessions right from the comfort of your home.
It’s the single best investment you can make for your fitness journey.
Choosing the right one can feel overwhelming with all the options out there, but don’t worry, we’ve got your back! This guide will walk you through everything you need to know, from essential features and weight capacities to budget considerations and the best exercises to get you started. Let’s build that dream home gym, starting with the perfect bench!
What to Know
Versatility is Key: The primary advantage of an adjustable weight bench is its ability to switch between flat, incline, and decline positions, allowing you to target a massive range of muscle groups with just one piece of equipment.
Focus on Core Features: When choosing, prioritize three things: weight capacity (your body weight + the weight you lift), the number of adjustment angles, and overall stability. A wobbly bench is a dangerous bench.
Budget Accordingly: Entry-level benches are great for beginners using lighter weights, but if you plan on serious, heavy lifting, investing in a mid-range or premium bench with a higher weight capacity and better construction is crucial for safety and longevity.
Form and Function Go Hand-in-Hand: A great bench is only effective if used correctly. Mastering proper form on exercises like presses, rows, and core work will maximize your results and prevent injuries.
What Exactly Is a Fitness Gear Adjustable Weight Bench?
At its core, a fitness adjustable bench is a simple yet brilliant piece of workout equipment. Unlike its static cousin, the flat bench, an adjustable bench features a backrest and often a seat that can be moved into various angles. This functionality allows you to position your body for a huge variety of strength training exercises, making it an incredibly efficient tool.
Think of it as the command center of your workout. The back pad typically moves from a flat position (0 degrees) all the way up to a fully upright position (around 85-90 degrees), with several incline stops in between. Many models, often called FID benches (Flat-Incline-Decline), also offer decline positions, which are fantastic for targeting the lower chest and performing challenging core exercises.
The adjustment mechanism is usually one of two types: a ladder-style system, where you lift the back pad and rest it on one of several rungs, or a pin-lock system, where you pull a pin, move the pad, and lock it back into place. Both are effective, but ladder systems are often faster to adjust. This simple piece of fitness gear unlocks dozens of exercises that would otherwise be impossible, making it the most valuable player in any home gym setup.
The Awesome Benefits: Why You Absolutely Need an Adjustable Bench
So, why all the excitement around a bench? Because a good weight bench for workouts does more than just support you; it amplifies every aspect of your training. It’s the difference between a basic routine and a truly comprehensive strength program.
Unmatched Versatility for a Full-Body Workout
This is the number one reason to get an adjustable bench. The ability to change the angle of the bench instantly changes the muscles you’re targeting. For example, with just a pair of dumbbells, you can perform:
Incline Press: This angle shifts the focus to your upper chest and the front of your shoulders (anterior deltoids).
Flat Press: The classic exercise that targets the middle portion of your pectoral muscles.
Decline Press: This hits the lower chest, giving you a complete chest workout that a flat bench alone can’t provide.
And that’s just the chest! You can use it for seated shoulder presses, dumbbell rows for your back, bicep curls, tricep extensions, and even leg exercises like Bulgarian split squats. One bench opens the door to a true full-body routine.
Maximize Your Space (and Your Gains!)
In a home gym, space is precious. An adjustable bench is the ultimate space-saver because it effectively replaces multiple pieces of equipment. You don’t need a separate incline press machine, a shoulder press machine, and a decline crunch board. Your bench does it all!
This is perfect for anyone working out in a garage, a spare bedroom, or an apartment. Many models are even designed to fold up for easy storage, allowing you to reclaim your floor space after your workout is done. It’s maximum functionality in a minimal footprint.
Promote Proper Form and Safety
Trying to do a dumbbell press on the floor or propped up on unstable chairs is a recipe for disaster. A sturdy fitness adjustable bench provides the stable support your spine needs to handle heavy weight safely. It allows for a full range of motion, which is essential for muscle activation and growth.
By supporting your back and putting your body in the optimal position for each lift, you drastically reduce the risk of injury. This stability gives you the confidence to push yourself and progressively add more weight, which is the key to making continuous progress.
Buyer’s Guide: How to Choose the Perfect Adjustable Weight Bench for Your Workouts
Feeling pumped to pick one out? Awesome! But before you click “buy,” let’s break down the key features to look for. Choosing the right adjustable weight bench is about matching the equipment to your body, your space, and your lifting ambitions.
Weight Capacity: Don’t Skip This Number!
This is arguably the most important safety feature. The weight capacity listed by the manufacturer is the total combined weight the bench can support—that means your body weight PLUS the weight you are lifting. Never underestimate this!
For Beginners (500-600 lbs total capacity): If you’re just starting out or using lighter dumbbells, a bench in this range is perfectly adequate and budget-friendly.
For Intermediate/Advanced Lifters (700-1,000+ lbs total capacity): If you’re serious about strength training and plan to lift heavy, you need a bench that can keep up. Investing in a higher capacity ensures your safety as you get stronger.
Always err on the side of a higher capacity. It’s better to have a bench that’s stronger than you need than one that could fail under pressure.
Adjustability and Angles: The More, The Merrier?
Look at the number of available back pad and seat positions. More options give you more exercise variety and allow you to find the perfect angle for your body.
Back Pad: A good bench will offer at least 6-8 back positions, covering decline, flat, and multiple incline angles up to a near-vertical 85 or 90 degrees for shoulder presses.
Seat Pad: An adjustable seat is a non-negotiable feature! When you set the back pad to an incline, you need to be able to angle the seat up too. This locks your body in place and prevents you from sliding down the bench during your set.
Stability and Construction: The Wobble Test
Stability is everything. A wobbly bench is distracting and dangerous. Look for a frame made from heavy-gauge steel (the lower the gauge number, the thicker the steel). A wide front and rear base will also prevent tipping and rocking during heavy lifts. Check for rubber end caps on the feet, which protect your floor and keep the bench from sliding.
Pro Tip: Look for a bench with a three-point base design (one foot in the front, two in the back). This structure is often more stable on slightly uneven floors, like in a garage, compared to a four-point design.
Padding and Upholstery: Comfort Meets Durability
Comfort matters, especially during a tough set. The pad should be firm and supportive, not soft and squishy. A pad thickness of 2 to 2.5 inches is a good standard. The upholstery should be a durable, sweat-resistant, and tear-resistant vinyl that’s easy to wipe clean. A grippy texture is a plus, as it helps you feel more secure.
Size and Footprint: Will It Fit?
Before you buy, measure your workout space! Check the bench’s dimensions (length, width, and height) to ensure it fits comfortably with enough room around it for you to move and lift. If space is tight, look for a foldable model. These benches often have a quick-release pin that allows them to be collapsed and stored upright against a wall or under a bed.
Top Recommendations: A Look at Popular Options
While specific models change, adjustable benches generally fall into a few key categories. Understanding these archetypes will help you identify the right fit for your home gym, no matter the brand.
The Budget-Friendly Beginner’s Choice
This is the perfect starting point for anyone new to lifting or working with a tight budget. These benches typically feature a weight capacity around 500-600 lbs, offer basic flat, incline, and sometimes decline positions, and often have a foldable design for easy storage. They are ideal for dumbbell workouts and general fitness. Brands like FLYBIRD and Marcy often have popular models in this category.
The All-Rounder for Home Gym Enthusiasts
This is the sweet spot for most people. Mid-range benches offer a significant upgrade in quality and durability. You’ll find weight capacities in the 700-1,000 lb range, more adjustment angles for both the back and seat, thicker steel frames, and denser, more comfortable padding. These are built to handle more serious training and are a fantastic long-term investment. Look at offerings from brands like REP Fitness and Titan Fitness to see great examples.
The Heavy-Duty Powerlifter’s Pick
For those who move serious weight, only the best will do. These premium, often commercial-grade benches boast weight capacities of 1,000 lbs or more. They are constructed with heavy-gauge steel, have minimal “pad gap” (the space between the seat and back pads), and are incredibly stable. They are heavier and usually don’t fold, but they provide the rock-solid foundation needed for maximal lifts. Rogue Fitness is a well-known name in this high-end space.
Comparison at a Glance
Feature
Beginner’s Choice
The All-Rounder
Heavy-Duty Pick
Weight Capacity
500-600 lbs
700-1,000 lbs
1,000+ lbs
Adjustments
Basic (4-6 positions)
More (7-10+ positions)
Precision adjustments
Construction
Lighter steel, often foldable
Heavier-gauge steel
Commercial-grade steel
Best For
Light-to-moderate dumbbell work
Serious home gym training
Powerlifting & heavy lifting
Price Range
$100 – $200
$250 – $500
$500+
Understanding Pricing: What Should You Expect to Pay?
The price of a fitness gear adjustable weight bench can vary widely, but you generally get what you pay for. Here’s a breakdown of what to expect in different price brackets.
Entry-Level Benches ($100 – $200)
In this range, you’ll find solid options for beginners. These benches are typically lighter, foldable, and have lower weight capacities. They are perfect for dumbbell exercises and general fitness but may not feel stable enough for heavy barbell work. They get the job done without breaking the bank.
Mid-Range Benches ($250 – $500)
This is the ideal price range for most dedicated home gym users. For this price, you get a massive jump in stability, build quality, and features. Expect higher weight capacities (often 1,000 lbs), thicker padding, more adjustment points, and a much sturdier feel. This is a true investment piece that will last for years of hard training.
Pro Tip: Keep an eye out for holiday sales events like Black Friday. Fitness equipment companies often offer significant discounts during these times, allowing you to get a high-quality, mid-range bench for a much lower price.
Premium/Commercial-Grade Benches ($500+)
This is the top tier. These benches are built to commercial gym standards with the thickest steel, best upholstery, and most precise adjustment mechanisms. They are designed for a lifetime of heavy use without compromise. If you’re a competitive lifter or simply want the absolute best in terms of safety and stability, this is where you should be looking.
Getting the Most Out of Your Fitness Adjustable Bench
Once you have your awesome new bench, it’s time to put it to work! The sheer number of exercises you can do is incredible. Here are a few essentials to build a powerful routine.
Essential Exercises to Master
Incline Dumbbell Press: The king of upper chest builders.
Flat Dumbbell or Barbell Press: A foundational movement for chest size and strength.
Single-Arm Dumbbell Row: Use the bench for support by placing one knee and one hand on it. This isolates your back muscles for a great V-taper.
Seated Dumbbell Shoulder Press: The upright position provides crucial back support, allowing you to press heavier weight safely.
Decline Crunches/Sit-ups: Hook your feet under the leg attachment (if it has one) for an intense abdominal workout.
Bulgarian Split Squats: Place your back foot on the bench for one of the best single-leg exercises to build powerful glutes and quads.
Watch and Learn: A Visual Guide
Sometimes, seeing is believing. Watching a review or demonstration of a bench can give you a much better feel for how the adjustment mechanisms work, how stable it looks in action, and whether it might be a good fit for you. Check out this review to see a popular model put through its paces.
Pros and Cons: An Honest Look
Like any piece of equipment, an adjustable bench has its strengths and a few things to be aware of. Let’s break it down.
The Amazing Pros
Incredible Versatility: One bench can be used for hundreds of exercises targeting every major muscle group.
Space-Efficient: It replaces the need for multiple, larger machines, saving valuable floor space.
Enhanced Safety: Provides a stable base of support for your back, reducing the risk of injury during heavy lifts.
Promotes Full Range of Motion: Allows for deeper stretches and contractions than floor-based exercises, leading to better muscle growth.
The Potential Cons
The “Pad Gap”: On many adjustable benches, there is a small gap between the seat pad and the back pad. When lying flat, some users find this gap uncomfortable. Higher-end models are designed to minimize this.
Higher Cost: They are more expensive than a basic flat bench, which can be a factor for those on a very tight budget.
Stability on Cheaper Models: Very cheap, low-quality benches can be wobbly and feel unsafe, which is why it’s important to read reviews and invest in a reputable brand.
Weight and Portability: They are generally heavier and bulkier than flat benches, making them a bit harder to move around your gym space.
Frequently Asked Questions (FAQ)
Is an adjustable weight bench worth it?
Absolutely! For the vast majority of people building a home gym, an adjustable weight bench is one of the best investments you can make. Its versatility allows for a complete, full-body workout routine with just a single piece of equipment and some free weights. It offers far more exercise variety than a simple flat bench, making it well worth the extra cost.
What is a good weight capacity for a home gym bench?
A good starting point for most people is a bench with at least a 600-700 lb total weight capacity. This provides a safe margin for the average person’s body weight plus the dumbbells or barbell they’ll be using. If you are a larger individual or plan on lifting very heavy (e.g., bench pressing over 250 lbs), you should look for a bench with a capacity of 1,000 lbs or more for maximum safety.
Can you do sit-ups on an adjustable bench?
Yes, and it’s a fantastic way to target your abs! If your bench has a decline setting and a leg hold-down attachment, you can perform decline sit-ups and crunches. This position increases the range of motion and puts more tension on your abdominal muscles, making the exercise more challenging and effective than doing it on a flat surface.
How much should I spend on a weight bench?
For most serious home gym users, the sweet spot is between $250 and $500. In this range, you can find a high-quality, durable, and stable bench that will last for many years. While you can find options for under $200, they often compromise on stability and weight capacity. Benches over $500 are typically commercial-grade and are best for competitive powerlifters or those who want the absolute best.
What’s the difference between a FID bench and a standard adjustable bench?
FID stands for Flat, Incline, and Decline. A FID bench offers all three position types. Some more basic or budget-friendly adjustable benches might only offer flat and incline (FI) positions. If you want the ability to do decline presses and decline core work, you need to make sure you are specifically buying a FID bench.
Final Thoughts: Your Next Step to a Better Workout
Choosing the right fitness gear adjustable weight bench is a huge step toward building an effective and exciting home gym. It’s more than just a piece of steel and padding; it’s the foundation upon which you’ll build a stronger, healthier version of yourself. By focusing on your personal needs—your lifting goals, your available space, and your budget—you can confidently select a bench that will serve you well for years to come.
Remember to prioritize safety and stability above all else. A solid, reliable weight bench for workouts gives you the confidence to push your limits and chase new personal records. Now you have all the information you need to make a great choice. Go find the bench that’s right for you and get ready to transform your training.
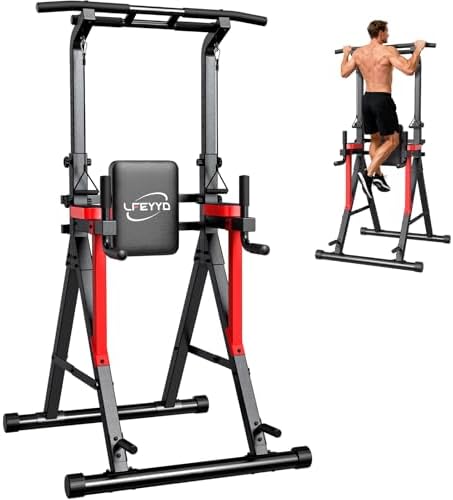
Fitness Gear Pro Half Rack Review: The Ultimate Home Gym Upgrade?
You’ve cleared a space in the garage, you’re tired of crowded commercial gyms, and you’re ready to build a personal temple of strength. The centerpiece of this new setup. A power rack. But not just any rack—you need something sturdy, versatile, and space-conscious.
This is where the fitness gear pro half rack enters the conversation, a popular choice for home gym builders everywhere. It promises the core functionality of a full power cage without dominating your entire room, but does it truly deliver.
This review will break down everything you need to know about this popular piece of equipment. We’re going beyond the marketing copy to look at the real-world performance, features, and limitations. By the end, you’ll know with confidence whether this is the perfect foundation for your fitness goals or if you should be looking at other options. Let’s get lifting!
What You’ll Learn
Core Functionality: The Fitness Gear Pro Half Rack is designed as a versatile, space-saving centerpiece for home gyms, ideal for foundational lifts like squats, bench presses, and overhead presses.
Key Audience: It’s best suited for beginner to intermediate lifters who need a reliable and safe setup without the massive footprint or high cost of a full commercial power rack.
Important Limitations: While affordable, its weight capacity (typically around 600 lbs) and non-standard attachment compatibility are crucial factors to consider for advanced athletes.
Value Proposition: This rack offers an excellent balance of safety, functionality, and price, making it one of the most accessible entry points into serious home-based strength training.
What Exactly is a Fitness Gear Pro Half Rack?
A half rack is the brilliant middle ground between a simple squat stand and a full, four-post power cage. It gives you two sturdy uprights, adjustable J-hooks to hold your barbell, and most importantly, adjustable safety spotter arms. This design provides the safety needed to push yourself on heavy lifts while maintaining an open, less claustrophobic feel and a significantly smaller footprint than a full cage. It’s the perfect solution for a garage or basement gym where every square foot counts.
The Fitness Gear Pro Half Rack is a specific model line, often found at major retailers like Dick’s Sporting Goods, that has become a go-to for home gym enthusiasts. It’s built to be an accessible, all-in-one solution. This isn’t a commercial-grade, 1,500 lb capacity beast you’d find in a university weight room. Instead, it’s engineered specifically for the home user who wants to perform the essential barbell movements safely and effectively.
Its target audience is clear: individuals starting their strength journey, intermediates who have outgrown basic equipment, and anyone looking for a reliable fitness half rack without breaking the bank. It provides a secure environment to progressively overload your squats, bench presses, and overhead presses, which are the absolute cornerstones of building strength and muscle.
Unpacking the Key Features: What Makes This Pro Half Rack Stand Out?
When you’re investing in a piece of equipment that will hold hundreds of pounds over your body, the details matter. The Fitness Gear Pro Half Rack packs a ton of value into its frame, focusing on the essentials that deliver a safe and effective workout. Let’s break down the core components that make this rack a popular choice.
Solid Steel Construction & Weight Capacity
The foundation of any good gym gear rack is its steel. This rack is typically built with 2-inch by 2-inch steel uprights, which has become a common standard for home-use equipment. While not as beefy as the 3×3 steel found on premium racks, it’s more than sufficient for its intended user base. The key number everyone looks for is the weight capacity, which for most models of the Fitness Gear Pro line is rated at a solid 600 pounds.
This provides plenty of room for growth for most lifters to build impressive strength over many years.
Integrated Multi-Grip Pull-Up Bar
This isn’t just a squat rack; it’s a bodyweight training station, too. The integrated pull-up bar is a massive feature that adds incredible versatility. It allows you to perform pull-ups, chin-ups, neutral-grip pull-ups, and hanging leg raises without needing any extra equipment. Having this built directly into the frame saves space and money, turning your rack into a comprehensive upper body and core training tool.
It’s an essential feature that dramatically increases the value of the entire unit.
Adjustable J-Hooks and Safety Spotter Arms
Safety is the number one reason to buy a rack, and these two components are the heroes of the story. The J-hooks are the adjustable brackets that hold the barbell. You can set them at the perfect height for re-racking the bar after a set of squats or for setting your starting position for a bench press. The long, sturdy safety spotter arms are your personal, 24/7 spotter.
Set them just below the bottom of your range of motion, and if you fail a lift, you can safely set the bar down on them instead of getting pinned. This feature alone provides the confidence to push for that extra rep and truly challenge yourself.
Built-in Plate Storage Pegs
One of the most underrated features of this rack is the inclusion of weight plate storage pegs on the rear uprights. This is a fantastic design choice for home gyms. It keeps your plates organized and off the floor, saving space and reducing trip hazards. More importantly, loading your plates onto these pegs adds significant weight and stability to the base of the rack, making it feel even more solid and secure during heavy lifts and pull-ups.
It’s a smart, dual-purpose feature that adds both convenience and stability.
The Real-World Benefits: Transforming Your Training Routine
Owning a fitness gear pro half rack is about more than just having a place to put your barbell. It’s about fundamentally changing how you approach your training. This single piece of equipment can be the catalyst for incredible progress, providing the safety, versatility, and structure you need to get seriously strong.
Safety and Confidence to Lift Heavy
This is the biggest benefit, hands down. How many times have you stopped a set early at a commercial gym because you didn’t have a spotter and were afraid of failing. The safety arms on a half rack eliminate that fear. They give you a safety net, allowing you to push your squats and bench presses to true muscular failure.
This is where growth happens. That confidence to attempt a new personal record, knowing you have a backup plan, is what separates maintaining from progressing.
Unlocking a Universe of Exercises
The half rack is the hub for the most effective strength-building exercises on the planet. With just the rack, a barbell, and a bench, you can perform the “big three” powerlifting movements: squat, bench press, and deadlift (using the floor in front of the rack). But it doesn’t stop there. You can do overhead presses, rack pulls for back thickness, barbell rows, and use the pull-up bar for a variety of upper body movements.
It truly is the foundation upon which countless effective workout programs are built.
Cost-Effective and Space-Efficient
Let’s be real: building a home gym can get expensive and take up a lot of room. The pro half rack hits the sweet spot. It provides 90% of the functionality of a full power cage for a fraction of the price and a much smaller footprint. This makes it an incredibly efficient investment.
You get a robust, safe, and versatile piece of equipment that serves as your gym’s command center without having to spend thousands of dollars or dedicate an entire two-car garage to your setup.
Pro Tip: Use the safety spotter arms for more than just safety. Set them at various heights to perform partial reps like rack pulls or pin presses. These exercises are fantastic for strengthening specific weak points in your main lifts and breaking through plateaus.
How to Choose the Right Fitness Half Rack for You
While the Fitness Gear Pro Half Rack is a fantastic option, it’s essential to make sure any rack you choose is the right fit for your specific needs. Thinking through these key factors will ensure your investment serves you well for years to come. This is your guide to selecting the perfect fitness half rack for your space and goals.
Assess Your Space Meticulously
Before you even click “add to cart,” grab a tape measure. You need to know three critical dimensions: height, width, and depth. The most overlooked dimension is height. Ensure you have enough ceiling clearance not only for the rack itself but also to perform a full pull-up without hitting your head.
For width, remember to account for a standard 7-foot Olympic barbell, which needs about 8.5 to 9 feet of wall space to load plates comfortably. Finally, measure the depth to ensure you have room to walk around the rack and move a bench in and out.
Know Your Lifting Goals & Numbers
Be honest about your current strength and future ambitions. If you’re a beginner squatting 135 pounds, a rack with a 600-pound capacity is more than enough to last you for years. However, if you’re already squatting over 400 pounds and have aspirations to compete in powerlifting, you might want to invest in a rack with a higher capacity (1,000+ lbs) and heavier-gauge steel (like 3×3 11-gauge) for long-term peace of mind. Match the equipment to your goals.
Consider Attachments and Expandability
Think of a rack as a system. What else do you want it to do. Many modern racks are compatible with a huge ecosystem of attachments like dip bars, landmine posts, monolift arms, and more. This is one area where budget-friendly racks like the Fitness Gear model can be limited.
They often use non-standard hole sizing, meaning you can only use attachments made specifically for that rack (which are often few and far between). If you dream of adding lots of attachments later, you may want to invest in a rack from a brand like Rogue or Rep Fitness that uses standardized sizing.
Watch It in Action: User Reviews and Videos
There’s no better way to get a feel for a rack than by seeing someone else use it. YouTube is an incredible resource for this. You can find assembly videos, detailed reviews, and workout footage that can reveal a lot about a rack’s stability and usability. Watching a review can give you a much better sense of the equipment’s quality than just looking at product photos.
Here is a great overview video that shows the Fitness Gear Pro Half Rack up close:
Fitness Gear Pro Half Rack vs. The Competition
To truly understand the value of the Fitness Gear Pro Half Rack, it helps to see how it stacks up against some other popular options on the market. This comparison highlights its position as a strong contender in the budget-friendly category.
Feature
Fitness Gear Pro Half Rack
Rogue SML-2 Squat Stand
Rep Fitness HR-3000
Price Range
$300 – $500
$500 – $600
$400 – $500
Steel Size
2″ x 2″
3″ x 3″ (11-Gauge)
3″ x 3″ (11-Gauge)
Weight Capacity
~600 lbs
1,000+ lbs
1,000 lbs
Hole Spacing
Non-Standard
Westside (1″ through bench)
2″ Spacing
Included Attachments
J-Hooks, Safeties, Pull-Up Bar
J-Hooks
J-Hooks, Safeties, Pull-Up Bar
Best For
Budget-Conscious Beginners
Serious Lifters, Expandability
High-Value Intermediate Lifters
As you can see, the Fitness Gear Pro Half Rack holds its own by offering a complete package at an extremely competitive price point. While premium options from Rogue and Rep Fitness boast heavier-duty steel and a much higher weight capacity, they also come at a higher cost. The Rogue SML-2 is technically a squat stand but is often cross-shopped; you’d need to purchase spotter arms separately, increasing the price further. The Rep Fitness HR-3000 offers a fantastic middle ground with heavy-duty construction at a great value.
The key takeaway is that the Fitness Gear model is designed for accessibility. It gives you everything you need to start training hard and safe, right out of the box, without the intimidating price tag or the need to buy extra components.
A Balanced Look: Pros and Cons of This Gym Gear Rack
No piece of equipment is perfect for everyone. Being aware of both the strengths and weaknesses of this gym gear rack is crucial for making an informed decision. Here’s an honest breakdown.
Pros
Incredible Affordability: This is arguably its biggest selling point. It’s one of the most cost-effective ways to get a safe, functional rack with a pull-up bar and storage, making serious strength training accessible to more people.
Compact, Space-Saving Design: The half-rack design is perfect for home gyms, basements, or garages where space is a premium. It provides essential safety without the massive footprint of a full power cage.
All-in-One Starter Package: It comes with J-hooks, safety arms, a multi-grip pull-up bar, and plate storage. You don’t need to buy these essential components separately, which simplifies the purchasing process.
Retail Availability: Unlike many specialty fitness brands that are online-only, you can often find this rack at a local sporting goods store, allowing you to see it in person and avoid shipping costs.
Cons
Lower Weight Capacity: With a capacity around 600 lbs, it’s more than enough for most people. However, elite-level powerlifters and very strong individuals may eventually outgrow it and will need to upgrade.
Limited Attachment Compatibility: This is a major consideration. The non-standard hole sizing and 2×2 tubing mean that the vast majority of third-party attachments (like dip bars or landmine posts) will not fit. Your expansion options are very limited.
Potential for Wobble: While generally stable, especially when weighed down with plates, it may exhibit more wobble with very heavy re-racks or dynamic movements (like kipping pull-ups) compared to heavier-duty, bolt-down racks.
Pricing: What Should You Expect to Pay?
One of the most attractive aspects of the Fitness Gear Pro Half Rack is its price tag. It sits firmly in the budget-friendly to mid-range tier, making it an achievable purchase for many aspiring home gym owners. Typically, you can expect to find this rack priced somewhere between $300 and $500, depending on the specific model, retailer, and any ongoing sales.
To put that in perspective, let’s look at the broader market. Basic, independent squat stands (with no safety arms or pull-up bar) can run from $150 to $300. On the other end, premium half racks from specialty brands like Rogue, Rep Fitness, or Sorinex can easily range from $600 to over $1,000. Full four-post power cages start around $800 and can go well into the thousands.
When you consider that the Fitness Gear model includes the essential safety arms and a pull-up bar, its value becomes even clearer. You’re getting a complete, functional system for a price that is often less than just the frame of a higher-end model. However, remember to budget for the other necessary components: a quality Olympic barbell ($150-$350), a set of weight plates ($300-$800+), and a sturdy adjustable bench ($150-$400).
Tracking Your Progress: Enhancing Your Rack Workouts
Once your rack is set up, the real work begins. Pushing your limits on big compound lifts is physically and neurologically demanding. To make sure you’re training smart and recovering effectively, tracking your body’s response is key. While lifting logs are essential, biometric data can provide a deeper layer of insight into your performance.
This is where modern fitness technology can complement your strength training. During a grueling set of 5×5 squats, your heart rate can soar, giving you a clear indication of the cardiovascular demand of the workout. Monitoring this can help you manage your rest periods more effectively, ensuring you’re recovered enough for the next set without letting your intensity drop.
Using a chest strap heart rate monitor, like the ones from Wahoo Fitness, can provide highly accurate, real-time data on your exertion levels. By tracking this over time, you can see how your body is adapting. As you get fitter, your heart rate may not spike as high during the same workout, or it may recover more quickly between sets. This data is invaluable for preventing overtraining and ensuring your hard work in the rack is translating to real results.
Frequently Asked Questions (FAQ)
Here are answers to some of the most common questions people have about the Fitness Gear Pro Half Rack and similar setups.
What is the weight capacity of the Fitness Gear Pro Half Rack?
The most common models of the Fitness Gear Pro Half Rack are rated for a maximum weight capacity of 600 pounds. This includes the weight of the barbell and the plates. It’s crucial to always check the specific documentation for the exact model you are purchasing, as specifications can change over time.
Can you do bench press in a half rack?
Yes, absolutely! A half rack is an excellent and safe station for the bench press. You simply slide an adjustable or flat bench into the rack, set the J-hooks to the correct height to un-rack the bar, and position the safety spotter arms just below your chest at the bottom of the movement. This allows you to train the bench press heavy and alone with confidence.
Is a half rack as safe as a full power rack?
For the vast majority of lifts and situations, a half rack is extremely safe. The forward-facing safety spotter arms will catch a failed squat or bench press just as effectively as the safeties inside a full cage. The primary difference is that a full cage surrounds you, offering a theoretical extra layer of protection from a bar falling backward, though this is a very rare occurrence with proper form.
What size barbell do I need for a half rack?
You will need a standard 7-foot Olympic barbell. These barbells have sleeves that are 2 inches in diameter to fit Olympic weight plates and are the standard size for this type of rack. A shorter bar will likely not provide enough space between the collars to fit on the J-hooks.
Will standard 2″x2″ attachments fit this rack?
This is a critical question, and the answer is usually no. While the steel tubing itself is 2″x2″, many budget-friendly racks use non-standard pin sizes for their attachments and inconsistent hole spacing along the uprights. This means that an attachment from another brand, even if it’s also for a 2″x2″ rack, will likely not fit properly or safely. You should assume you can only use attachments made specifically by Fitness Gear for that model.
Final Thoughts: Is the Fitness Gear Pro Half Rack Your Perfect Home Gym Centerpiece?
After breaking it all down, the verdict on the fitness gear pro half rack is overwhelmingly positive, provided you are the right user. It stands out as an exceptional entry point into the world of serious home strength training. It successfully delivers on its promise of safety, core functionality, and versatility without demanding a huge financial investment or a massive amount of floor space.
If you are a beginner or intermediate lifter looking to build a solid foundation of strength with exercises like squats, presses, and pull-ups, this rack is one of the best values on the market. It provides the confidence to train hard and the essential features you need to see real progress. The convenience of the built-in storage and multi-grip pull-up bar makes it a truly complete package right out of the box.
However, if you are an advanced powerlifter pushing elite numbers or someone who loves customizing their equipment with a wide array of attachments, you may find its limitations restrictive. In that case, investing in a more premium, modular system from a specialty brand would be a wiser long-term choice. For the vast majority of home gym builders, though, the Fitness Gear Pro Half Rack is a fantastic, reliable, and exciting choice to begin building the body and strength you’ve always wanted. It’s time to get lifting!
CrossFit Training Gear UK: Your 2026 Buyer’s Guide for Beginners
You’ve signed up for your first CrossFit class, and the excitement is electric. You’re ready to tackle WODs, hit new personal bests, and join an incredible community. But then a question pops into your head: what do I actually wear and bring. Navigating the world of crossfit training gear in the UK can feel overwhelming at first, with a seemingly endless list of specialized shoes, grips, belts, and sleeves.
The great news is, you don’t need a gym bag overflowing with expensive kit to get started. The key is to begin with a few high-quality essentials that will protect you, enhance your performance, and make your first few months of training so much more effective and enjoyable.
This guide is here to cut through the noise. We’ll break down exactly what you need as a beginner, what you can wait on, and how to choose the right options for your goals and budget. We’re going to get you kitted out and confident, so you can walk into that box ready to crush your first workout. Let’s get started!
What to Know
Start with the Essentials: As a beginner, focus on three key items: proper training shoes, hand grips, and a good speed rope. This core kit will cover you for the vast majority of workouts.
Shoes Are Your Foundation: Do not use running shoes for CrossFit. Invest in a pair of cross-training shoes with a flat, stable sole to provide the support needed for lifting and dynamic movements.
Protect Your Hands Early: Calluses are a badge of honor, but torn, bleeding hands will stop you from training. A simple pair of gymnastic grips is a cheap investment that prevents painful rips from pull-ups and barbell work.
Gear Grows With You: You don’t need a weightlifting belt, knee sleeves, or wrist wraps on day one. Add more specialized UK crossfit equipment as you get stronger and your lifting becomes more advanced.
Track Your Effort: To truly understand your performance in high-intensity workouts, consider a heart rate monitor. It provides objective data on your effort and recovery, helping you train smarter.
What Exactly is CrossFit Training Gear? (And What You DON’T Need at First)
At its core, CrossFit training gear is any apparel, footwear, or accessory designed to improve your performance, safety, and comfort during a Workout of the Day (WOD). This can range from the shoes on your feet to the chalk on your hands. The design philosophy behind this gear is function-first; it needs to withstand high-intensity, varied movements that include weightlifting, gymnastics, and metabolic conditioning.
For someone new, it’s easy to see experienced athletes with their fully-stocked gym bags and think you need it all. You might see weightlifting belts for heavy squats, knee sleeves for support, wrist wraps for overhead lifts, and specialized grips for muscle-ups. While all this crossfit gear in the UK has its place, it’s crucial to understand that most of it is for intermediate to advanced athletes who are lifting heavy loads or performing high-volume, complex movements.
As a beginner, your primary focus is on learning proper form and building a solid foundation of strength and conditioning. Loading up on supportive gear too early can become a crutch, preventing you from developing crucial stabilizer muscles and body awareness. Your coach will guide you, but the simple truth is you only need a few key items to start your journey safely and effectively. The rest can wait until you’ve earned it through consistent training and progress.
The Non-Negotiable Essentials: Your CrossFit Starter Kit
Before you even think about belts or sleeves, you need to nail the basics. These three categories are the true essentials that will have the biggest impact on your training from day one. Investing in quality here is one of the smartest decisions you can make.
The Right Footwear: Your Foundation for Performance
If you buy only one piece of specialized gear, make it a good pair of training shoes. The squishy, cushioned soles of running shoes are fantastic for pounding the pavement, but they are terrible for CrossFit. They create an unstable surface for lifting, causing your form to break down during squats, deadlifts, and cleans. This not only limits your strength but also significantly increases your risk of injury.
CrossFit shoes are engineered for versatility. They typically have a minimal heel-to-toe drop (the difference in height between the heel and the forefoot), which keeps you stable and connected to the floor during lifts. The soles are made from a firm, dense rubber that won’t compress under heavy weight, providing a solid platform to drive force from. They also have features like reinforced side panels for durability during rope climbs and a flexible forefoot for running and jumping.
Brands like Nike (Metcon), Reebok (Nano), and NOBULL are leaders in this space for a reason.
Hand Protection: Saving Your Palms from Rips and Tears
It won’t take long before you encounter workouts with high-rep pull-ups, toes-to-bar, or kettlebell swings. These movements create a lot of friction between your hands and the bar, and without protection, you’re setting yourself up for painful blisters and tears (known as “rips” in the CrossFit world). While some calluses are inevitable, a nasty rip can take you out of training for a week or more.
This is where gymnastic grips come in. These simple pieces of leather or synthetic material strap to your wrists and cover your palms, providing a protective barrier. They allow you to hold onto the bar longer without shredding your hands, meaning you can push harder in workouts. There are many styles available, from simple two-finger leather grips to full-coverage carbon fiber models.
For a beginner, a basic, affordable pair is more than enough to save your skin.
Speed Ropes: Mastering Your Double-Unders
Jumping rope is a staple of CrossFit conditioning, and the “double-under” (where the rope passes under your feet twice in a single jump) is a milestone skill for every new athlete. Trying to learn this with the thick, clunky ropes found at most gyms is a recipe for frustration. They are often the wrong length, slow, and unforgiving.
Owning your own speed rope is a small investment that pays huge dividends. A good speed rope has a thin steel cable coated in plastic and smooth ball bearings in the handles, allowing it to spin incredibly fast. Most importantly, you can cut it to your exact height, which is the single most critical factor for mastering the movement. Having a consistent rope that is perfectly sized for you will dramatically shorten the learning curve for double-unders and make your cardio training far more efficient.
Level Up Your Lifts: Gear for Strength and Support
Once you’ve been training consistently for a few months and your lifts are getting heavier, it’s time to consider adding some supportive crossfit training equipment UK to your bag. This gear isn’t about masking bad form; it’s about providing stability and support so you can safely push your limits and continue making progress.
Lifting Belts: Supporting Your Core Under Load
A common misconception is that a lifting belt supports your back directly. In reality, its job is to increase intra-abdominal pressure. When you take a deep breath and brace your core against the belt, you create a rigid, stable torso. This stability helps protect your spine and allows you to transfer more force through your body to lift heavier weights safely, especially in movements like the back squat, deadlift, and clean.
However, a belt is a tool, not a crutch. You shouldn’t wear it for every lift. It’s best reserved for your heaviest sets, typically those above 80-85% of your one-rep max. For warm-ups and lighter sets, it’s crucial to lift without a belt to continue strengthening your core muscles naturally.
Belts come in leather (more rigid and supportive) and nylon/velcro (more flexible and easier to adjust), with the choice often coming down to personal preference.
Knee Sleeves: Keeping Your Joints Warm and Supported
As you start squatting heavier, you might notice your knees feeling a bit achy or unstable. Knee sleeves, typically made from neoprene, are designed to combat this. They provide compression to the knee joint, which increases blood flow and helps keep the joint warm and lubricated throughout your workout. This warmth and compression can reduce pain and swelling.
Beyond physical support, knee sleeves provide what’s known as proprioceptive feedback. The gentle pressure on your skin makes you more aware of your knee’s position in space, which can help you maintain better form and movement patterns during squats and lunges. They come in different thicknesses, with 5mm being great for general WODs and 7mm offering more rigid support for heavy lifting sessions.
Wrist Wraps: Stabilizing for Overhead Lifts
Movements like the overhead squat, push press, and handstand push-ups place a huge amount of strain on the wrist joint, forcing it into an extended position under load. Wrist wraps provide external support to prevent the wrist from hyperextending, helping to keep it in a more stable, neutral position. This can reduce pain, prevent injuries, and give you the confidence to press heavier weights overhead.
Wraps come in varying levels of stiffness. More flexible wraps are great for WODs where you need some mobility (like a workout with cleans and pull-ups), while stiffer wraps are ideal for max-effort lifts like a one-rep max jerk, where stability is the only priority. They are a simple and effective tool for any athlete looking to improve their overhead strength and safety.
Tracking Your Performance: The Smart Way to Train
CrossFit is all about measurable, observable, and repeatable results. While the whiteboard tracks your scores, understanding the physiological effort behind those scores is the next level of smart training. This is where modern fitness technology can give you a significant edge, helping you optimize your intensity and recovery.
Why a Heart Rate Monitor is Your Secret Weapon
In a high-intensity metcon, how hard are you really working? It can be tough to gauge effort subjectively. A heart rate monitor removes the guesswork. It provides real-time, objective data on your cardiovascular response, showing you exactly how hard you’re pushing and, just as importantly, how well you’re recovering between intervals.
By tracking your heart rate zones, you can learn to pace workouts more effectively, avoiding the dreaded “fly and die” where you go out too hot and burn out early. It also helps you measure fitness improvements over time. As you get fitter, your heart rate will be lower for the same amount of work, and it will recover faster after a hard effort. This data is incredibly motivating and helps you and your coach make smarter training decisions.
Pro Tip: Use your heart rate data to manage rest periods. Instead of just waiting for the clock, wait for your heart rate to drop to a specific level (e.g., 60-70% of max) before starting your next interval. This ensures you are adequately recovered and can maintain high quality of movement.
Our Pick: The Wahoo TICKR Heart Rate Monitor
When it comes to accuracy and reliability, a chest strap monitor is the gold standard, and the Wahoo Fitness TICKR is one of the best on the market. It’s designed to be simple, effective, and comfortable, so you can focus on your workout, not your tech.
It uses an electrocardiogram (ECG) to measure your heart’s electrical signals, which is far more accurate than the optical sensors found in most wrist-based watches, especially during the rapid, high-intensity movements common in CrossFit. The TICKR features both ANT+ and Bluetooth connectivity, meaning it can connect to virtually any device you use, from your smartphone and Garmin watch to the concept2 rower at your gym. The soft, adjustable strap is comfortable to wear and stays put even during burpees and double-unders.
Pros
Exceptional Accuracy: Provides precise heart rate data you can trust for serious training.
Universal Connectivity: Dual-band ANT+ and Bluetooth connects to up to three devices simultaneously.
Comfortable Design: The soft fabric strap is easy to adjust and comfortable for long workouts.
Cons
Requires Battery Changes: Unlike rechargeable watches, it uses a coin cell battery that needs replacing periodically.
Chest Strap Feel: Some athletes simply prefer not to wear a strap around their chest.
If you’re ready to get serious about data-driven training, the Wahoo TICKR is a fantastic tool to add to your arsenal. You can check the current price on Amazon.
How to Choose the Right UK CrossFit Equipment for You
Selecting the right gear is a personal process. What works for a competitive athlete might be overkill for someone just starting out. Here’s a simple framework to help you make smart choices based on your individual needs.
Assess Your Current Fitness Level (Be Honest!)
Are you walking into a CrossFit box for the first time, or have you been training for a year? Your experience level is the biggest factor in your gear decisions.
Beginner (0-6 months): Focus entirely on the essentials: shoes, grips, and a rope. Don’t even think about a belt or sleeves yet. Your goal is to build a base of strength and master the fundamental movements with your own body.
Intermediate (6 months – 2 years): You’re likely lifting heavier and attempting more complex skills. This is the time to consider adding a lifting belt for your heavy days, knee sleeves for squat-heavy cycles, and wrist wraps if you’re working on overhead strength.
Advanced (2+ years): You know your body, your weaknesses, and your goals. You might invest in multiple pairs of shoes (one for lifting, one for running-heavy WODs), different types of grips for different implements, and other specialized gear.
Consider Your Goals: Competitor or Casual Athlete?
Why did you start CrossFit? Your answer will guide your purchases. If your goal is to get fit, have fun, and stay healthy, you can stick with the basics for a long time. Your needs will be driven by comfort and injury prevention.
If you have competitive aspirations, however, your approach to gear will be different. You’ll want to invest in equipment that can give you a performance edge. This might mean buying high-end carbon fiber grips for faster transitions on the pull-up bar or specialized weightlifting shoes with a raised heel for improved squat depth. Competitive athletes often view their gear as a necessary investment in their performance.
Budgeting for Your Gear: Where to Splurge and Where to Save
You don’t need to spend a fortune to get kitted out. The key is to allocate your budget wisely. Here’s a quick breakdown of typical price ranges for crossfit gear UK and our advice on where to invest.
Gear Item
Typical Price Range (UK)
Splurge or Save?
Training Shoes
£80 – £130
Splurge
Hand Grips
£15 – £40
Save (initially)
Speed Rope
£15 – £35
Save
Lifting Belt
£30 – £90
Save (initially), Splurge (later)
Knee Sleeves
£25 – £60
Save (initially), Splurge (later)
Wrist Wraps
£10 – £25
Save
Splurge on shoes. They are your connection to the ground and have the biggest impact on your safety and performance. A great pair will last you a long time. You can save money on everything else at the start. An affordable pair of grips and a basic speed rope will serve you perfectly well as you learn the ropes.
Frequently Asked Questions about CrossFit Gear
Here are answers to some of the most common questions new CrossFitters have about their equipment.
What gear do I need for my first CrossFit class?
For your very first class, you need very little. Just wear comfortable athletic clothing that you can move freely in, a good pair of trainers (your running shoes will be fine for the first day or two), and a water bottle. The most important thing is to show up with a positive attitude and a willingness to learn. Your gym, or “box,” will have all the equipment you need to get through the workout.
Are CrossFit shoes really necessary?
Yes, eventually they are. While you can get by for a week or two in regular trainers, you will quickly find their limitations once you start lifting weights. The stable, flat sole of a proper training shoe is essential for safety and performance in squats, deadlifts, and Olympic lifts. It’s the single most important piece of gear you can buy and should be your first major purchase.
How much should I spend on CrossFit gear as a beginner?
As a beginner, you can get fully kitted out with the essentials for around £120 to £160. This would cover a great pair of shoes (£80-£110), a solid pair of grips (£20-£25), and your own speed rope (£20-£25). This initial investment will set you up for success for at least your first year of training without breaking the bank. Avoid buying expensive gear you don’t need yet.
How do I care for my grips and knee sleeves?
Proper care will extend the life of your gear. For leather grips, avoid washing them. Instead, let them air dry completely after each use and use a wire brush to gently scrape off caked-on chalk. For neoprene knee sleeves, they can get very smelly.
To wash them, turn them inside out and soak them in a bucket of warm water with some mild detergent. Rinse thoroughly and let them air dry completely before your next session.
Final Thoughts: Gearing Up for Success
Embarking on your CrossFit journey is an incredibly exciting step. Equipping yourself with the right crossfit training gear in the UK is not about looking the part; it’s about setting yourself up for safety, performance, and long-term enjoyment. Remember to start small and build your collection as you build your skills. Focus on mastering the basics with a great pair of shoes, a trusty set of grips, and your own speed rope.
As you grow stronger and more confident, you can strategically add pieces like a belt, sleeves, and wraps to support your progress. Listen to your body, listen to your coaches, and invest in quality gear that will work as hard as you do. And if you’re serious about tracking your progress and training smarter, a reliable heart rate monitor like the Wahoo is a fantastic investment in your fitness.
Now, pack your bag, head to the box, and get ready to discover what you’re truly capable of. Welcome to the community!
Fitness Gear Power Tower Review: Is It the Ultimate Home Gym Addition?
If you’re looking to build serious upper body and core strength without cluttering your home with a dozen different machines, the search can feel endless. You want something effective, versatile, and space-efficient. This is where the concept of a fitness gear power tower comes into play, offering a complete bodyweight training station in a single, vertical footprint. It’s a powerhouse piece of equipment that promises to be the cornerstone of any serious home gym setup, allowing you to master foundational exercises like pull-ups, dips, and leg raises.
But with so many options and claims, is this piece of equipment truly the all-in-one solution it’s made out to be? This comprehensive review will break down everything you need to know. We’ll explore its core features, the incredible benefits of bodyweight training, how to select the perfect model for your space and budget, and whether it’s the right investment to supercharge your fitness journey. Get ready to transform your workout routine!
What to Know
All-in-One Workout Station: A fitness power tower combines multiple workout stations—typically a pull-up bar, dip station, vertical knee raise station, and push-up bars—into one compact unit, making it ideal for comprehensive upper body and core workouts.
Bodyweight Training is Key: This equipment is designed for calisthenics, using your own body weight as resistance. This method is fantastic for building functional strength, improving muscle definition, and reducing the risk of injury associated with heavy weights.
Choosing Wisely Matters: The right power tower depends on its stability, weight capacity, adjustability, and footprint. Cheaper models can be unstable, so investing in a quality frame is crucial for safety and performance.
Incredible Versatility: From pull-ups and chin-ups to triceps dips, hanging leg raises, and push-ups, the range of exercises you can perform is massive. It’s one of the most versatile pieces of fitness gear you can own for a home gym.
What Exactly Is a Fitness Gear Power Tower?
A fitness gear power tower, often called a vertical knee raise (VKR) station or a captain’s chair, is a freestanding piece of exercise equipment designed to facilitate a wide range of bodyweight exercises. Think of it as a vertical playground for strength training. Its design is brilliantly simple yet incredibly effective, consolidating several key workout stations into a single, space-saving frame.
Most models are built around a sturdy steel frame that typically includes four primary stations. At the top, you have a pull-up bar, which often features multiple grip positions (wide, narrow, neutral) to target different back and bicep muscles. In the middle, you’ll find horizontal bars for triceps dips and a padded backrest with arm supports for vertical knee and leg raises, which are phenomenal for abdominal development. At the base, you’ll often find handles for performing deep push-ups.
This consolidation of equipment is what makes the fitness power tower so appealing. Instead of needing a separate pull-up bar to mount in a doorway, a dip station, and floor space for push-ups, you get everything in one place. It’s a self-contained ecosystem for calisthenics that allows for smooth transitions between exercises, making it perfect for circuit training or high-intensity workouts at home.
The Core Features and Incredible Benefits of an Exercise Power Tower
The true magic of an exercise power tower lies in its combination of simple features that unlock a massive range of benefits. It’s not just about having a pull-up bar; it’s about how all the components work together to deliver a complete and challenging workout experience. Let’s break down the key features and the amazing results they can help you achieve.
Key Features Explained:
Multi-Grip Pull-Up Bar: This is the crown jewel of the power tower. High-quality models offer wide grips to blast your lats, narrow grips for bicep and central back focus, and neutral (hammer) grips to reduce shoulder strain. This variety prevents workout plateaus and allows for comprehensive back development.
Dip Station: The parallel bars are your go-to for building powerful triceps, chest, and shoulders. The ability to perform full-range-of-motion dips is far superior to using benches or chairs, leading to better muscle activation and growth.
Vertical Knee Raise (VKR) Station: Also known as the Captain’s Chair, this station with its padded armrests and back support is an ab-shredding machine. It allows you to perform hanging knee raises and leg raises with proper form, isolating your core without straining your lower back or hip flexors.
Push-Up Handles: Located at the base, these elevated handles allow for a deeper range of motion during push-ups. This increased stretch leads to greater chest muscle activation and can be easier on the wrists compared to traditional floor push-ups.
Unbeatable Benefits:
Builds Functional, Real-World Strength: Bodyweight exercises force your muscles to work together in coordinated movements, building strength that translates directly to everyday activities. You’re not just isolating a single muscle; you’re teaching your body to move as a cohesive, powerful unit.
Cost-Effective and Space-Efficient: For the price of a few months at a commercial gym, you can own a piece of equipment that targets nearly every muscle in your upper body and core. Its vertical design takes up minimal floor space, making it perfect for garages, basements, or even a spare room.
Incredibly Versatile: The sheer number of exercises is astounding. Beyond the basics, you can do Australian pull-ups, L-sits, hanging windshield wipers, and more. With the addition of resistance bands or a weight vest, the challenge can be scaled infinitely, making it suitable for both beginners and advanced athletes.
Promotes Better Posture and Core Stability: Exercises like pull-ups and hanging leg raises are fantastic for strengthening the muscles that support your spine. A strong core and back are essential for maintaining good posture, reducing back pain, and improving overall stability and balance.
How to Choose the Right Fitness Power Tower for You
Selecting the perfect fitness power tower is about more than just finding the cheapest option. The right choice will be a safe, stable, and long-lasting partner in your fitness journey. A poor choice can be wobbly, uncomfortable, and potentially dangerous. Here are the critical factors to consider to ensure you make a smart investment.
1. Stability and Construction
This is the most important factor. A wobbly tower is not only distracting but also unsafe. Look for a base with a wide footprint, often in an H-shape or with splayed feet for maximum stability. The frame should be constructed from heavy-gauge steel (12-14 gauge is a good standard). The heavier the unit itself, the more stable it will likely be during dynamic movements like kipping pull-ups or explosive dips.
2. Weight Capacity
Always check the manufacturer’s maximum weight capacity. This isn’t just about your body weight; you need to account for the additional force generated during exercises. A good rule of thumb is to choose a tower with a capacity at least 100 lbs greater than your body weight. If you plan on using a weight vest or dip belt in the future, aim for an even higher capacity (400 lbs or more is excellent).
3. Adjustability and Ergonomics
Not all bodies are the same, so adjustability is key. Look for power towers with adjustable pull-up bar heights to accommodate different user heights and ceiling clearances. The backrest and armrests on the VKR station should be positioned comfortably. Some premium models even offer adjustable-width dip handles to better fit your shoulder width, which can significantly improve comfort and reduce injury risk.
4. Footprint and Dimensions
Measure your space before you buy! Check the power tower’s height, width, and depth. Ensure you have enough ceiling clearance to perform a full pull-up without hitting your head. Also, consider the space around the tower needed to perform exercises comfortably. Some models are designed to fit neatly into a corner, while others may require more central placement.
Pro Tip: Look for models with foldable dip arms or other space-saving features if you’re working with a very limited area. This can make a huge difference in a smaller home gym.
Comparison of Key Features to Look For
Feature
Budget Model (~$150)
Mid-Range Model (~$300)
Premium Model (~$500+)
Steel Gauge
Lighter gauge (e.g., 16)
Heavier gauge (e.g., 14)
Commercial grade (e.g., 12)
Weight Capacity
250-300 lbs
350-400 lbs
500+ lbs
Stability
Basic U-shaped base, may wobble
Wide H-shaped base, more stable
Oversized base with floor mounts
Adjustability
Limited or none
Adjustable pull-up bar height
Fully adjustable components
Grip Options
Basic straight bar
Multi-grip pull-up bar
Ergonomic, angled grips
Top Exercises to Master on Your Power Tower
Once you have your power tower fitness equipment, it’s time for the fun part: the workouts! This single station unlocks a huge variety of exercises that can build a truly impressive physique. Here’s a look at some of the best movements you can perform and a video demonstrating proper form.
Watch and Learn: Power Tower Workout Essentials
Upper Body Annihilators
Pull-Ups / Chin-Ups: The king of back exercises. Use a wide, overhand grip for pull-ups to target your lats and build that coveted V-taper. Use a closer, underhand grip for chin-ups to put more emphasis on your biceps. Focus on a full range of motion, starting from a dead hang and pulling your chest to the bar.
Dips: This is one of the best exercises for building your triceps, chest, and front deltoids. Keep your torso upright to focus more on the triceps, or lean forward slightly to engage more of your chest. Lower yourself until your shoulders are just below your elbows, then press back up powerfully.
Push-Ups: Using the handles at the base allows for a deeper stretch and greater pectoral activation. This variation can also be easier on the wrists. To increase the difficulty, you can elevate your feet on a box or bench.
Core-Carving Movements
Vertical Knee Raises: This is the signature move of the VKR station. Supporting yourself on your forearms, slowly raise your knees toward your chest without swinging. Squeeze your abs at the top, then lower your legs with control. This is a fantastic way to target the lower abdominals.
Hanging Leg Raises: For a more advanced challenge, perform leg raises from the pull-up bar. Keeping your legs straight, raise them until they are parallel to the floor (or higher!). This requires immense core strength and control.
L-Sits: An advanced isometric hold that builds incredible core and hip flexor strength. Using the dip bars, press yourself up and extend your legs straight out in front of you, forming an “L” shape with your body. Hold for as long as you can maintain proper form.
Maximizing Your Workouts: Tracking Your Progress
Doing the exercises is one thing, but truly maximizing your gains requires tracking your progress. Knowing your heart rate, workout duration, and calories burned can help you ensure you’re pushing hard enough and recovering properly. This is where modern fitness technology can be a huge asset alongside your fitness gear power tower.
Using a heart rate monitor or fitness tracker allows you to quantify your effort. For example, you can structure your power tower workouts as high-intensity interval training (HIIT), performing a set of pull-ups, then dips, then knee raises with minimal rest. A tracker helps you see if your heart rate is reaching the optimal fat-burning or cardio-conditioning zones during these intense circuits.
For those serious about data-driven fitness, a dedicated device like the Wahoo Fitness tracker can provide precise metrics. It can help you monitor your performance over time, see how your cardiovascular health is improving, and stay motivated by hitting new personal bests. Pairing old-school bodyweight strength with new-school tech is a powerful way to accelerate your results.
Pricing and Cost Comparison: What Should You Expect to Pay?
The price of a fitness power tower can range from just over $100 to well over $500, and what you get for your money varies significantly. Understanding these price tiers can help you find the best value for your budget and needs, ensuring you don’t overspend or, worse, buy a piece of equipment that doesn’t meet your standards.
Budget-Friendly Options ($100 – $200)
In this range, you’ll find entry-level power towers perfect for beginners or lighter individuals. They will have all the basic stations but may be constructed from lighter steel and have lower weight capacities (typically under 300 lbs). The main drawback is often stability; they can feel a bit wobbly during more dynamic movements. However, for basic, controlled exercises, they can be a fantastic starting point.
Mid-Range Workhorses ($200 – $400)
This is the sweet spot for most home gym enthusiasts. Towers in this price range offer a significant upgrade in stability, construction, and features. You can expect heavier-gauge steel, higher weight capacities (350-400+ lbs), wider and more stable bases, and better padding. Many will also include multi-grip pull-up bars and more ergonomic designs, providing a much better user experience for a modest increase in price.
Premium and Commercial-Grade Models ($400+)
If you’re a serious athlete, a heavier individual, or simply want the best of the best, the premium tier is for you. These power towers are built like tanks, often using commercial-grade 11 or 12-gauge steel with weight capacities exceeding 500 lbs. They feature superior stability, fully adjustable components, and often include extras like rotating dip handles, climbing grips, or attachments for resistance bands. While the cost is higher, you’re paying for lifetime durability and unparalleled performance.
Pros and Cons: Is a Power Tower Right for You?
Like any piece of fitness equipment, the exercise power tower has its strengths and weaknesses. Being honest about both sides can help you decide if it’s the right fit for your fitness goals, space, and workout style. It’s an amazing tool, but it’s not for everyone.
The Pros: Why You’ll Love It
Unmatched Versatility: It’s hard to find another single piece of equipment that allows for so many foundational upper-body and core exercises. It effectively replaces a pull-up bar, dip station, and more.
Builds Impressive Bodyweight Strength: Calisthenics is a proven method for building lean muscle and functional strength. Mastering your own body weight is an incredibly rewarding and effective way to train.
Excellent Value for Money: Compared to the cost of a gym membership or buying multiple pieces of equipment, a power tower offers incredible bang for your buck.
Compact Footprint: Its vertical design saves a ton of floor space compared to a home gym with a bench, squat rack, and other machines.
The Cons: Potential Drawbacks to Consider
Limited Lower Body Exercises: The power tower is overwhelmingly focused on the upper body and core. You will need to supplement with other exercises like squats, lunges, or deadlifts for a complete, full-body routine.
Can Be Bulky for Small Apartments: While it has a small footprint, its height can be an issue in rooms with low ceilings. It’s still a substantial piece of furniture that needs a dedicated spot.
Instability in Cheaper Models: This is a major concern. Low-quality, budget towers can shake and wobble, which can be unnerving and potentially unsafe. It’s often worth spending a little more for a sturdier frame.
Can Be Challenging for Beginners: Exercises like pull-ups and dips are difficult. Absolute beginners may need to start with resistance bands to assist them, as there’s no way to lower the “weight” (your body) on its own.
Frequently Asked Questions (FAQ)
We’ve covered a lot, but you might still have some questions. Here are detailed answers to some of the most common queries about using a fitness gear power tower.
Can I build muscle with a power tower?
Absolutely. A power tower is an excellent tool for building muscle, a process known as hypertrophy. The key is applying the principle of progressive overload. This means continually challenging your muscles to do more than they are used to.
With a power tower, you can achieve this by increasing the number of reps and sets, decreasing rest times, or adding external weight using a dip belt or weight vest.
Exercises like pull-ups and dips are compound movements that recruit multiple large muscle groups simultaneously, which is highly effective for stimulating muscle growth. By focusing on proper form and pushing yourself to failure (or close to it) on your sets, you can definitely build a strong, muscular, and defined upper body and core.
Is a power tower a good workout?
Yes, a power tower provides an incredibly effective and efficient workout. It focuses on compound exercises, which are movements that work multiple joints and muscle groups at once. This is far more efficient than doing isolation exercises for each muscle. A 30-minute power tower circuit can provide a more intense and comprehensive upper-body workout than an hour spent on various machines.
Furthermore, bodyweight training enhances your relative strength (strength in relation to your body weight), which is a great indicator of overall fitness. It also improves coordination, balance, and core stability. Whether your goal is muscle gain, fat loss, or improved athletic performance, a power tower workout is a fantastic choice.
What are the best exercises to do on a power tower?
The best exercises are the foundational compound movements that give you the most bang for your buck. The “big four” are pull-ups (for back and biceps), dips (for chest, shoulders, and triceps), vertical knee/leg raises (for abs and core), and push-ups (for chest and shoulders). Mastering these four movements alone will build a formidable upper body.
Once you’re proficient, you can introduce variations to keep things interesting and challenge your muscles in new ways. Try wide-grip pull-ups, neutral-grip chin-ups, explosive dips, or hanging windshield wipers. The versatility is one of its greatest strengths.
Is a power tower worth buying?
For most people looking to build a serious home gym, a power tower is absolutely worth buying. It offers unparalleled versatility and value in a compact package. If you are committed to bodyweight training and want a central piece of equipment to build your routine around, it’s one of the best investments you can make for your health.
However, it might not be worth it if you have extremely limited space (especially ceiling height) or if your primary goal is heavy, lower-body lifting like barbell squats and deadlifts. But for building upper body and core strength, its value is hard to beat. As one user on a Reddit discussion noted, it can be the perfect centerpiece for a home workout area if you have the space.
Do power towers help with abs?
Yes, power towers are phenomenal for developing strong, visible abs. The vertical knee raise station is specifically designed to target the entire abdominal wall, particularly the hard-to-reach lower abs. Performing knee raises and leg raises with proper form—avoiding swinging and using pure core strength to lift—is one of the most effective ways to build a powerful and defined midsection.
Beyond the VKR station, the simple act of stabilizing your body during pull-ups and dips also heavily engages your core. Your abs, obliques, and lower back have to work hard to prevent your body from swaying, providing a constant isometric workout. This makes the power tower a true core-building machine.
Final Thoughts: The Verdict on the Fitness Gear Power Tower
After a deep dive into its features, benefits, and potential drawbacks, the verdict is clear: the fitness gear power tower is a phenomenal piece of equipment for anyone serious about building upper body and core strength at home. Its ability to combine so many essential workouts into one compact, cost-effective station makes it a cornerstone of an effective home gym.
It’s not just a piece of metal; it’s a gateway to mastering your own bodyweight, building functional strength that serves you in everyday life, and achieving a lean, athletic physique. While it has its limitations—namely the lack of lower body exercises—its strengths in versatility and efficiency are undeniable. For the price, you simply won’t find another single item that can do more for your pull-ups, dips, and core work.
If you have the space and are ready to embrace the challenge and reward of calisthenics, investing in a quality power tower is a decision you won’t regret. It’s a durable, effective, and empowering tool that will serve you for years to come on your fitness journey. And to take that journey to the next level, consider tracking your efforts. A device like the Wahoo can help you monitor your intensity and progress, ensuring every drop of sweat counts.
Weighted Vest Fitness Gear: Your 2026 Buyer’s Guide for Max Results
Have you ever hit that frustrating plateau in your fitness journey. You’re doing all the right things—hitting the gym, eating well—but the progress has slowed to a crawl. It’s time to introduce a tool that can supercharge every single rep and step you take. High-quality weighted vest fitness gear is one of the most effective and versatile investments you can make to break through barriers, build serious strength, and incinerate calories like never before.
This isn’t just another accessory; it’s a commitment to making every movement count more.
This guide is your ultimate resource for navigating the world of weighted vests. We’ll break down everything from the incredible benefits and safety protocols to the best exercises and how to choose the perfect vest for your specific goals. Get ready to transform your training and see the results you’ve been working so hard for!
What to Know
Start with the Right Weight: The golden rule for beginners is to choose a vest that’s around 5-10% of your body weight. This ensures you can maintain perfect form while still challenging your muscles.
Versatility is Key: A fitness weighted vest can be used for almost any activity, from strength training circuits with push-ups and squats to enhancing your daily walk or run for a massive cardio boost.
Fit and Comfort are Non-Negotiable: Look for a vest with adjustable straps and ample padding. A vest that bounces, chafes, or shifts during your workout is a distraction and a potential injury risk.
Safety First, Always: Never sacrifice form for added weight. Master the exercise with your body weight first, then gradually introduce the vest. Listen to your body and don’t overdo it.
The Incredible Benefits of Weighted Vest Training
So, why all the excitement around this piece of weighted workout gear? The benefits are profound and can impact nearly every aspect of your physical fitness. Adding external resistance that moves with your body forces it to adapt in amazing ways.
First and foremost, you’ll see a massive increase in strength and endurance. Your muscles have to work harder to perform the same movements, which stimulates muscle fiber growth (hypertrophy) and builds raw power. This concept, known as progressive overload, is the foundation of all strength gains. A weighted vest is one of the easiest ways to apply it to bodyweight exercises like pull-ups, dips, and squats.
Beyond strength, the cardiovascular benefits are huge. Wearing a vest during a walk, jog, or hike increases the intensity exponentially. Your heart has to pump harder to deliver oxygen to your working muscles, which strengthens your cardiovascular system and boosts your VO2 max—a key indicator of aerobic fitness. This also leads to a significant increase in calorie burn, both during and after your workout, making it an incredible tool for weight management.
Finally, weighted vest training has a positive impact on your bone health. The added load from the vest creates mechanical stress on your bones, signaling your body to increase bone mineral density. This is a powerful way to build a stronger, more resilient skeleton and help stave off conditions like osteoporosis later in life. It’s a full-body upgrade from a single piece of gear!
How to Choose the Right Weighted Vest for Your Fitness Level
Walking into the world of weighted vests can feel overwhelming with all the options available. But finding the right one is simple if you focus on a few key factors. Your goal is to find a vest that feels like a natural extension of your body, not a bulky, awkward burden.
Weight and Adjustability
This is the most important decision. As mentioned, a great starting point is a vest that’s 5-10% of your total body weight. If you weigh 180 pounds, a 9-18 pound vest is perfect to begin. Many vests come in fixed weights (e.g., 10 lbs, 20 lbs), which are great for simplicity. However, for long-term progress, an adjustable vest is a fantastic investment. These vests allow you to add or remove small weight blocks or plates, so you can start light and gradually increase the load as you get stronger. This makes them suitable for a wider range of exercises and fitness levels.
Fit, Comfort, and Style
An ill-fitting vest is a workout killer. Look for vests with multiple adjustable straps around the shoulders and waist to ensure a snug, secure fit that doesn’t shift or bounce while you move. Good shoulder padding is essential to prevent digging and discomfort, especially during longer workouts. The two main styles you’ll encounter are:
Traditional Shoulder Vests: These often use sandbags or small iron blocks and wrap around your torso. They are great all-rounders for general fitness.
Plate Carrier Vests: Popular in CrossFit, these are modeled after tactical gear and hold flat weight plates. They offer a very secure fit and distribute weight evenly, making them ideal for high-intensity movements.
Material and Durability
Your vest is going to see a lot of sweat and action, so durability is key. Look for high-quality materials like heavy-duty nylon, neoprene, or Cordura fabric that can withstand intense use. Check for reinforced stitching, especially around the shoulder straps and weight pockets. A well-made vest is a long-term training partner.
Best Exercises to Perform with a Weighted Vest
One of the best things about a fitness weighted vest is its versatility. You can use it to level up almost any exercise you’re already doing. Here are some of the most effective movements to incorporate into your routine.
Bodyweight Strength Movements
This is where weighted vests truly shine. They add a new layer of challenge to foundational exercises that build functional strength.
Push-ups: The added weight on your back forces your chest, shoulders, and triceps to work significantly harder through the entire range of motion.
Squats and Lunges: Loading your torso increases the demand on your quads, glutes, and hamstrings, building powerful legs without needing a barbell.
Pull-ups and Chin-ups: If you’ve mastered bodyweight pull-ups, adding a vest is the next logical step to building a stronger back and biceps.
Planks and Core Work: Wearing a vest during planks or leg raises forces your entire core to stabilize against a heavier load, building incredible abdominal strength.
Cardio and Endurance Work
Don’t just think of your vest for strength days! It’s an amazing tool for boosting your cardio.
Walking or Hiking: This is one of the most accessible ways to use a vest. A simple walk around the neighborhood becomes a challenging workout that burns more calories and improves cardiovascular health.
Running or Jogging: For more advanced users, running with a light vest can improve running economy and build endurance. Start with short distances and a very light weight.
Stair Climbing: Whether on a machine or actual stairs, adding a vest will have your heart pounding and your legs burning in the best way possible.
Pro Tip: When starting out, reduce your normal rep or distance goals. If you can do 20 bodyweight squats, aim for 10-12 with the vest, focusing on perfect form. The intensity is higher, so your volume should adjust accordingly.
Safety Tips for Wearing a Weighted Vest
While weighted vests are incredibly effective, safety must always be your top priority. Adding external load changes your body’s mechanics, and being mindful of this is crucial to prevent injury and get the most out of your training.
First, master the movement before you add the weight. You should be able to perform any exercise with perfect bodyweight form before you even think about strapping on a vest. This ensures your joints, ligaments, and stabilizer muscles are prepared for the added stress. If your form breaks down, the weight is too heavy or you’re not ready for that specific exercise with a vest.
Second, progress gradually. It’s exciting to get a new piece of weighted workout gear, but don’t jump straight to a 40-pound vest. Start with 5-10% of your body weight and use it for a few weeks. Once that feels comfortable and your form is solid, you can consider adding another 2-5 pounds.
Slow and steady progress is sustainable and keeps you injury-free.
Finally, listen to your body. Pay close attention to your joints, especially your knees, hips, and lower back. If you feel any sharp or unusual pain, stop immediately. Muscle soreness is normal, but joint pain is a red flag.
Also, be sure to warm up properly before every session and cool down with stretching afterward to aid recovery.
Comparing Different Types of Weighted Vests
Not all weighted vests are created equal. The design, weight distribution, and intended use can vary significantly. Understanding the main types will help you pick the perfect one for your training style.
The All-Rounder: Adjustable Block Vests
These are perhaps the most common type you’ll see. They feature numerous small pockets that hold weighted blocks or sandbags. Their biggest advantage is granular adjustability. You can often change the weight in 1-2 pound increments, offering precise control over your progressive overload. They are fantastic for general fitness, bodyweight circuits, and walking. However, they can sometimes be bulkier than other styles.
The Athlete’s Choice: Plate Carrier Vests
Popularized by CrossFit and tactical athletes, these vests are designed for high-intensity, dynamic movements. They use two flat weight plates (one in the front, one in the back), which keeps the weight secure and close to your center of gravity. This minimal-bounce design is ideal for running, jumping, and metabolic conditioning workouts. Their fit is typically very snug and ergonomic, but they offer less precise weight adjustments, as you’re limited to the plates you own.
The Runner’s Companion: Slim-Profile Vests
Designed specifically for cardio, these vests are much thinner and lighter. They often come in fixed weights (e.g., 6, 8, or 12 pounds) and are made from soft, flexible materials like neoprene. They hug the body tightly to eliminate bouncing and chafing during runs or long walks. While not suitable for heavy strength training, they are perfect for anyone looking to add a consistent, low-level challenge to their endurance work.
To see a fantastic breakdown and comparison of many popular models, check out this in-depth review:
The Impact of Weighted Vests on Strength Training
For anyone serious about building muscle and strength, the principle of progressive overload is everything. It’s the process of continually increasing the demands on your musculoskeletal system to force it to adapt. A weighted vest is one of the most practical and effective tools for applying this principle, especially outside of a traditional weight room.
Think about a push-up. Once you can do 20-30 reps with ease, simply doing more reps will primarily build endurance, not raw strength or muscle size. To trigger new growth, you need to increase the intensity. By adding a 20-pound vest, you’ve fundamentally changed the exercise.
Your body is now pushing a significantly heavier load, forcing more muscle fibers in your chest, shoulders, and triceps to activate. This increased mechanical tension is a primary driver of muscle hypertrophy.
This applies to all bodyweight movements. Squats, lunges, pull-ups, and dips are all transformed from endurance-builders into potent strength-builders. This is especially valuable for individuals who work out at home or have limited access to heavy weights. A single fitness weighted vest can replace the need for multiple dumbbells or a barbell for many lower-body and upper-body pushing and pulling movements, making it an incredibly efficient piece of equipment.
Weighted Vests for Cardio: Enhancing Your Running or Walking Routine
If you think weighted vests are just for strength training, you’re missing out on half the fun! Incorporating weighted workout gear into your cardio routine can shatter plateaus and elevate your fitness in ways that simple running or walking can’t.
When you walk or run with a vest, you increase your body’s mass. This means your muscles—from your legs to your core—have to produce more force with every single step to propel you forward. Your heart also has to work harder to supply those muscles with oxygenated blood. The result.
A much higher heart rate and a significantly greater calorie burn compared to doing the same activity without the vest. A study published in the Journal of Strength and Conditioning Research found that walking at the same speed with a vest equivalent to 15% of body weight increased calorie expenditure by 12%. That’s a huge difference over the course of a 30-minute walk.
This increased intensity does more than just burn calories; it improves your overall cardiovascular engine. Consistently training with a vest can lead to a lower resting heart rate and an improved VO2 max, which is your body’s ability to effectively use oxygen during exercise. For runners, training with a light vest can improve running economy and power, which may translate to faster times when you run without it.
Pro Tip: When running with a vest, focus on maintaining your normal stride and posture. Don’t let the weight cause you to lean forward or shorten your steps. If it does, the weight is too heavy. Start with brisk walking before you progress to running.
Using Weighted Vests for Rehabilitation and Physical Therapy
While often associated with intense athletic training, weighted vests can also be a valuable tool in certain rehabilitation and physical therapy settings. Under the guidance of a qualified professional, they can help patients safely rebuild strength, improve balance, and increase bone density after an injury or surgery.
One of the primary applications is in osteogenic loading—using resistance to promote bone growth. For individuals recovering from fractures or those with osteoporosis, wearing a light vest during weight-bearing exercises like walking or standing can provide the necessary stimulus to encourage bone remodeling and strengthening. The load is distributed evenly across the torso, which can be safer and more comfortable than holding dumbbells.
Additionally, weighted vests can be used to improve proprioception and balance. The added weight provides constant sensory feedback to the body, which can help retrain the neuromuscular system. Therapists might use them during balance drills or functional movement exercises to challenge a patient’s stability in a controlled manner. This is particularly useful for athletes recovering from lower-body injuries or older adults working on fall prevention.
It is absolutely critical to state that using a weighted vest for rehabilitation should only be done under the direct supervision of a doctor or physical therapist. They can determine the appropriate weight, exercises, and progression to ensure the process is safe and effective for your specific condition.
Trends in Weighted Vest Design and Technology
The humble weighted vest has come a long way from its early days as a simple sack with pockets for sandbags. Today’s market is filled with innovative designs that prioritize comfort, performance, and even technology. The evolution of weighted vest fitness gear is exciting for anyone looking to optimize their training.
One of the biggest trends is the focus on ergonomics and breathability. Manufacturers are using advanced materials like moisture-wicking fabrics and incorporating ventilation channels to keep athletes cool and dry during intense workouts. Shoulder straps are now contoured and padded with high-density foam to distribute weight more evenly and prevent pressure points. The goal is to create a vest that feels like it disappears on your body, allowing you to focus solely on your performance.
Another major advancement is the rise of the slim, compact profile. Gone are the days of excessively bulky vests. Modern designs, especially plate carriers and running-specific vests, sit close to the body to minimize movement and bounce. This allows for a much greater range of motion, making them suitable for everything from burpees to sprints.
Looking ahead, we may even see the integration of smart technology. Imagine a weighted vest with built-in sensors that track your movement, rep count, or even posture, providing real-time feedback to an app on your phone. While not mainstream yet, the fusion of smart fitness trackers and traditional training gear is a logical next step in the evolution of performance equipment.
User Reviews and Recommendations: What to Look For
When you’re ready to buy, one of the best things you can do is read reviews from real users. They provide invaluable insight into how a vest actually performs in the real world. While specific brand recommendations change, the qualities that users consistently praise (or complain about) remain the same.
What Users Love:
A Secure, No-Bounce Fit: This is almost always the number one compliment. Users rave about vests that stay put during dynamic movements like jumping jacks or running. Vests with multiple adjustment points and a snug torso fit consistently get the best reviews. * Comfortable Shoulder Straps: Nothing ruins a workout faster than straps digging into your shoulders.
Vests with wide, well-padded shoulder straps are highly praised, especially for heavier loads or longer workouts. * Easy Adjustability: For adjustable vests, users appreciate systems that make it quick and simple to add or remove weight. Fumbling with complicated pockets or straps mid-workout is a common frustration with poorly designed models.
Common Complaints to Watch For:
Chafing: Vests made from rough materials or with poorly placed seams are often cited for causing skin irritation, especially around the neck and under the arms.
Poor Weight Distribution: Some cheaper vests have weights that sag or bunch up, leading to an unbalanced and uncomfortable experience.
Durability Issues: Look out for reviews mentioning ripped seams, broken buckles, or leaking weight packets (especially with sand-filled vests). This is often a sign of low-quality materials and construction.
Reading through discussions on platforms like Reddit’s r/homegym can provide honest, unfiltered feedback on various brands and styles before you make a purchase.
FAQ: Your Weighted Vest Questions Answered
Let’s tackle some of the most common questions people have when considering adding a weighted vest to their fitness arsenal.
Do weighted vests do anything for fitness?
Absolutely. Weighted vests are a powerful tool for increasing the intensity of your workouts. By adding external resistance, they force your muscles and cardiovascular system to work harder. This leads to significant improvements in strength, muscular endurance, calorie burn, and even bone density.
They are one of the most versatile pieces of gear for accelerating fitness progress.
What is the downside of a weighted vest?
The primary downside is the potential for injury if used improperly. Wearing a vest that is too heavy or using it with poor exercise form can place excessive stress on your joints, particularly the spine, hips, and knees. It’s also crucial to choose a well-fitting vest, as a poorly designed one can cause chafing and discomfort. Always prioritize form over weight and progress gradually.
What happens 30 days with wearing a weight vest?
If you consistently and safely incorporate a weighted vest into your routine for 30 days, you can expect to see noticeable results. You’ll likely feel stronger in your bodyweight exercises, such as being able to do more push-ups or squats. Your cardiovascular endurance may improve, with activities like walking or climbing stairs feeling easier. You may also see changes in body composition due to the increased calorie burn.
How many lbs should a weighted vest be?
For beginners, the general recommendation is to start with a vest that is 5-10% of your body weight. For example, if you weigh 150 pounds, a 7.5 to 15-pound vest is an ideal starting point. This allows your body to adapt to the new load without compromising form. More advanced athletes may work up to 20% or more of their body weight for specific strength exercises, but it’s essential to build up to that level over time.
Final Thoughts
Investing in weighted vest fitness gear is more than just buying another piece of equipment; it’s a decision to make every workout more challenging, efficient, and effective. From building explosive strength with bodyweight exercises to turning a simple walk into a powerful cardio session, the applications are nearly limitless. By choosing the right vest for your goals, starting with a sensible weight, and always prioritizing safety and form, you can break through plateaus and unlock a new level of fitness.
Now you have the knowledge to confidently select and use a weighted vest. The only thing left to do is take that first step and experience the incredible difference it can make in your training. Get ready to feel stronger, faster, and more powerful with every single rep!
Fitness Gear Squat Rack Buying Guide: How to Choose for Your Home Gym
Building a home gym is one of the most exciting investments you can make in your health, and the absolute centerpiece of any serious setup is the right piece of fitness gear: a squat rack. This isn’t just a frame for holding a barbell; it’s the command center for building strength, muscle, and confidence. A quality squat rack unlocks a universe of exercises, from heavy squats and bench presses to pull-ups and rack pulls, all within the safety and convenience of your own space. It’s the single best purchase to elevate your training from casual to committed!
Choosing the right one can feel overwhelming with all the options out there. You’ve got power racks, half racks, squat stands, and a dozen different features to consider. But don’t worry, we’re going to break it all down. This guide will walk you through everything you need to know to select the perfect squat rack equipment that fits your space, budget, and fitness ambitions.
Let’s build something awesome.
What You’ll Learn
The Main Types of Racks: Understand the critical differences between power racks, half racks, and squat stands to see which one matches your training style and space.
Key Features to Look For: Learn what steel gauge, hole spacing, and weight capacity actually mean for your rack’s stability, safety, and long-term value.
Must-Have Accessories: Discover the essential attachments and add-ons that transform a basic rack into a complete, all-in-one home gym solution.
Safety is Paramount: Get actionable tips on how to set up and use your gym squat rack safely to prevent injury and lift with total confidence.
Budgeting for Your Build: Find out what you can expect to get for your money at different price points, from entry-level stands to pro-grade power cages.
Types of Squat Racks: What You Need to Know
Before you can pick the perfect rack, you need to know what your options are. The term “squat rack” covers a few different designs, each with its own set of pros and cons. Choosing the right type is the most important first step!
Power Racks (Full Cages)
This is the king of home gym safety and versatility. A power rack, or full cage, consists of four vertical posts connected by crossmembers, creating a cage-like structure you stand inside to lift. Its biggest advantage is safety. The four-post design allows you to set two horizontal safety bars (pins or straps) that will catch the barbell if you fail a lift, meaning you can push yourself to the limit without needing a human spotter.
It’s incredible peace of mind.
Power racks are also the most stable option, often supporting 1,000 lbs or more. They typically come with a built-in pull-up bar and have the most compatibility with attachments like dip stations, landmine posts, and lat pulldown systems. The only real downside is their footprint; they take up the most floor space and require a higher ceiling clearance, usually 8 feet or more.
Half Racks
A half rack is a fantastic compromise between a full power rack and a simple squat stand. It features two vertical posts connected to a stable base, with two shorter posts in the back often used for plate storage. You lift in front of the rack, not inside it. Safety is provided by adjustable spotter arms that extend forward from the main uprights.
This design offers a more open feel, which some lifters prefer, and it takes up less floor space than a full cage. Many high-quality half racks are just as stable as power racks and can handle immense weight. They are an excellent choice for lifters who want robust safety features without dedicating a massive area to their gym squat rack. The primary trade-off is that the safety spotter arms, while very effective, don’t offer the same fully enclosed protection as a power cage.
Fitness Squat Stands
Squat stands are the most basic and space-efficient option. They consist of two independent, adjustable uprights that hold the barbell. Some models have a connecting bar at the base for added stability, while others are completely separate. Their main appeal is their small footprint and lower cost, making them ideal for apartments or garages with limited space.
However, this compact design comes with significant trade-offs. Most squat stands lack robust safety features like spotter arms, making them riskier for heavy squats or bench presses performed alone. They are also less stable and have a lower weight capacity than half or full racks. A fitness squat stand is a great starting point, but most serious lifters will outgrow it quickly as they get stronger.
The Incredible Benefits of Using a Squat Rack
Investing in a squat rack is about so much more than just having a place to do squats. It’s about fundamentally changing the way you train for the better. The benefits are massive and will pay dividends in your fitness journey for years to come.
First and foremost is unmatched safety. The ability to set safety pins or spotter arms at the correct height is a true game-changer. It means you can confidently push for that extra rep on a heavy bench press or squat without the fear of getting pinned under the bar. This safety net encourages you to train harder and pursue progressive overload, which is the key to building strength and muscle, without needing a workout partner for every session.
Second is mind-blowing versatility. A good gym squat rack is a multi-purpose station. You can perform the foundational strength movements: squats, bench presses, and overhead presses. Most racks also include a pull-up bar, opening the door to bodyweight exercises like pull-ups and chin-ups.
Add an adjustable bench, and you can do incline presses, seated shoulder presses, and dozens of other movements. It consolidates so much exercise potential into one piece of equipment.
Finally, it enables consistent progressive overload. To get stronger, you have to consistently lift more weight or do more reps over time. A squat rack provides the stable, secure environment needed to do this effectively. You’re not limited by what you can clean and press over your head.
You can simply load the bar, get under it, and lift. This direct path to adding weight to the bar is the fastest way to see real, measurable progress in your strength and physique.
How to Choose the Right Squat Rack for Your Home Gym
Alright, you know the types and the benefits. Now for the fun part: picking your own! Choosing the right fitness gear squat rack comes down to a few key factors. Getting these right will ensure you buy a rack you love and that will last a lifetime.
Measure Your Space (Twice!)
This is the most important, non-negotiable step. Before you even look at a single rack, grab a tape measure. You need three key measurements:
Ceiling Height: Most racks are between 84 inches (7 feet) and 96 inches (8 feet) tall. You need enough clearance not only for the rack itself but also to perform pull-ups without hitting your head.
A minimum of 8.5 to 9-foot ceilings is ideal for most racks. * Floor Width & Depth: Check the rack’s footprint dimensions. A typical power rack is about 4 feet wide by 4 feet deep. Remember to add extra space around it—at least 2-3 feet on each side and in front—for loading plates and moving around safely.
Barbell Space: A standard Olympic barbell is 7 feet long. You need to make sure you have enough width to rack and un-rack the bar without hitting a wall.
Steel Quality: Gauge and Tubing Size
The backbone of any good squat rack is its steel. Two numbers tell you almost everything you need to know: the gauge and the tubing size. Steel gauge refers to its thickness; a lower number means thicker, stronger steel. For a home gym, look for 11-gauge or 12-gauge steel.
Anything higher (like 14-gauge) is generally too thin for serious lifting.
Tubing size refers to the dimensions of the vertical uprights. The most common sizes are 2×2″, 2×3″, and 3×3″. While 2×2″ is fine for beginners, 2×3″ or 3×3″ uprights offer far superior stability and a higher weight capacity. The 3×3″ with 11-gauge steel is considered the gold standard for home and commercial gyms.
Weight Capacity
Pay close attention to the manufacturer’s listed weight capacity. This tells you how much weight the rack can safely support. For a long-term investment, aim for a rack with a capacity of at least 700 lbs, with 1,000 lbs being ideal. Even if you’re not lifting that much now, a higher capacity indicates better construction, stronger welds, and more robust hardware.
It’s a sign of quality and gives you unlimited room to grow.
Hole Spacing
This might seem like a small detail, but it’s incredibly important for safety and performance. Hole spacing refers to the distance between the adjustment holes on the uprights. Look for racks with 1-inch spacing through the bench press zone. This is often called “Westside” spacing.
It allows you to get a much more precise placement for your J-cups and safety bars, which is critical for setting up a safe and effective bench press.
Essential Accessories for Your Squat Rack
Your squat rack is the foundation, but the accessories are what turn it into a powerhouse. These add-ons expand your exercise options and make your training more efficient and enjoyable. Here are the must-haves!
A Quality Barbell and Weight Plates: This is non-negotiable. You’ll need a standard 7-foot, 45-pound Olympic barbell. For plates, a 300 lb set is a great starting point for most people, including a pair of 45s, 35s, 25s, 10s, 5s, and 2.5s.
An Adjustable Bench: An adjustable flat-incline-decline (FID) bench is crucial. It allows you to perform flat bench presses, incline presses for your upper chest, and seated overhead presses, dramatically increasing your exercise library.
Upgraded J-Cups: The J-cups that come with most racks are basic steel. Upgrading to a pair with a dense plastic (UHMW) lining is a smart move. This protects the knurling on your expensive barbell from getting scratched and damaged over time.
Dip Station Attachment: Most racks have a compatible dip station attachment that slides into the uprights. This is a fantastic tool for building your chest, shoulders, and triceps with one of the best bodyweight exercises around.
Landmine Attachment: This simple sleeve attachment holds one end of your barbell, allowing you to perform a huge variety of rotational and pressing exercises like landmine presses, rows, and anti-rotation movements. It’s an incredibly versatile and low-cost addition.
Pro Tip: When buying accessories, always check for compatibility! The most important factor is the size of your rack’s uprights (e.g., 2×3″ or 3×3″) and the diameter of the holes (e.g., 5/8″ or 1″). Not all attachments fit all racks.
Safety First: Critical Tips for Squatting with a Rack
A squat rack is an amazing safety tool, but only if you use it correctly. Following these safety rules will ensure you can train hard while minimizing your risk of injury. Your long-term progress depends on staying healthy!
Always Set the Safety Bars Correctly. This is the number one rule. For squats, set the safety bars just below the lowest point of your range of motion. You should be able to complete a full squat without the barbell touching them, but they should be high enough to catch the weight if you fail. For bench press, set them just above your chest when you have a slight arch in your back. Test the height with an empty bar before loading it up.
Learn How to Bail Safely. Even with safeties, you should know how to get out from under a failed lift. For squats, if you get stuck, simply sit down and let the safety bars catch the weight behind you. For bench press, you can roll the bar down your torso towards your hips (the “roll of shame”) or, if the safeties are set right, just relax your arms and let them catch it.
Use Barbell Clips/Collars. Always secure your weight plates with collars. It’s shocking how many people skip this. An unbalanced load caused by a sliding plate can lead to a dangerous failed lift and serious injury. It only takes a few seconds and it’s a non-negotiable safety step.
Perform Regular Equipment Checks. About once a month, take a few minutes to check all the nuts and bolts on your rack and tighten anything that has come loose. Also, inspect the welds for any signs of stress or cracking. A well-maintained rack is a safe rack.
Common Mistakes to Avoid When Buying and Using a Squat Rack
Making an informed decision now will save you from frustration and buyer’s remorse later. Here are some of the most common mistakes people make with squat rack equipment—avoid these at all costs!
Ignoring Ceiling Height: This is a classic, heartbreaking mistake. You get your dream rack, spend hours assembling it, and then realize you can’t do a pull-up because your head hits the ceiling. Measure your space first, and make sure you have at least 6-12 inches of clearance above the rack’s pull-up bar.
Buying a Rack with a Low Weight Capacity: Don’t just buy a rack that can handle what you lift now. Buy a rack that can handle what you aspire to lift in the future. A cheap rack with a 300-500 lb capacity might seem like a good deal, but you’ll quickly outgrow it and lose confidence in its stability as you get stronger.
Forgetting About Attachments: When you buy a rack from a specific brand, you’re also buying into their ecosystem of attachments. Choosing a rack with 3×3″ uprights and 1″ holes will give you the most options, as many companies make attachments for this standard. Don’t lock yourself into a proprietary size that limits your future upgrades.
Improper Setup: Failing to ensure the rack is on a level surface can make it unstable. If your garage floor is sloped, use shims to level it out. For half racks and some lighter power racks, bolting them to the floor or a lifting platform is highly recommended for maximum stability, especially if you plan on doing kipping pull-ups or using band attachments.
Comparison of Popular Squat Rack Brands
The market is full of great options. While we can’t review every model, here’s a quick look at some of the most popular brands to give you an idea of the landscape.
Feature
Rogue Fitness
REP Fitness
Titan Fitness
Price Point
Premium
Mid-Range
Budget-Friendly
Steel Origin
USA-Made
Imported
Imported
Primary Uprights
3×3″, 11-gauge
3×3″, 11-gauge
2×3″ or 3×3″, 11-gauge
Best For
Lifters wanting the highest quality, made-in-USA gear and are willing to pay for it.
The best balance of high-end features, excellent quality, and value.
Home gym owners on a tighter budget who still want a capable and feature-rich rack.
Key Selling Point
Legendary build quality, huge ecosystem of attachments, and brand reputation.
Premium features like laser-cut numbers and Westside spacing at a very competitive price.
Often the most affordable option for a given set of features.
How to Properly Set Up Your Squat Rack
Your new rack has arrived! The excitement is real, but proper assembly is key to its safety and longevity. Here’s a simple step-by-step guide to get you started.
Unbox and Organize Everything: Open all the boxes and lay out all the parts. Group the bolts, nuts, and washers by size. This seems tedious, but it will save you a massive headache later. Cross-reference the parts list with what you have to ensure nothing is missing.
Build the Base First: Start by assembling the base of the rack on the floor where it will live. Don’t fully tighten the bolts just yet; leave them slightly loose. This allows for some play to get everything aligned correctly.
Attach the Uprights: With a helper (this is a two-person job!), attach the four vertical uprights to the base. Again, only hand-tighten the bolts for now. Once all four are attached, you can install the top crossmembers and pull-up bar.
Level and Square the Rack: Once the frame is assembled, use a level to ensure the uprights are perfectly vertical and the base is level. Make any necessary adjustments. This is the most critical step for stability. Once it’s perfectly level and square, go back and tighten every single nut and bolt securely with a wrench or socket set.
Consider Bolting it Down: For maximum safety, especially with half racks or if you’re a heavy lifter, bolting your rack to the floor is the best practice. If you’re on concrete, you’ll need a hammer drill and concrete anchors. If you’re on a wood platform, you can use heavy-duty lag bolts.
Integrating a Squat Rack into Your Workout Routine
A squat rack is the perfect tool to structure your entire training week around compound movements. Here is a sample 3-day full-body routine that uses the rack as its centerpiece:
Workout A (e.g., Monday)
Main Lift: Barbell Back Squats (in the rack) – 3 sets of 5-8 reps
Accessory Press: Barbell Bench Press (in the rack) – 3 sets of 5-8 reps
Accessory Pull: Barbell Rows – 3 sets of 8-12 reps
Extra Work: Face Pulls, Bicep Curls
Workout B (e.g., Wednesday)
Main Lift: Barbell Overhead Press (in the rack) – 3 sets of 5-8 reps
Accessory Squat: Dumbbell Lunges – 3 sets of 10-15 reps per leg
Accessory Pull: Pull-ups (on the rack’s bar) – 3 sets to failure
Extra Work: Tricep Pushdowns, Leg Curls
Workout C (e.g., Friday)
Main Lift: Deadlifts (in front of the rack) – 1 set of 5 reps
Accessory Press: Incline Dumbbell Press (using the bench) – 3 sets of 8-12 reps
Accessory Pull: Chin-ups (on the rack’s bar) – 3 sets to failure
Extra Work: Lateral Raises, Ab work
This simple structure ensures you’re hitting all major muscle groups with heavy, effective exercises, with the squat rack playing a central role in your progress.
Squat Rack Maintenance: Keeping Your Equipment in Shape
Your squat rack is built to last, but a little bit of regular maintenance will keep it looking and performing its best for decades. It’s simple and only takes a few minutes.
First, make it a habit to wipe down the rack after your workouts, especially the J-cups and pull-up bar where your hands and sweat make the most contact. This prevents grime buildup and keeps it looking clean.
About once a month, do a bolt check. Go around the entire rack with your wrench and socket set and re-tighten all the nuts and bolts. They can sometimes loosen slightly over time with heavy use. This is a quick and easy safety check that ensures the rack remains rock-solid.
Finally, inspect for rust, especially if your gym is in a humid garage or basement. If you see any surface rust starting to form, especially around welds or scratches, you can easily remove it with a wire brush and then touch it up with a rust-resistant spray paint like Rust-Oleum to prevent it from spreading.
Frequently Asked Questions (FAQ)
Can I use a squat rack for bench press?
Absolutely. This is one of its primary functions. A power rack or half rack is the safest way to bench press alone. You can set the safety bars or spotter arms just above your chest, which will catch the barbell if you fail a rep, preventing a very dangerous situation.
You will need a quality flat or adjustable bench to go with it.
Do I need to bolt my squat rack to the floor?
It depends on the rack and your training style. For most full power racks (cages) that weigh over 300 lbs, bolting down is often optional for general strength training, though still recommended for maximum stability. For lighter power racks, half racks, and squat stands, bolting them to the floor or a lifting platform is highly recommended to prevent any tipping or shifting during heavy lifts or dynamic movements like kipping pull-ups.
What’s the difference between a power rack and a half rack?
The main difference is the design. A power rack is a four-post cage that you lift inside of, offering the highest level of safety with its pin-and-pipe or strap safety systems. A half rack has two main posts that you lift in front of, using adjustable spotter arms that extend forward for safety. Power racks take up more space but offer more enclosed protection, while half racks are more compact and have a more open feel.
How much should I spend on a good squat rack?
Prices can vary widely, but you can find excellent, high-quality squat racks for a home gym in the $400 to $900 range. Below $300, you’re typically looking at basic squat stands with limited features and lower weight capacities. In the $400-$900 sweet spot, you can get a very robust half rack or power rack made from 11-gauge steel that will last a lifetime. Premium, commercial-grade racks can cost $1,000 or more.
Final Thoughts
Choosing the right fitness gear squat rack is the single most important decision you’ll make for your home gym. It’s the foundation upon which all your strength goals will be built. By considering your space, budget, and training ambitions, you can confidently select a piece of squat rack equipment that will serve you for years to come.
Remember to prioritize safety and quality. Look for heavy-gauge steel, a high weight capacity, and the design—be it a power rack, half rack, or squat stand—that best fits your needs. Don’t be afraid to invest in a quality piece; it’s an investment in your health, strength, and consistency. Now go out there and build the home gym you’ve always dreamed of!
To provide the best experiences, we use technologies like cookies to store and/or access device information. Consenting to these technologies will allow us to process data such as browsing behavior or unique IDs on this site. Not consenting or withdrawing consent, may adversely affect certain features and functions.
Functional
Always active
The technical storage or access is strictly necessary for the legitimate purpose of enabling the use of a specific service explicitly requested by the subscriber or user, or for the sole purpose of carrying out the transmission of a communication over an electronic communications network.
Preferences
The technical storage or access is necessary for the legitimate purpose of storing preferences that are not requested by the subscriber or user.
Statistics
The technical storage or access that is used exclusively for statistical purposes.The technical storage or access that is used exclusively for anonymous statistical purposes. Without a subpoena, voluntary compliance on the part of your Internet Service Provider, or additional records from a third party, information stored or retrieved for this purpose alone cannot usually be used to identify you.
Marketing
The technical storage or access is required to create user profiles to send advertising, or to track the user on a website or across several websites for similar marketing purposes.
To provide the best experiences, we use technologies like cookies to store and/or access device information. Consenting to these technologies will allow us to process data such as browsing behavior or unique IDs on this site. Not consenting or withdrawing consent, may adversely affect certain features and functions.