
- Must-Have Camera Accessories for Every Photographer: This all-in-one camera cleaning kit is a must-have for all photogra…
- Safe Professional-Grade Lens Cleaner: Camera lens cleaning kit includes a premium lens cleaner spray that’s alcohol-free…
- All-in-One Photography Accessories Set: This professional lens cleaning kit features high quality photography accessorie…
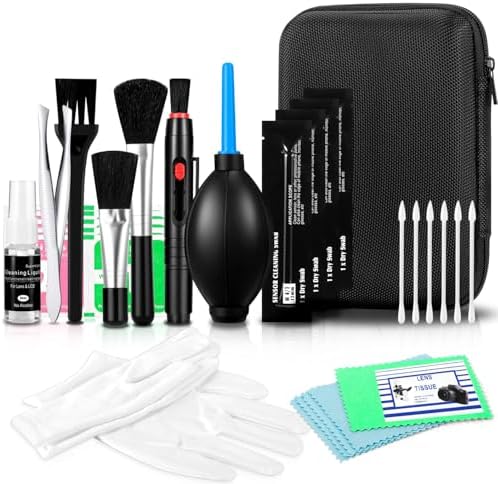
- Camera Cleaning Brush Set 14pcs, Blow Ball / Lens Pen / Cleaning Brush / Dust Free Cloth / Wet & Dry Wipes, Cotton Swabs…
- Rocket Blow Up Balloon: The blow up balloon easily directs airflow to blow away dirt and dust from the lens or camera se…
- Cleaning brushes and swabs: Microfibre easily cleans invisible dust, particles and smudges from cameras and lenses, soft…

- WHAT YOU CAN GET: 1 camera lens Cleaner 50ml + 1 air blower + 1 two in one Lens Cleaning Pen + 1 Retractable wool soft b…
- WHAT IT USED FOR : Professional Camera cleaning kit for Canon, Sony, Nikon, Pentax, drone, is mainly used for camera, ds…
- WHAT WE DIFFERENT FROM OTHERS: We equipped A retractable wool brush, which is super soft and bushy, can be great used in…
How to Clean Camera Lenses Without Scratches: A Photographer’s Guide
There’s nothing more frustrating than capturing a once-in-a-lifetime shot, only to find it ruined by a blurry smudge or a distracting dust spot. A dirty lens can sabotage your photos, robbing them of sharpness, contrast, and clarity. That’s why learning the proper way of cleaning camera lenses isn’t just a chore—it’s one of the most fundamental skills every photographer must master to protect their investment and ensure every image is as crisp and vibrant as possible. It’s your secret weapon for consistently brilliant photos!
Getting this right is easier than you think, and it can make a world of difference in your photography. Forget the myths and the risky shortcuts; we’re going to walk through the professional, safe, and incredibly effective methods that will keep your glass pristine. You’ll be amazed at how much better your photos look when you start with a perfectly clean lens!
Quick Summary
- Blow, Then Brush: Always start by removing loose dust and debris with an air blower and a soft brush. This prevents you from grinding abrasive particles into the glass during the wiping stage.
- Use the Right Tools: Never use your shirt, paper towels, or household cleaners. Stick to dedicated microfiber cloths, lens cleaning solution, and lens pens designed specifically for delicate optical coatings.
- Technique Matters: Apply cleaning fluid to your cloth, not directly to the lens. Wipe gently in a circular or spiral motion, starting from the center and moving outwards to push debris away from the middle of the lens.
- Prevention is Key: Use lens caps religiously and consider a high-quality UV or protective filter. A filter is much cheaper and easier to replace than the front element of your expensive lens.
Why a Flawlessly Clean Lens is Your Secret Weapon

A camera lens is a marvel of optical engineering, designed to bend light with incredible precision onto your camera’s sensor. Even the tiniest imperfection on its surface can disrupt this process, leading to noticeable flaws in your final image. A smudge from a fingerprint, for instance, is an oily residue that can cause softness and a significant loss of contrast, making your photos look hazy or washed out.
Dust particles are another common enemy. While a few tiny specks might not be visible at wide apertures, they become glaringly obvious when you stop down your aperture (using a higher f-number like f/11 or f/16), especially when shooting bright scenes like a clear blue sky. These spots can mean hours of tedious post-processing work to remove them from every photo in a set. It’s so much easier to spend 30 seconds cleaning your lens!
Beyond just dust and smudges, things like sea spray, pollen, or water spots can leave mineral deposits that not only degrade image quality but can also damage the delicate coatings on your lens over time if left unchecked. These coatings are essential for reducing glare, preventing flare, and ensuring accurate color transmission. Keeping your lens clean is a direct investment in the quality and longevity of your gear.
Know Your Glass: A Quick Guide to Lens Types and Coatings
Before you start cleaning, it helps to understand what you’re working with. While the fundamental cleaning process is the same for most lenses, knowing a bit about their construction can reinforce why certain techniques are so important. Broadly, you’ll encounter prime lenses (with a fixed focal length) and zoom lenses (with a variable focal length). The cleaning process for the front and rear glass elements is identical for both.
What’s truly critical are the multi-layer coatings applied to the glass surfaces. Modern lenses from manufacturers like Canon, Nikon, Sony, and others feature advanced nano-crystal, fluorine, or super-integrated coatings. These microscopic layers are designed to minimize reflections, reduce chromatic aberration, and repel water and oil. Fluorine coatings, for example, make it much easier to wipe away fingerprints and water droplets.
However, these coatings are the very reason you must avoid harsh chemicals. Abrasive materials or cleaners containing alcohol, ammonia, or detergents can strip these coatings, permanently damaging the lens and its optical performance. Think of it like this: you’re not just cleaning a piece of glass; you’re caring for a highly engineered optical surface. That’s why using tools specifically designed for camera lens cleaning is absolutely essential.

Your Essential Camera Lens Cleaning Toolkit
Assembling the right kit is the first step toward perfect, scratch-free lens cleaning. Having these items on hand means you’re always prepared, whether you’re at home or out in the field. You don’t need a lot, but you do need the right things. Here’s your must-have list!
-
Rocket Air Blower: This is your first line of defense. A rubber bulb blower, often called a rocket blower, provides powerful jets of clean air to dislodge loose dust and larger particles without ever touching the lens. Crucially, do NOT use canned or compressed air. Canned air contains chemical propellants that can spray onto your lens, freezing and damaging the coatings.
-
Ultra-Soft Lens Brush: After blowing, a retractable brush with very soft, fine bristles (often made of camel hair) can gently sweep away any remaining, more stubborn particles. A retractable design is fantastic because it keeps the bristles clean and protected when not in use.
-
Microfiber Cleaning Cloths: These are non-negotiable. Get several high-quality, lint-free microfiber cloths specifically made for optics. They are designed to lift and trap oils and smudges without leaving behind fibers or scratching the surface. Avoid using the cloth that came with your sunglasses; it’s likely collected dirt and oils over time.
-
Lens Cleaning Solution: A good cleaning fluid is formulated to be safe for all lens coatings. It breaks down oils from fingerprints and other grime effectively. A small spray bottle will last you a very long time, as you only need one or two drops per cleaning session.
-
Lens Pen: This is a brilliant all-in-one tool. One end typically has the soft, retractable brush, while the other has a carbon-based cleaning tip. This carbon compound is amazing at absorbing oils from fingerprints. It’s a fantastic tool for quick touch-ups in the field.
Pro Tip: Keep your cleaning tools clean! Store your microfiber cloths in individual ziplock bags to prevent them from picking up dust and grit in your camera bag. You can wash them occasionally with a bit of mild soap and water, but be sure to rinse them thoroughly and let them air dry completely.
The Ultimate Step-by-Step Guide to Cleaning Camera Lenses
Alright, you’ve got your tools, and you’re ready to get that glass sparkling! This is the professional method that will give you perfect results every time. Take your time, be gentle, and work in a clean, well-lit space.
Here is the step-by-step process for how to clean lenses safely and effectively:
-
Step 1: Prepare Your Workspace. Find a clean, dust-free, and brightly lit area. This will help you see all the dust and smudges on the lens surface and prevent more dust from settling on it while you work.
-
Step 2: Blow It Off. Hold the lens with the front element facing downwards to let gravity help. Use your rocket air blower to puff air across the entire surface of the lens. This will remove the majority of loose dust and grit. This is the most important first step to prevent scratches.
-
Step 3: Brush Away Stubborn Particles. If you still see some stubborn particles, use your soft lens brush. Gently sweep from the center of the lens outwards. Use a light touch; the goal is to flick the particles away, not grind them in.
-
Step 4: Apply Cleaning Fluid (To the Cloth!). This is a critical rule: NEVER apply cleaning fluid directly to the lens. Liquid can seep into the lens barrel and cause serious internal damage, including fungus growth or problems with the electronics. Instead, apply one or two drops of lens cleaning solution to the corner of your microfiber cloth.
-
Step 5: The Perfect Wipe. Take the dampened part of your cloth and gently wipe the lens surface. Start in the center and work your way outwards in a slow, continuous spiral motion. This technique pushes any remaining microscopic debris to the edges of the lens instead of just smearing it around the center.
-
Step 6: Buff and Dry. Immediately after wiping with the damp part of the cloth, use a clean, dry section of the same cloth to gently buff the lens. Use the same center-out spiral motion. This removes any remaining moisture and eliminates streaks, leaving a perfectly clear surface.
-
Step 7: Don’t Forget the Rear Element! The rear element of the lens—the part that connects to your camera body—is just as important. A smudge or dust particle here can be even more visible in your photos. Repeat the exact same process (blow, brush, wipe) on the rear element, being extra careful not to touch the electronic contacts around it.
Tackling Tough Messes: How to Handle Stubborn Smudges and Dust
Sometimes you’ll face more than just a bit of dust. Oily fingerprints, dried saltwater spray, or sticky pollen can require a little more effort. The key is to remain gentle and patient. Don’t resort to more pressure or harsh chemicals!
For a particularly greasy fingerprint, the carbon tip of a lens pen is your best friend. After blowing and brushing, gently use the carbon tip in the same circular, center-out motion. The carbon compound is specifically designed to lift and absorb the oils that microfiber cloths can sometimes just spread around. You’ll be shocked at how effective it is!
If you’re dealing with dried water spots or sea spray, you might need a bit more moisture to dissolve the mineral deposits. A great technique is to gently “huff” on the lens with your breath. The warm, moist air creates a fine layer of condensation. Immediately follow up with a gentle wipe using your microfiber cloth.
This is often enough to dissolve the spots without needing extra cleaning fluid.
In extreme cases, you might need to use a slightly more dampened cloth. Apply one or two more drops of solution to your cloth and let it soak in for a moment. Then, perform the center-out wipe, followed immediately by a buff with a dry cloth. You may need to repeat this process a couple of times for very stubborn grime, but it’s much safer than applying more pressure.
Prevention is the Best Medicine: Keeping Your Lenses Pristine
While knowing how to clean camera lenses is essential, the ultimate goal is to clean them as infrequently as possible. The best way to do that is through prevention. A few simple habits can dramatically reduce the amount of dust and smudges your lenses collect.
First and foremost: use your lens caps! This is the single most effective thing you can do. Your lens should have a cap on both the front and rear elements whenever it’s not mounted on the camera. When you’re changing lenses, do it quickly and in a sheltered environment if possible, with the camera body pointing downwards to prevent dust from falling onto the sensor.
Second, consider using a high-quality protective filter. A clear or UV filter screws onto the front of your lens and acts as a sacrificial barrier. It protects the expensive front element of your lens from dust, moisture, fingerprints, and even physical scratches. It’s far better to accidentally scratch a $50 filter than a $1,500 lens.
Plus, cleaning a flat filter is often easier than cleaning the curved front element of a lens.
Finally, be mindful of your environment. When shooting at the beach, try to keep your back to the wind to avoid sand and sea spray hitting your lens. In dusty conditions, avoid changing lenses outdoors if you can. A little bit of situational awareness goes a long way in keeping your gear clean and safe.
Lenses vs. Filters: What’s the Difference in Cleaning?

This is a great question that often comes up. Is there a difference between cleaning the lens itself and cleaning a filter that’s attached to it? The process is virtually identical, but the mindset can be slightly different.
You should use the exact same tools and the same gentle, center-out technique for both. A dirty filter will degrade your image quality just as much as a dirty lens, so it deserves the same level of care. You still need to blow, brush, and then wipe with a clean microfiber cloth and proper solution.
The key difference is the consequence of a mistake. As mentioned before, filters are a protective, replaceable layer. If you somehow manage to scratch a filter despite being careful, it’s a relatively inexpensive fix. Scratching the front element of your actual lens is a much more serious and costly problem.
This is why many professional photographers use filters in harsh environments—not for any optical effect, but purely for protection. So, while you should always be careful, you can have a little more peace of mind when cleaning a filter.
The Most Common (and Damaging) Lens Cleaning Mistakes to Avoid
Knowing what not to do is just as important as knowing the right steps. Many well-intentioned photographers have accidentally damaged their gear by using improper materials or techniques. Here are the absolute worst offenders to avoid at all costs:
-
Using Your T-Shirt or Breath: Your shirt is not clean. It’s full of tiny, abrasive dust particles and oils from your skin. Wiping your lens with it is like using fine-grit sandpaper. Similarly, while a gentle huff of breath is okay, spitting on your lens is not—saliva contains enzymes that can damage coatings.
-
Using Paper Products: Never use paper towels, napkins, or facial tissues. These products are made from wood pulp, which is surprisingly abrasive at a microscopic level. They will leave behind lint and can create fine “slew marks” or scratches on your lens coatings.
-
Using Household Cleaners: Windex, glass cleaner, rubbing alcohol, or any other household chemical is a huge no-no. These cleaners often contain ammonia, alcohol, and other harsh solvents that will strip the delicate anti-reflective coatings right off your lens, ruining its performance.
-
Applying Too Much Pressure: You should never have to scrub your lens. If a smudge isn’t coming off, the solution is more patience and perhaps another gentle wipe with a clean cloth, not more force. Pressing too hard can grind microscopic grit into the glass.
Pro Tip: When changing lenses, turn your camera off first. An active sensor has a slight electrostatic charge that can attract dust into the camera body. Powering down the camera reduces this effect, helping to keep both your sensor and the rear element of your lens cleaner.
When to Call in the Pros: Recognizing a Job for a Professional
There are some cleaning jobs that are best left to a trained technician. Attempting to fix these issues yourself can lead to permanent damage. So, when should you put down the microfiber cloth and take your lens to a professional camera repair shop?
Internal Dust or Debris: If you see dust specks inside the lens when you look through it, that’s beyond the scope of a surface cleaning. This is common in zoom lenses that pull air in and out as they operate. A professional can safely disassemble the lens in a cleanroom environment to remove the internal dust.
Fungus Growth: This is a serious problem. If a lens is stored in a damp, dark environment, fungus can begin to grow on the internal glass elements. It often looks like fine, spiderweb-like threads. This fungus can permanently etch the glass coatings if not treated.
Professional cleaning is the only way to address it.
Sand or Grit in the Mechanism: If you were shooting at the beach and got sand in the zoom or focus ring, do not try to force it! You’ll just grind the sand into the delicate internal mechanics. A technician will need to take the lens apart to properly clean out the grit.
Oily Aperture Blades: If you notice oil on the aperture blades inside the lens, this is a sign of an internal lubrication issue. This requires professional service to clean the blades and repair the source of the leak.
Frequently Asked Questions About Cleaning Lenses
Let’s tackle some of the most common questions photographers have about camera lens cleaning tips. Getting clear, direct answers to these is key to building confidence in your cleaning routine.
What is the best thing to clean camera lenses with?
The absolute best combination is a three-part system. First, an air blower to remove loose particles. Second, an ultra-soft brush for any remaining grit. Third, a clean, high-quality microfiber cloth with a single drop of a cleaning solution specifically formulated for multi-coated optical lenses.
This combination safely removes both abrasive dust and oily smudges without risking damage.
Can you use alcohol wipes on camera lenses?
This is a tricky one. You should never use general-purpose alcohol wipes or rubbing alcohol, as the concentration is often too high and can damage coatings. However, some pre-moistened wipes, like those made by Zeiss, are specifically designed for coated optics and use a precise amount of isopropyl alcohol that is safe. If you use pre-moistened wipes, make sure they are explicitly marketed for camera lenses.
Can I use Windex on a camera lens?
No, absolutely not. Windex and other household glass cleaners contain ammonia and other harsh chemicals that are designed for durable household glass, not for delicate, multi-coated optical surfaces. These chemicals will strip the anti-reflective coatings from your lens, leading to increased flare, loss of contrast, and permanent damage. Stick to dedicated lens cleaning solutions only.
How to clean fingerprints off camera lens?
Fingerprints are oily, so an air blower won’t work. The best tool is a lens pen with a carbon cleaning tip, which is designed to absorb oil. Alternatively, use a microfiber cloth with a drop of lens cleaning solution. Apply the solution to the cloth, then wipe the fingerprint away using a gentle, circular motion starting from the center of the lens and spiraling outwards.
What should you not clean lenses with?
You should never clean a lens with anything abrasive or chemically harsh. This includes your t-shirt, paper towels, napkins, facial tissues, and any household cleaners like Windex or rubbing alcohol. Also, avoid using canned or compressed air, as the propellants can damage the lens. Always stick to tools designed for camera optics.
How do professionals clean camera lenses?
Professionals use the exact same tools and techniques described in this guide: air blowers, soft brushes, microfiber cloths, and proper cleaning fluid. The main difference is their experience and environment. They work in very clean, controlled settings and have performed the process thousands of times, allowing them to be efficient and confident. They don’t have a secret magic tool; they just have mastered the fundamentals.
Final Thoughts: Your Path to Perfectly Clean Lenses
Mastering how to clean camera lenses is a rite of passage for every photographer. It’s a simple, meditative process that connects you with your gear and directly impacts the quality of your work. By investing in a small, inexpensive cleaning kit and following the safe, step-by-step methods we’ve covered, you can ensure your lenses perform at their absolute best for years to come.
Forget the anxiety and uncertainty. You now have the knowledge to tackle dust, smudges, and grime with confidence. Make lens cleaning a regular part of your pre-shoot ritual. A few minutes of care before you head out the door will save you hours of frustration and editing later, allowing you to focus on what truly matters: capturing incredible, crystal-clear images.
Now go on, give your lenses the sparkle they deserve and see the difference it makes in your photos. Happy shooting!