About Best High Tech Gadgets For Adults: Best High Tech Gadgets For Adults is your trusted source for cutting-edge technology insights and solutions. High Tech Gadget Reviews We provide reliable, well-researched technology content to keep you informed and help you make better decisions. This content focuses on Camera Lenses for Mobile Phones: A Beginner’s Buying Guide and related topics.


- ✔ COMPATIBLE WITH ALL SMARTPHONES, TABLETS, and LAPTOPS including ALL iPhone models, Samsung Galaxy and Note, Google Pix…
- ✔ TRUVIEW 0.45x WIDE ANGLE LENS – CAPTURE 45% MORE PICTURE WITH EVERY SNAP: Shoot stunning photos of people, pets, trave…
- ✔ CLARUS 15x MACRO LENS – MARVEL YOUR SENSES. MAGNIFY NEARBY SUBJECTS FOR BREATHTAKING, SUPER CLOSE-UP PHOTOS: Capture a…


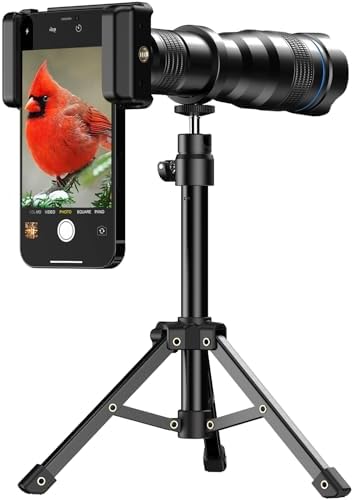
- 【HD High Power】32x HD mobile phone lens with advanced anti-shake design for clearer and better imaging.
- 【2 in 1 Purpose】When you connect it to your phone, it’s a telephoto lens. When you hold it in your hand, it’s a high – d…
- 【Iphone&Android】It’s perfectly compatible with both Apple and Android phone systems, you can choose with confidence.


- 3 in 1 Phone Camera Lens Set: Every lens can be used separately. The 20X Macro lens has a best focusing distance of 1.18…
- High Quality: Professional HD Lens with advanced lanthanide optical glass can reduce the reflection and ghosting, bringi…
- Clip-on Phone Lens: Easy Use Design. Just attach the lens to the clip and clip it on the phone camera, then you can enjo…
Camera Lenses for Mobile Phones: A Beginner’s Buying Guide
Your smartphone is already an incredible camera, capturing stunning photos with the tap of a button. But what if you could push its creative boundaries even further. That’s where the magic of camera lenses for mobile phones comes in. These powerful attachments can transform your phone from a simple point-and-shoot into a versatile photography tool, letting you capture sweeping landscapes, intimate portraits, and detailed close-ups you never thought possible.
It’s time to get excited about mobile photography again.
This guide is your ultimate resource for navigating the exciting world of phone camera lenses. We’ll break down everything you need to know, from the different types of lenses available to how to choose the perfect one for your artistic vision. Get ready to take your mobile photography to a whole new level!
What You’ll Learn
- Lens Types Explained: Discover the key differences between wide-angle, telephoto, macro, and anamorphic lenses and which one is right for the shots you want to take.
- Quality is Key: Learn why the quality of the glass and coatings in a lens has a massive impact on the sharpness, color, and overall clarity of your photos.
- Compatibility Matters: Understand the different ways lenses attach to your phone, from simple clips to dedicated cases, ensuring you buy a lens that actually fits your device.
- Beyond the Lens: Get actionable tips on how to use your new lenses with manual camera apps and stabilization techniques to capture truly professional-looking images.
Unlocking Your Phone’s Potential: The Different Types of Mobile Camera Lenses


Choosing your first lens attachment can feel overwhelming, but it’s really about matching the lens to the type of photos you love to take. Each lens type opens up a new creative door, allowing you to see the world through a different perspective. Let’s break down the most popular options!
Wide-Angle Lenses
Ever tried to take a photo of a stunning mountain range or a big group of friends, only to find you can’t fit everything in the frame. A wide-angle lens is your solution. These lenses expand your phone’s field of view, typically around 18mm, allowing you to capture more of the scene. They are perfect for landscape photography, architecture, and large group shots.
The effect is immersive, making the viewer feel like they are right there in the moment.
Telephoto Lenses
Telephoto lenses do the opposite of wide-angle lenses: they bring distant subjects closer. While your phone has a digital zoom, it simply crops the image and reduces quality. A true optical telephoto lens, usually around 58mm or 60mm, magnifies the image without losing sharpness. This is fantastic for portrait photography, as it creates a beautiful, natural compression and background blur (bokeh).
It’s also great for capturing wildlife or sporting events from a distance.
Macro Lenses
Get ready to explore a tiny world! Macro lenses are designed for extreme close-up photography, revealing intricate details the naked eye can’t see. You can capture the delicate veins on a leaf, the tiny hairs on a spider, or the texture of a piece of fabric. These lenses have a very short focal distance, meaning you have to get physically close to your subject, but the results are absolutely breathtaking and open up a whole new genre of photography.
Fisheye Lenses
For a fun, creative, and highly stylized look, nothing beats a fisheye lens. These lenses produce an ultra-wide, distorted, and spherical image, bending straight lines and creating a dynamic, almost cartoonish effect. They have a massive field of view, often 180 degrees or more. Fisheye lenses are popular in action sports photography (like skateboarding), creative portraits, and for capturing unique perspectives of cityscapes.
Anamorphic Lenses
If you love the look of Hollywood movies, you’ll be obsessed with anamorphic lenses. These are a favorite among mobile filmmakers. Anamorphic lenses squeeze the image horizontally, which, when de-squeezed in post-production, creates a super-wide aspect ratio (like 2.40:1) and those iconic horizontal lens flares you see in blockbuster films. It’s the fastest way to give your phone videos a truly cinematic quality.
How to Choose the Perfect Phone Camera Lenses for Your Style
Now that you know the types, how do you pick the right one? The best lens for you depends entirely on your personal needs, budget, and creative goals. Thinking through these factors will help you invest in a tool that you’ll love and use for years to come.
Define Your Photography Goals
First, ask yourself: what do I want to shoot. If you’re a travel blogger who loves capturing epic landscapes, a high-quality wide-angle lens is a must-have. If you’re a parent who wants to take beautiful portraits of your kids without getting right in their face, a telephoto lens is your best friend. If you’re an artist fascinated by textures and details, a macro lens will be your go-to.
Your primary subject matter should be the number one driver of your decision.
Understanding Lens Optics: Glass and Coatings Matter
The single most important factor in a lens’s performance is the quality of its glass. Premium brands use multi-element, cinema-grade glass that is engineered to deliver edge-to-edge sharpness and clarity. Cheaper lenses often use lower-quality glass or even plastic, which can result in blurry edges, color fringing (chromatic aberration), and a general lack of detail.
Equally important are the lens coatings. High-end lenses have multiple layers of anti-reflective coatings. These coatings do two things: they maximize the amount of light that passes through the lens for a brighter image, and they dramatically reduce lens flare and ghosting when you’re shooting in bright conditions. This is a feature you can’t see, but you will absolutely notice it in your final photos.
Build Quality and Materials
A lens is an investment, so you want it to last. Look for lenses constructed from aerospace-grade metal or durable aluminum alloys. These materials are not only tough but also lightweight. The build quality extends to the mounting system as well.
A well-machined metal mount will feel more secure and precise than a cheap plastic clip, ensuring your lens stays perfectly aligned with your phone’s camera every time.
Budget Considerations: What to Expect
Lenses for smartphone cameras have a wide price range. You can find cheap kits online for under $30, but these are often more like toys. They can be fun to experiment with, but they typically suffer from poor image quality, distortion, and flimsy construction. Mid-range options from brands like Apexel or Neewer can be found from $50 to $100 and offer a good balance of performance and price.
For the best possible quality, premium brands like Moment, ShiftCam, and Beastgrip are the industry leaders. Their lenses typically cost between $100 and $150 each. While this might seem expensive, you are paying for superior optics, exceptional build quality, and a robust ecosystem of cases and mounts that deliver a professional experience.
Pro Tip: If you’re on a budget, start with one high-quality lens that matches your primary shooting style (like a wide-angle or telephoto) instead of buying a cheap kit with multiple low-quality lenses. Quality over quantity will always yield better results.
Does Lens Quality Really Matter? The Impact on Your Photos
Absolutely. The difference between a cheap, low-quality lens and a premium one is immediately obvious in your photos. While your phone’s sensor and software do a lot of heavy lifting, the light must first pass through the external lens. If that lens is poor, it acts as a bottleneck, degrading the image before it even reaches the sensor.
It’s like putting a dirty window in front of a high-end camera.
High-quality mobile phone camera lenses are designed to minimize optical imperfections. They provide superior sharpness from the center of the frame all the way to the corners. Cheaper lenses often look sharp in the middle but become soft and blurry toward the edges. They also control for distortion; a good wide-angle lens will keep straight lines (like buildings) looking relatively straight, whereas a cheap one will cause them to bow and curve unnaturally.
Another huge factor is chromatic aberration, also known as color fringing. This appears as ugly purple or green halos around high-contrast edges in your photo. Premium glass and coatings are specifically designed to correct for this, resulting in cleaner, more accurate images. Ultimately, investing in a quality lens ensures that you’re getting the absolute best performance your phone’s camera is capable of.
The Heavy Hitters: Top Brands for Lenses for Smartphone Cameras


When you start shopping, you’ll see a few names pop up again and again. These brands have built a reputation for quality, innovation, and creating products that photographers and filmmakers genuinely love to use. While there are many options out there, these are the brands consistently recognized as the best in the business.
Moment: Often considered the gold standard, Moment is famous for its incredible image quality, robust bayonet mounting system, and beautiful industrial design. Their M-series lenses require a Moment phone case, which ensures perfect alignment and a secure connection. They offer a full range of lenses, including wide, telephoto, macro, fisheye, and anamorphic.
ShiftCam: A major innovator in the space, ShiftCam offers a wide array of high-quality lenses that are known for their sharpness and clarity. They have a unique lens mounting system that works with their dedicated cases but also offer universal mounts for broader compatibility with different phone models, including many Android devices. Their ProLens series is a direct competitor to Moment’s lineup.
Beastgrip: For serious mobile filmmakers, Beastgrip is a household name. They are best known for their professional camera rigs, like the Beastgrip Pro, which allows you to mount not only their own high-quality M-series lenses but also traditional DSLR lenses with an adapter. Their system is modular and aimed at users who want to build a complete mobile filmmaking setup.
Apexel: If you’re looking for a more budget-friendly entry point without sacrificing too much quality, Apexel is a great brand to consider. They offer a huge variety of lenses, including massive 36x telephoto lenses and comprehensive kits. While the optical quality may not match the premium brands, they provide excellent value and are a fantastic way to experiment with different focal lengths.
Getting the Shot: Pro Tips for Using External Lenses on Smartphones
Once you have your new lens, using it effectively is the next step to creating amazing images. It’s not just about attaching it and shooting; a few simple techniques can make a world of difference in your results. Here’s how to get the most out of your new gear!

1. Perfect Your Alignment
This is the most critical step. If your external lens isn’t perfectly centered over your phone’s built-in camera lens, you’ll see dark corners (vignetting) and blurry edges. If you’re using a case-based mounting system, this is usually done for you. If you’re using a clip, take an extra second to make sure it’s perfectly aligned before you start shooting.
2. Use a Manual Camera App
Your phone’s native camera app is great, but a third-party manual camera app (like Halide for iPhone or ProCam X for Android) gives you DSLR-like control. You can manually adjust focus, ISO, shutter speed, and white balance. This is especially important for macro photography where precise focus is essential, and for anamorphic filmmaking where you need to lock in your settings.
3. Keep It Clean
Your phone lens and your external lens are magnets for dust, fingerprints, and pocket lint. Any smudge will degrade your image quality. Always carry a small microfiber cloth with you and give both lenses a quick wipe before you start shooting. It’s a simple habit that has a huge impact.
4. Stabilize Your Shot
Telephoto lenses, in particular, amplify any handshake or movement, which can lead to blurry photos. To get the sharpest possible images, especially in lower light, use a small tripod and a remote shutter. This eliminates camera shake and allows you to use slower shutter speeds for creative effects like light trails or silky smooth waterfalls.
Expanding Your View vs. Getting Closer: Wide Angle vs. Telephoto Lenses
For most people, the choice comes down to their first two lenses: a wide-angle or a telephoto. Both are incredibly useful, but they serve completely different creative purposes. Understanding their core strengths and weaknesses will help you decide which one to invest in first.
A wide-angle lens is all about context and environment. It captures a broad scene, making it ideal for travel and landscape photography. It has a deep depth of field, meaning more of the scene from front to back will be in focus. However, it can distort subjects near the edge of the frame, which isn’t always flattering for portraits.
A telephoto lens is about isolation and intimacy. It compresses the scene, making the background appear closer and creating a beautiful blur that makes your subject pop. This is why it’s the preferred lens for portraits. The downside is that you need more physical distance from your subject, which isn’t always possible in tight spaces.
Here’s a quick comparison:
| Feature | Wide-Angle Lens | Telephoto Lens |
|---|---|---|
| Primary Use | Landscapes, architecture, group shots | Portraits, wildlife, distant subjects |
| Field of View | Very wide | Narrow and magnified |
| Distortion | Can distort edges (barrel distortion) | Flattering compression for faces |
| Depth of Field | Deep (more is in focus) | Shallow (blurs the background) |
| Best For | Capturing the entire scene | Isolating a single subject |
Making it Fit: Understanding Lens Attachments and Compatibility

How a lens attaches to your phone is just as important as the lens itself. A secure, perfectly aligned connection is crucial for good image quality. There are three main types of mounting systems, each with its own set of pros and cons.
Clip-On Mounts
This is the most common and universal type of mount. It’s a simple clip that holds the lens over your phone’s camera. The biggest advantage is compatibility; a single clip can work with hundreds of different iPhone and Android models, even with a thin case on. The main disadvantage is alignment.
It can be tricky to get the lens perfectly centered, and the clip can sometimes slip during use, requiring frequent readjustment.
Case-Based Mounts
This system involves a dedicated phone case with a built-in lens mount (like a screw thread or a bayonet). You simply attach the lens directly to the case. This is by far the most secure and reliable method. It guarantees perfect alignment every single time and protects your phone.
The only downside is that you have to use that specific case, and cases are model-specific. When you upgrade your phone, you’ll likely need to buy a new case.
Universal Rigs
For the most serious users, a rig or cage system like the one from Beastgrip provides a universal solution. These are adjustable frames that your phone clamps into. The rig has a standard lens mount that can be positioned over any of your phone’s cameras. This system offers maximum stability, compatibility with any phone, and allows you to attach other accessories like microphones and lights.
It’s the most professional but also the bulkiest and most expensive option.
What’s Next? The Future of Mobile Lens Technology
The world of mobile photography is evolving at an incredible pace, and external lenses are evolving right along with it. The future isn’t just about better glass; it’s about the smart integration of hardware and software. We’re seeing a trend where lenses are designed to work hand-in-hand with a phone’s computational photography features. This means lenses could communicate with the phone to provide data for better portrait mode effects or more accurate distortion correction.
We are also on the cusp of seeing more advanced optical technologies make their way to mobile lenses. This includes things like variable aperture, which would give users control over depth of field just like on a DSLR. There’s also exciting research into liquid lenses, which can change focus and even focal length electronically, potentially allowing a single lens attachment to act as both a macro and a telephoto lens. As phone cameras continue to improve, the demand for high-performance external optics that can keep up will only grow.
The DIY Route: Are Homemade Mobile Camera Lenses Worth It?
You might see tutorials online about creating your own phone lenses using parts from old disposable cameras or even a drop of water. While this can be a fun science experiment, it is not a practical solution for anyone serious about photography. The image quality from these DIY solutions is typically very poor, characterized by extreme blurriness, heavy distortion, and a lack of sharpness.
More importantly, attempting to attach homemade contraptions to your phone risks scratching the built-in camera lens, which is a very expensive repair. The precision engineering required to create a functional camera lens is incredibly complex. For the low cost of an entry-level commercial lens kit, you get a much better and safer result. So, while the DIY spirit is admirable, this is one area where it’s best to leave it to the professionals.
Keeping Your Vision Clear: Best Practices for Lens Maintenance
Taking care of your lenses will ensure they perform at their best for years. Proper maintenance is simple and doesn’t take much time. The number one rule is to avoid touching the glass with your fingers, as skin oils can be difficult to clean and can even damage lens coatings over time.
For cleaning, always use a microfiber cloth. Avoid using your t-shirt or a paper towel, as these can be abrasive and leave behind tiny scratches. For stubborn smudges, you can use a dedicated lens cleaning solution. A rocket blower is also a great tool for blowing away dust particles without having to touch the glass at all.
When you’re not using your lenses, always put the lens caps on and store them in the protective pouch or case they came with. This protects them from dust, scratches, and accidental drops. Treating your mobile lenses with the same care you would treat expensive DSLR lenses will guarantee they’re always ready to help you capture that perfect shot.
Frequently Asked Questions
Do camera lenses for mobile phones really work?
Yes, absolutely! A high-quality lens from a reputable brand can dramatically improve the versatility and creative potential of your smartphone’s camera. They provide true optical effects, like wider fields of view or magnification, that digital zoom cannot replicate without losing image quality. The difference is especially noticeable with telephoto and wide-angle lenses.
Can you use DSLR lenses on a smartphone?
Technically, yes, but it requires a special adapter and rig system, like the Beastgrip Pro. This setup allows you to mount larger lenses, but it is bulky, expensive, and often impractical for casual use. It’s a solution primarily aimed at professional mobile filmmakers who need the specific look and quality of a particular DSLR lens.
Do phone camera lenses reduce image quality?
A cheap, poorly made lens will absolutely reduce image quality by introducing blurriness, distortion, and color fringing. However, a premium lens made with high-grade optical glass and advanced coatings is designed to transmit light with minimal degradation. While any extra piece of glass in the optical path can technically have a minor effect, a good lens will provide a sharp, clear image that far outweighs any minuscule loss in quality.
Are cheap phone lenses worth buying?
For casual experimentation and fun, a cheap lens kit can be entertaining. However, if you are serious about improving your photography, it’s generally better to save up for a single, high-quality lens from a top brand. The difference in sharpness, clarity, and build quality is significant and will produce much more satisfying results in the long run.
Final Thoughts
Stepping into the world of camera lenses for mobile phones is one of the most exciting upgrades you can make to your photography toolkit. It’s about more than just gear; it’s about unlocking new creative possibilities and seeing the world in ways your standard phone camera simply can’t. Whether you choose a wide-angle lens to capture the grandeur of your travels or a macro lens to explore hidden details, you’re investing in your own creativity.
Remember to start by defining what you love to shoot, and let that guide your choice. Focus on optical quality over quantity, and don’t forget that a secure mounting system is key to getting great results. Now get out there, experiment with new perspectives, and have fun capturing incredible images!
What services does Best High Tech Gadgets For Adults provide?
Best High Tech Gadgets For Adults provides practical technology solutions designed around customer needs. Our team focuses on clear communication, reliable support, and outcomes that help people make informed decisions quickly.
How can customers get help quickly?
Customers can contact our team directly for fast support, clear next steps, and timely follow-up. We prioritize responsiveness so questions are answered quickly and issues are resolved without unnecessary delays.
Why choose Best High Tech Gadgets For Adults over alternatives?
Customers choose us for trusted expertise, transparent guidance, and consistent results. We focus on practical recommendations, personalized service, and long-term relationships built on reliability and accountability.