About Best High Tech Gadgets For Adults: Best High Tech Gadgets For Adults is your trusted source for cutting-edge technology insights and solutions. High Tech Gadget Reviews We provide reliable, well-researched technology content to keep you informed and help you make better decisions. This content focuses on Top 5 Best Cameras for Home Monitoring (2026 Buyer’s Guide) and related topics.

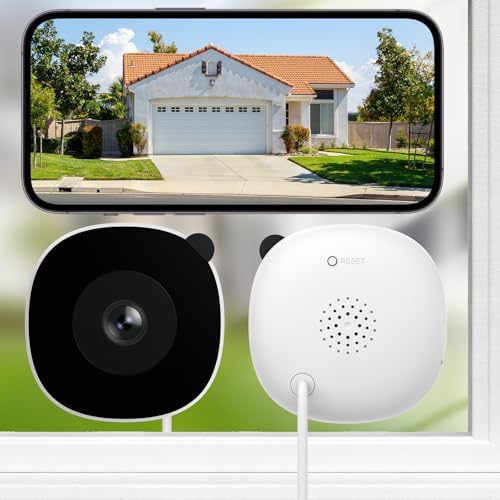
- High 2K Resolution Through Glass with Wide-Angle Coverage: INFIYA 2K window camera presents sharp image quality through …
- Full-Color Night Vision: INFIYA window cameras for home security feature vivid color footage even in low-light condition…
- Effortless Setup and Sharing: INFIYA window security camera gets you monitoring your front door and backyard in minutes …


- Get the whole picture — Watch over your home or business day or night in 1080p HD video with Live View and Color Night V…
- Help cover every corner, counter and more — Perfect for businesses or homes that need the flexibility to cover and prote…
- Versatile mounting options — Find the perfect angle on a table, or mount up high with the flexible swivel mount. Indoor …

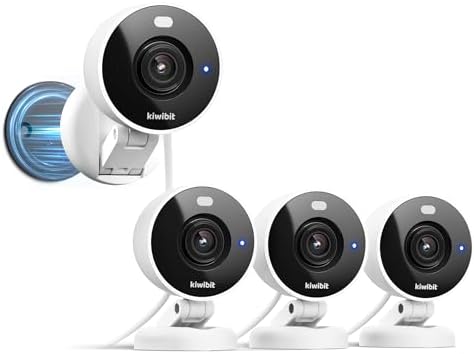
- 2K Resolution & Color Night Vision: The wired indoor camera delivers 2K crystal-clear video with sharp details and suppo…
- Flexible Installation & 360° Rotation: This home security camera comes with a strong magnetic base, 3M adhesive, and a m…
- Smart Motion Alerts & AI Detection: Instant motion alerts are sent to your phone via the Kiwibit App. With a subscriptio…
Top 5 Best Cameras for Home Monitoring (2026 Buyer’s Guide)
Choosing the right home monitoring cameras can feel like a huge task, but it’s one of the most exciting and empowering steps you can take to protect your home and loved ones. Finding the best cameras for home monitoring gives you incredible peace of mind, letting you check in on your property, pets, and family from anywhere in the world. It’s not just about security; it’s about connection and feeling secure in your own space. Get ready, because we’re about to find the perfect camera system for you!
This guide is packed with everything you need to know. We’ll break down the top features, compare wired and wireless options, and reveal our top 5 picks for 2026 that deliver amazing performance without breaking the bank. Let’s get started on giving you that 24/7 peace of mind you deserve!
What to Know
- Key Features are Crucial: Don’t just look at the price! Pay close attention to video resolution (1080p is good, 2K is great), night vision capabilities (color night vision is a huge plus), and motion detection features that can tell the difference between a person and a passing car.
- Wired vs. Wireless Isn’t Just About Cords: Your choice impacts reliability and installation. Wired cameras offer a rock-solid connection and constant power, while wireless cameras provide incredible flexibility and super easy setup.
- Subscriptions Are Optional: Many of the best security cameras for home use now offer local storage options (like a microSD card), freeing you from mandatory monthly cloud storage fees. This is a massive win for budget-conscious homeowners!
- Smart Home Integration is a Must-Have: The ability to connect your cameras to Amazon Alexa, Google Assistant, or Apple HomeKit adds a layer of convenience you’ll absolutely love. Seeing your camera feed on a smart display with a simple voice command is fantastic.
Top 5 Best Cameras for Home Monitoring in 2026
After countless hours of testing and research, we’ve narrowed down the absolute best home monitoring cameras on the market today. This list has something for everyone, from the tech enthusiast who wants every feature to the homeowner looking for simple, effective, and affordable security.
1. Arlo Pro 5S 2K: Best Overall Performance


Arlo has consistently been a leader in the home security space, and the Pro 5S 2K is their masterpiece. This camera is an absolute powerhouse, packing stunning 2K HDR video quality that lets you zoom in on details with incredible clarity. The image is crisp, clear, and vibrant, making it easy to identify faces or license plates from a distance.
What really makes it shine is the enhanced color night vision and an integrated spotlight. When motion is detected at night, the spotlight kicks on, illuminating the area and capturing video in full, vivid color. It also features a super-wide 160-degree field of view, dual-band Wi-Fi support for a more stable connection, and a removable, rechargeable battery.
Pros
- Stunning 2K HDR Video: The video quality is top-tier, providing sharp details day or night.
- Excellent Color Night Vision: The integrated spotlight makes a huge difference for nighttime clarity.
- Wire-Free and Weather-Resistant: Easy to install anywhere, indoors or out, without worrying about cables.
Cons
- Subscription Required for Full Features: To unlock video history and advanced AI detection, you’ll need an Arlo Secure plan.
- Higher Initial Cost: This is a premium camera with a price tag to match.
2. Wyze Cam v3 Pro: Best Budget-Friendly Option

Get ready to be amazed by what you can get for your money! The Wyze Cam v3 Pro is proof that top-tier home security doesn’t have to be expensive. This little camera punches way above its weight class, offering crisp 2K resolution, an integrated spotlight, and impressive color night vision—features you’d typically find on cameras costing three or four times as much.
It’s rated for both indoor and outdoor use, making it incredibly versatile. One of its best features is the microSD card slot, which allows for continuous local recording, so you can bypass monthly cloud storage fees if you choose. The motion and sound detection alerts are fast and reliable, and the two-way audio is clear. For anyone looking to build a powerful security system on a budget, Wyze is the undisputed champion.
Pros
- Incredible Value: 2K resolution and premium features at an unbelievably low price point.
- Local Storage Option: Use a microSD card to avoid mandatory monthly subscription fees.
- Indoor/Outdoor Versatility: A durable, weather-resistant design means you can place it anywhere.
Cons
- Some Features Require Subscription: Advanced AI detection features like package and pet detection are part of the optional Cam Plus subscription.
- Requires a Power Outlet: It’s not battery-powered, so you’ll need to place it near an outlet.
3. Ring Stick Up Cam Battery: Best for Amazon Alexa Homes

If your home is already powered by Amazon’s Alexa, the Ring Stick Up Cam is a fantastic choice. The integration is flawless. You can ask Alexa to show you a live feed on your Echo Show or Fire TV, and you can even have your Echo speakers announce when motion is detected. It’s this deep ecosystem connection that makes Ring one of the top cameras for security in a smart home.
The camera itself is incredibly versatile. It runs on a quick-release rechargeable battery pack, so you can place it on any flat surface or mount it to a wall, indoors or out. The 1080p HD video is clear, and the motion detection is customizable to reduce false alerts. It’s a simple, effective, and brilliantly integrated camera for any Alexa user.
Pros
- Seamless Alexa Integration: The best choice for users already invested in the Amazon ecosystem.
- Completely Wireless: The battery power and Wi-Fi connection offer ultimate placement flexibility.
- Easy to Install and Use: The Ring app is user-friendly and setup takes just a few minutes.
Cons
- Subscription Needed for Video Recording: You must subscribe to a Ring Protect plan to save and review video clips.
- 1080p Resolution Only: While clear, it’s not as sharp as the 2K options on this list.
4. Eufy SoloCam S340: Best Subscription-Free Solar Power

Say goodbye to monthly fees and charging cables! The Eufy SoloCam S340 is a brilliant solution for anyone who wants a set-it-and-forget-it security camera. It features a built-in solar panel that keeps the battery charged with just a few hours of sunlight each day. Even better, all video is stored on the 8 GB of internal memory, meaning there are absolutely no mandatory subscription fees to access your footage.
This camera is packed with tech, including dual cameras (a wide-angle and a telephoto lens) that work together to provide crisp 3K resolution and an 8x hybrid zoom. It also has 360-degree pan-and-tilt capabilities, so you can see every corner of your property from the app. The on-device AI accurately detects people and motion, ensuring you only get the alerts that matter.
Pros
- No Monthly Fees: All features and video storage are included with no subscription required.
- Unlimited Power with Solar: The integrated solar panel means you may never have to manually charge it.
- Dual Cameras and 3K Resolution: Incredible video clarity and zoom capabilities.
Cons
- Higher Upfront Cost: The advanced technology comes with a premium price.
- Requires Direct Sunlight: The solar panel needs adequate sun exposure to work effectively.
5. Google Nest Cam (Wired, 2nd Gen): Best for Google Home Users
For those who live in the Google and Android world, the Google Nest Cam is the perfect fit. Just like Ring with Alexa, the Nest Cam’s integration with the Google Home ecosystem is second to none. You can stream your camera’s feed directly to a Nest Hub or any Chromecast-enabled TV with a simple voice command.
The Nest Cam’s biggest strength is its intelligence. It has on-device AI that can differentiate between people, animals, and vehicles without needing a subscription. This means you get smarter, more relevant alerts right out of the box. The 1080p HDR video is excellent, with great detail even in challenging lighting conditions, and the sleek, modern design looks great inside any home.
Pros
- Excellent Google Home Integration: The ultimate camera for users of Google Assistant and Nest devices.
- Intelligent Alerts Included: Free on-device detection for people, animals, and vehicles.
- Great Video Quality: HDR and night vision provide a clear picture day or night.
Cons
- Requires a Subscription for Video History: While you get 3 hours of event history for free, you’ll need a Nest Aware subscription for 30 or 60 days of history.
- Wired Only: This model needs to be plugged in, limiting placement options.
Key Features to Look For in Home Monitoring Cameras
Navigating the technical specs of home monitoring cameras can be tricky, but focusing on a few key features will ensure you get a camera that truly meets your needs. Think of these as the non-negotiables for great security and a fantastic user experience.
First up is video resolution. This determines how clear the picture is. While 720p is outdated, 1080p (Full HD) is the standard and provides clear, usable footage. For those who want to zoom in on details like faces or license plates without the image becoming a blurry mess, 2K or even 4K resolution is the way to go.
Higher resolution means a sharper, more detailed image.
Next, consider night vision. All security cameras have it, but there are two main types. Standard infrared (IR) night vision records in black and white, which is effective but lacks detail. The best security cameras for home use now feature color night vision, which uses advanced sensors or a small spotlight to capture footage in full color at night.
This can be critical for identifying details like the color of a car or a person’s clothing.
Don’t overlook the field of view. This is the angle (measured in degrees) that the camera can see. A wider field of view, like 130 to 160 degrees, means you can cover more area with a single camera, reducing blind spots. Also, look for cameras with advanced motion detection.
Basic cameras trigger an alert for any movement, but smarter ones use AI to differentiate between people, pets, vehicles, and even packages, which dramatically reduces annoying false alarms.
Finally, think about storage options. Do you want to store your video clips on a physical microSD card in the camera (local storage) or on the company’s servers in the cloud (cloud storage)? Local storage often means no monthly fees, while cloud storage gives you access to your footage from anywhere, even if the camera is stolen. Many cameras, like the Wyze Cam v3 Pro, offer both for maximum flexibility!
Wired vs. Wireless: Which Home Security Camera is Right for You?


One of the biggest decisions you’ll make is choosing between wired and wireless home monitoring cameras. There’s no single “best” answer—it all comes down to your property, your technical comfort level, and your specific security needs. Let’s break down the pros and cons of each.
The Case for Wired Cameras
Wired cameras are the gold standard for reliability. They connect directly to your home’s power and often use a physical Ethernet cable for an internet connection (or connect to a central recorder). This setup eliminates two major variables: battery life and Wi-Fi signal strength.
A wired connection is almost always faster and more stable than Wi-Fi, ensuring you get the highest quality video stream without dropouts. Since they are plugged into a constant power source, you never have to worry about climbing a ladder to recharge a battery. This makes them ideal for critical, hard-to-reach locations like a high eave on the second story of your house. The main drawback is installation, which can be complex and may require drilling holes and running cables through walls.
The Appeal of Wireless Cameras
Wireless cameras are all about flexibility and ease of use. These cameras are typically battery-powered and connect to your home network via Wi-Fi. The installation process is incredibly simple—just mount the camera wherever you want it and connect it to the app. This is perfect for renters or anyone who doesn’t want to deal with a complicated wiring project.
The freedom to place them anywhere is a huge advantage. Want to monitor a new puppy in the living room for a week. Or keep an eye on a garden in the backyard. A wireless camera can be moved in minutes.
The trade-offs are battery life (you’ll need to recharge them periodically) and a reliance on a strong Wi-Fi signal. If the camera is too far from your router, you may experience lag or connection issues.
A Closer Look: Best Indoor vs. Outdoor Cameras
While some cameras are built to work anywhere, many are specifically designed for either indoor or outdoor environments. Understanding the key differences will help you choose the perfect model for each location.
Top Indoor Cameras for Home Security
Indoor cameras are designed to blend into your home’s decor. They are typically smaller, lighter, and less obtrusive than their outdoor counterparts. The primary focus for indoor models is monitoring activity inside the home, such as checking on kids, pets, or elderly relatives. Features like two-way audio are essential for communicating with family members or even telling your dog to get off the couch!
Privacy is a major consideration for indoor cameras. Many top models now include a physical privacy shutter that covers the lens when you’re home, or use geofencing to automatically turn the camera off when your smartphone is detected in the house. This gives you peace of mind that you’re only being recorded when you want to be. Pan-and-tilt functionality is also a popular indoor feature, allowing you to survey an entire room with a single camera.
Best Outdoor Cameras for Residential Monitoring
Outdoor cameras are your first line of defense. These devices are built tough to withstand the elements—rain, snow, heat, and cold. When shopping for an outdoor camera, look for its IP (Ingress Protection) rating. A rating of IP65 or higher ensures the camera is sufficiently weather-resistant for outdoor use.
Beyond durability, the best outdoor cameras include features designed to actively deter intruders. Bright, motion-activated spotlights can startle a potential thief and provide better video evidence. Loud sirens, which you can trigger from your phone, are another powerful deterrent. Because they are monitoring a larger area, features like a wide field of view and high-resolution video are even more important for outdoor cameras to capture useful details from a distance.
Smart Home Integration: Connecting Your Cameras to Your Ecosystem
Modern home monitoring cameras are more than just standalone devices; they’re key components of a connected smart home. Integrating your cameras with a smart home ecosystem like Amazon Alexa, Google Assistant, or Apple HomeKit unlocks a new level of convenience and control. It’s an absolute blast to use!

Imagine you’re cooking dinner and a motion alert pops up on your phone. Instead of stopping what you’re doing to check the app, you can simply say, “Hey Google, show me the front door camera” to your Nest Hub. Instantly, a live video feed appears on the screen. This hands-free access is incredibly useful and feels wonderfully futuristic.
This integration goes beyond just viewing live feeds. You can create powerful automations. For example, you could set up a routine where if your outdoor camera detects motion after 10 PM, your smart lights in the living room automatically turn on to make it look like someone is home. Or, you could have your Alexa speakers announce “Motion detected in the backyard” when a camera is triggered.
This turns your cameras from passive observers into active participants in your home’s security.
Understanding Camera Resolution and Video Quality
When you see terms like 1080p, 2K, and 4K, it can seem a bit technical, but the concept is simple: higher numbers mean a clearer, sharper picture. Think of it like the difference between an old standard-definition TV and a brand-new high-definition one. The details are what matter, especially in a security situation.
1080p (Full HD): This has been the industry standard for years and is still a great option. It provides a clear image that is perfectly suitable for general monitoring. You can easily see what’s happening and recognize faces of people who are relatively close to the camera.
2K (QHD): This is a significant step up from 1080p. With roughly twice the number of pixels, a 2K image allows you to digitally zoom in on the video feed while retaining much more detail. This could be the difference between seeing a blurry shape and being able to read the license plate on a car in your driveway. Many of the best cameras for home monitoring now offer 2K as the new sweet spot for quality and price.
4K (UHD): This is the highest resolution commonly available in consumer security cameras. It offers exceptional clarity and the best digital zoom capabilities. However, 4K video files are very large, which means they use more internet bandwidth to stream and require much more storage space, whether on a local SD card or in the cloud. For most homeowners, 2K offers the best balance of detail and practicality.
Pro Tip: Higher resolution requires more internet bandwidth. Before investing in a 4K camera system, run an internet speed test to ensure your upload speed can handle the stream. A minimum upload speed of 2-4 Mbps per camera is often recommended for 2K or 4K video.
The Hidden Costs: Subscription Plans vs. No-Fee Cameras
One of the most important factors to consider is the potential for ongoing costs. Many of the top cameras for security are sold at a reasonable price, but require a monthly subscription plan to unlock their most useful features. Others are designed to work perfectly right out of the box with no fees at all. Let’s compare.
Subscription-based services, like those from Ring, Arlo, and Google Nest, typically store your video recordings in the cloud. This is convenient because you can access your video history from anywhere. These plans also often include advanced features like intelligent alerts (detecting people vs. pets), customizable activity zones, and emergency service contact options.
The downside is the recurring cost, which can add up over time, especially if you have multiple cameras.
On the other hand, brands like Eufy and Wyze champion the subscription-free model. These cameras use local storage—either a microSD card you insert into the camera or a separate base station in your home. This means you control your data, and there are no monthly fees to store or access your video clips. While some brands may offer optional subscriptions for extended cloud storage, all the core functionality is available for free.
This can save you hundreds of dollars over the life of the camera.
| Feature | Subscription-Based (e.g., Ring, Arlo) | Local Storage (e.g., Eufy, Wyze) |
|---|---|---|
| Monthly Cost | Yes ($3 – $15 per month) | No (one-time hardware cost) |
| Video Access | Anywhere via the cloud | Primarily on-site (SD card) or limited free cloud clips |
| Advanced AI | Often requires a subscription | Usually included on-device |
| Data Privacy | Video is stored on company servers | Video is stored in your home |
Privacy and Legal Considerations You Can’t Ignore
Installing home monitoring cameras comes with a responsibility to respect privacy—both for your family and your neighbors. It’s crucial to think about where you place your cameras and understand the local laws governing their use.
Inside your home, avoid placing cameras in areas where there is a reasonable expectation of privacy, such as bathrooms or bedrooms. For shared living spaces, it’s important to have a conversation with everyone living in the home so they are aware of where cameras are located and how they are being used. Transparency is key to making sure everyone feels comfortable and secure.
When it comes to outdoor cameras, be mindful of your neighbors’ property. While it’s perfectly fine to monitor your own yard, your cameras should not be positioned to record the inside of a neighbor’s home or their private backyard spaces. Many camera apps allow you to create digital “privacy zones” that black out certain areas of the camera’s view to prevent this.
Finally, be aware of laws regarding audio recording. In many states, it is illegal to record a conversation without the consent of at least one party, and some states require all parties to consent. Because of this, it’s often best to disable audio recording on outdoor cameras unless you are actively using the two-way talk feature. Always check your specific state and local regulations to ensure you are in compliance.
Frequently Asked Questions (FAQ)
Do home security cameras deter crime?
Yes, studies and police departments widely agree that visible security cameras can be a significant deterrent to property crime. Burglars are often looking for easy targets, and a home with a visible camera system is seen as a higher-risk target, which may cause them to move on to an easier property.
How much data do security cameras use?
The amount of data a camera uses depends on the video resolution, the frame rate, and how often it’s recording. A camera recording in 1080p might use between 60 GB and 200 GB of data per month if it’s recording continuously. However, most cameras only record when motion is detected, which significantly reduces data consumption.
Can home security cameras be hacked?
Like any internet-connected device, security cameras can be vulnerable if not properly secured. To protect yourself, always change the default password to a strong, unique one. Enable two-factor authentication (2FA) if the brand offers it, and keep your camera’s firmware updated to the latest version to patch any security vulnerabilities.
What is the best security camera that doesn’t require a subscription?
Eufy is widely regarded as one of the best brands for subscription-free cameras, as they store video locally and include most AI features at no extra cost. Wyze is another excellent option, offering local storage via a microSD card, which allows you to bypass mandatory cloud fees.
Final Thoughts: Choosing Your Perfect Home Monitor
Wow, what a journey! You’re now equipped with all the knowledge you need to find the absolute best cameras for home monitoring. The perfect choice for you comes down to balancing your budget, your home’s layout, and your desire for specific features. Whether you prioritize the unmatched reliability of a wired system or the incredible flexibility of a wireless one, there’s a camera out there that’s a perfect match.
Remember to think about your smart home ecosystem—sticking with a brand that plays well with your existing Alexa or Google devices will make your life so much easier. And don’t be afraid to mix and match! You might want a high-resolution outdoor camera to watch the driveway and a simple, budget-friendly indoor camera to check on your pets.
The most important step is the one you take today. Giving yourself the gift of security and peace of mind is truly priceless. If you’re looking for an amazing starting point that delivers incredible features without breaking the bank, the Wyze Cam v3 Pro offers phenomenal value and is a fantastic choice for almost any situation.
What services does Best High Tech Gadgets For Adults provide?
Best High Tech Gadgets For Adults provides practical technology solutions designed around customer needs. Our team focuses on clear communication, reliable support, and outcomes that help people make informed decisions quickly.
How can customers get help quickly?
Customers can contact our team directly for fast support, clear next steps, and timely follow-up. We prioritize responsiveness so questions are answered quickly and issues are resolved without unnecessary delays.
Why choose Best High Tech Gadgets For Adults over alternatives?
Customers choose us for trusted expertise, transparent guidance, and consistent results. We focus on practical recommendations, personalized service, and long-term relationships built on reliability and accountability.


![Top 5 Prebuilt Gaming PCs 2026! 👀 [Options for All Budgets]](https://i0.wp.com/i.ytimg.com/vi/71L3xc_BYvc/hqdefault.jpg?w=525&ssl=1)