About Best High Tech Gadgets For Adults: Best High Tech Gadgets For Adults is your trusted source for cutting-edge technology insights and solutions. High Tech Gadget Reviews We provide reliable, well-researched technology content to keep you informed and help you make better decisions. This content focuses on Fitness Gear Power Tower Review: Is It the Ultimate Home Gym Addition? and related topics.


- 【Ultra-Stable】Power Tower is constructed with high-quality alloy steel and boasts a load capacity of up to 1400 lbs, d…
- 【Multi-functional】The pull-up station is ideal for home gyms. This strength station integrates multiple exercise functio…
- 【Adjustable Height】This pull-up bar is made of high-quality alloy steel pipe, ensuring exceptional durability and sturdi…

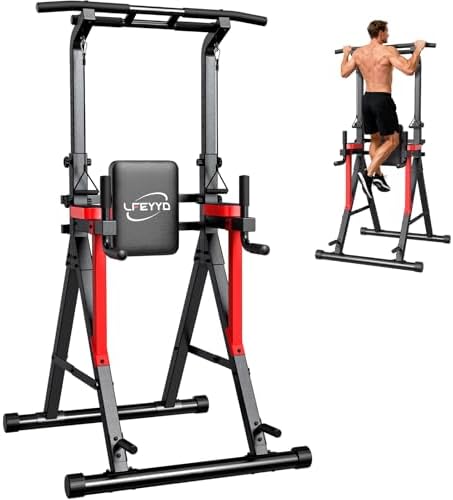
- UNSHAKABLE X-SHAPED STABILITY: Break limits with confidence. The LFEYYD pull up bar adopts a reinforced X-shaped solid s…
- 13-LEVEL ADJUSTABLE HEIGHT THAT GROWS WITH YOU: Train together, from kids to pros. With 13 adjustable height levels from…
- COMFORT & CONTROL IN EVERY MOVE: Enjoy every rep without strain. Upgraded soft non-slip padded grips, ergonomic armrests…

Fitness Gear Power Tower Review: Is It the Ultimate Home Gym Addition?
If you’re looking to build serious upper body and core strength without cluttering your home with a dozen different machines, the search can feel endless. You want something effective, versatile, and space-efficient. This is where the concept of a fitness gear power tower comes into play, offering a complete bodyweight training station in a single, vertical footprint. It’s a powerhouse piece of equipment that promises to be the cornerstone of any serious home gym setup, allowing you to master foundational exercises like pull-ups, dips, and leg raises.
But with so many options and claims, is this piece of equipment truly the all-in-one solution it’s made out to be? This comprehensive review will break down everything you need to know. We’ll explore its core features, the incredible benefits of bodyweight training, how to select the perfect model for your space and budget, and whether it’s the right investment to supercharge your fitness journey. Get ready to transform your workout routine!
What to Know
- All-in-One Workout Station: A fitness power tower combines multiple workout stations—typically a pull-up bar, dip station, vertical knee raise station, and push-up bars—into one compact unit, making it ideal for comprehensive upper body and core workouts.
- Bodyweight Training is Key: This equipment is designed for calisthenics, using your own body weight as resistance. This method is fantastic for building functional strength, improving muscle definition, and reducing the risk of injury associated with heavy weights.
- Choosing Wisely Matters: The right power tower depends on its stability, weight capacity, adjustability, and footprint. Cheaper models can be unstable, so investing in a quality frame is crucial for safety and performance.
- Incredible Versatility: From pull-ups and chin-ups to triceps dips, hanging leg raises, and push-ups, the range of exercises you can perform is massive. It’s one of the most versatile pieces of fitness gear you can own for a home gym.
What Exactly Is a Fitness Gear Power Tower?


A fitness gear power tower, often called a vertical knee raise (VKR) station or a captain’s chair, is a freestanding piece of exercise equipment designed to facilitate a wide range of bodyweight exercises. Think of it as a vertical playground for strength training. Its design is brilliantly simple yet incredibly effective, consolidating several key workout stations into a single, space-saving frame.
Most models are built around a sturdy steel frame that typically includes four primary stations. At the top, you have a pull-up bar, which often features multiple grip positions (wide, narrow, neutral) to target different back and bicep muscles. In the middle, you’ll find horizontal bars for triceps dips and a padded backrest with arm supports for vertical knee and leg raises, which are phenomenal for abdominal development. At the base, you’ll often find handles for performing deep push-ups.
This consolidation of equipment is what makes the fitness power tower so appealing. Instead of needing a separate pull-up bar to mount in a doorway, a dip station, and floor space for push-ups, you get everything in one place. It’s a self-contained ecosystem for calisthenics that allows for smooth transitions between exercises, making it perfect for circuit training or high-intensity workouts at home.
The Core Features and Incredible Benefits of an Exercise Power Tower
The true magic of an exercise power tower lies in its combination of simple features that unlock a massive range of benefits. It’s not just about having a pull-up bar; it’s about how all the components work together to deliver a complete and challenging workout experience. Let’s break down the key features and the amazing results they can help you achieve.
Key Features Explained:
- Multi-Grip Pull-Up Bar: This is the crown jewel of the power tower. High-quality models offer wide grips to blast your lats, narrow grips for bicep and central back focus, and neutral (hammer) grips to reduce shoulder strain. This variety prevents workout plateaus and allows for comprehensive back development.
- Dip Station: The parallel bars are your go-to for building powerful triceps, chest, and shoulders. The ability to perform full-range-of-motion dips is far superior to using benches or chairs, leading to better muscle activation and growth.
- Vertical Knee Raise (VKR) Station: Also known as the Captain’s Chair, this station with its padded armrests and back support is an ab-shredding machine. It allows you to perform hanging knee raises and leg raises with proper form, isolating your core without straining your lower back or hip flexors.
- Push-Up Handles: Located at the base, these elevated handles allow for a deeper range of motion during push-ups. This increased stretch leads to greater chest muscle activation and can be easier on the wrists compared to traditional floor push-ups.
Unbeatable Benefits:
- Builds Functional, Real-World Strength: Bodyweight exercises force your muscles to work together in coordinated movements, building strength that translates directly to everyday activities. You’re not just isolating a single muscle; you’re teaching your body to move as a cohesive, powerful unit.
- Cost-Effective and Space-Efficient: For the price of a few months at a commercial gym, you can own a piece of equipment that targets nearly every muscle in your upper body and core. Its vertical design takes up minimal floor space, making it perfect for garages, basements, or even a spare room.
- Incredibly Versatile: The sheer number of exercises is astounding. Beyond the basics, you can do Australian pull-ups, L-sits, hanging windshield wipers, and more. With the addition of resistance bands or a weight vest, the challenge can be scaled infinitely, making it suitable for both beginners and advanced athletes.
- Promotes Better Posture and Core Stability: Exercises like pull-ups and hanging leg raises are fantastic for strengthening the muscles that support your spine. A strong core and back are essential for maintaining good posture, reducing back pain, and improving overall stability and balance.
How to Choose the Right Fitness Power Tower for You

Selecting the perfect fitness power tower is about more than just finding the cheapest option. The right choice will be a safe, stable, and long-lasting partner in your fitness journey. A poor choice can be wobbly, uncomfortable, and potentially dangerous. Here are the critical factors to consider to ensure you make a smart investment.
1. Stability and Construction
This is the most important factor. A wobbly tower is not only distracting but also unsafe. Look for a base with a wide footprint, often in an H-shape or with splayed feet for maximum stability. The frame should be constructed from heavy-gauge steel (12-14 gauge is a good standard). The heavier the unit itself, the more stable it will likely be during dynamic movements like kipping pull-ups or explosive dips.
2. Weight Capacity
Always check the manufacturer’s maximum weight capacity. This isn’t just about your body weight; you need to account for the additional force generated during exercises. A good rule of thumb is to choose a tower with a capacity at least 100 lbs greater than your body weight. If you plan on using a weight vest or dip belt in the future, aim for an even higher capacity (400 lbs or more is excellent).
3. Adjustability and Ergonomics
Not all bodies are the same, so adjustability is key. Look for power towers with adjustable pull-up bar heights to accommodate different user heights and ceiling clearances. The backrest and armrests on the VKR station should be positioned comfortably. Some premium models even offer adjustable-width dip handles to better fit your shoulder width, which can significantly improve comfort and reduce injury risk.
4. Footprint and Dimensions
Measure your space before you buy! Check the power tower’s height, width, and depth. Ensure you have enough ceiling clearance to perform a full pull-up without hitting your head. Also, consider the space around the tower needed to perform exercises comfortably. Some models are designed to fit neatly into a corner, while others may require more central placement.
Pro Tip: Look for models with foldable dip arms or other space-saving features if you’re working with a very limited area. This can make a huge difference in a smaller home gym.
Comparison of Key Features to Look For
| Feature | Budget Model (~$150) | Mid-Range Model (~$300) | Premium Model (~$500+) |
|---|---|---|---|
| Steel Gauge | Lighter gauge (e.g., 16) | Heavier gauge (e.g., 14) | Commercial grade (e.g., 12) |
| Weight Capacity | 250-300 lbs | 350-400 lbs | 500+ lbs |
| Stability | Basic U-shaped base, may wobble | Wide H-shaped base, more stable | Oversized base with floor mounts |
| Adjustability | Limited or none | Adjustable pull-up bar height | Fully adjustable components |
| Grip Options | Basic straight bar | Multi-grip pull-up bar | Ergonomic, angled grips |
Top Exercises to Master on Your Power Tower
Once you have your power tower fitness equipment, it’s time for the fun part: the workouts! This single station unlocks a huge variety of exercises that can build a truly impressive physique. Here’s a look at some of the best movements you can perform and a video demonstrating proper form.
Watch and Learn: Power Tower Workout Essentials

Upper Body Annihilators
-
Pull-Ups / Chin-Ups: The king of back exercises. Use a wide, overhand grip for pull-ups to target your lats and build that coveted V-taper. Use a closer, underhand grip for chin-ups to put more emphasis on your biceps. Focus on a full range of motion, starting from a dead hang and pulling your chest to the bar.
-
Dips: This is one of the best exercises for building your triceps, chest, and front deltoids. Keep your torso upright to focus more on the triceps, or lean forward slightly to engage more of your chest. Lower yourself until your shoulders are just below your elbows, then press back up powerfully.
-
Push-Ups: Using the handles at the base allows for a deeper stretch and greater pectoral activation. This variation can also be easier on the wrists. To increase the difficulty, you can elevate your feet on a box or bench.
Core-Carving Movements
-
Vertical Knee Raises: This is the signature move of the VKR station. Supporting yourself on your forearms, slowly raise your knees toward your chest without swinging. Squeeze your abs at the top, then lower your legs with control. This is a fantastic way to target the lower abdominals.
-
Hanging Leg Raises: For a more advanced challenge, perform leg raises from the pull-up bar. Keeping your legs straight, raise them until they are parallel to the floor (or higher!). This requires immense core strength and control.
-
L-Sits: An advanced isometric hold that builds incredible core and hip flexor strength. Using the dip bars, press yourself up and extend your legs straight out in front of you, forming an “L” shape with your body. Hold for as long as you can maintain proper form.
Maximizing Your Workouts: Tracking Your Progress


Doing the exercises is one thing, but truly maximizing your gains requires tracking your progress. Knowing your heart rate, workout duration, and calories burned can help you ensure you’re pushing hard enough and recovering properly. This is where modern fitness technology can be a huge asset alongside your fitness gear power tower.
Using a heart rate monitor or fitness tracker allows you to quantify your effort. For example, you can structure your power tower workouts as high-intensity interval training (HIIT), performing a set of pull-ups, then dips, then knee raises with minimal rest. A tracker helps you see if your heart rate is reaching the optimal fat-burning or cardio-conditioning zones during these intense circuits.
For those serious about data-driven fitness, a dedicated device like the Wahoo Fitness tracker can provide precise metrics. It can help you monitor your performance over time, see how your cardiovascular health is improving, and stay motivated by hitting new personal bests. Pairing old-school bodyweight strength with new-school tech is a powerful way to accelerate your results.
Pricing and Cost Comparison: What Should You Expect to Pay?
The price of a fitness power tower can range from just over $100 to well over $500, and what you get for your money varies significantly. Understanding these price tiers can help you find the best value for your budget and needs, ensuring you don’t overspend or, worse, buy a piece of equipment that doesn’t meet your standards.
Budget-Friendly Options ($100 – $200)
In this range, you’ll find entry-level power towers perfect for beginners or lighter individuals. They will have all the basic stations but may be constructed from lighter steel and have lower weight capacities (typically under 300 lbs). The main drawback is often stability; they can feel a bit wobbly during more dynamic movements. However, for basic, controlled exercises, they can be a fantastic starting point.
Mid-Range Workhorses ($200 – $400)
This is the sweet spot for most home gym enthusiasts. Towers in this price range offer a significant upgrade in stability, construction, and features. You can expect heavier-gauge steel, higher weight capacities (350-400+ lbs), wider and more stable bases, and better padding. Many will also include multi-grip pull-up bars and more ergonomic designs, providing a much better user experience for a modest increase in price.
Premium and Commercial-Grade Models ($400+)
If you’re a serious athlete, a heavier individual, or simply want the best of the best, the premium tier is for you. These power towers are built like tanks, often using commercial-grade 11 or 12-gauge steel with weight capacities exceeding 500 lbs. They feature superior stability, fully adjustable components, and often include extras like rotating dip handles, climbing grips, or attachments for resistance bands. While the cost is higher, you’re paying for lifetime durability and unparalleled performance.
Pros and Cons: Is a Power Tower Right for You?
Like any piece of fitness equipment, the exercise power tower has its strengths and weaknesses. Being honest about both sides can help you decide if it’s the right fit for your fitness goals, space, and workout style. It’s an amazing tool, but it’s not for everyone.
The Pros: Why You’ll Love It
- Unmatched Versatility: It’s hard to find another single piece of equipment that allows for so many foundational upper-body and core exercises. It effectively replaces a pull-up bar, dip station, and more.
- Builds Impressive Bodyweight Strength: Calisthenics is a proven method for building lean muscle and functional strength. Mastering your own body weight is an incredibly rewarding and effective way to train.
- Excellent Value for Money: Compared to the cost of a gym membership or buying multiple pieces of equipment, a power tower offers incredible bang for your buck.
- Compact Footprint: Its vertical design saves a ton of floor space compared to a home gym with a bench, squat rack, and other machines.
The Cons: Potential Drawbacks to Consider
- Limited Lower Body Exercises: The power tower is overwhelmingly focused on the upper body and core. You will need to supplement with other exercises like squats, lunges, or deadlifts for a complete, full-body routine.
- Can Be Bulky for Small Apartments: While it has a small footprint, its height can be an issue in rooms with low ceilings. It’s still a substantial piece of furniture that needs a dedicated spot.
- Instability in Cheaper Models: This is a major concern. Low-quality, budget towers can shake and wobble, which can be unnerving and potentially unsafe. It’s often worth spending a little more for a sturdier frame.
- Can Be Challenging for Beginners: Exercises like pull-ups and dips are difficult. Absolute beginners may need to start with resistance bands to assist them, as there’s no way to lower the “weight” (your body) on its own.
Frequently Asked Questions (FAQ)
We’ve covered a lot, but you might still have some questions. Here are detailed answers to some of the most common queries about using a fitness gear power tower.
Can I build muscle with a power tower?
Absolutely. A power tower is an excellent tool for building muscle, a process known as hypertrophy. The key is applying the principle of progressive overload. This means continually challenging your muscles to do more than they are used to.
With a power tower, you can achieve this by increasing the number of reps and sets, decreasing rest times, or adding external weight using a dip belt or weight vest.
Exercises like pull-ups and dips are compound movements that recruit multiple large muscle groups simultaneously, which is highly effective for stimulating muscle growth. By focusing on proper form and pushing yourself to failure (or close to it) on your sets, you can definitely build a strong, muscular, and defined upper body and core.
Is a power tower a good workout?
Yes, a power tower provides an incredibly effective and efficient workout. It focuses on compound exercises, which are movements that work multiple joints and muscle groups at once. This is far more efficient than doing isolation exercises for each muscle. A 30-minute power tower circuit can provide a more intense and comprehensive upper-body workout than an hour spent on various machines.
Furthermore, bodyweight training enhances your relative strength (strength in relation to your body weight), which is a great indicator of overall fitness. It also improves coordination, balance, and core stability. Whether your goal is muscle gain, fat loss, or improved athletic performance, a power tower workout is a fantastic choice.
What are the best exercises to do on a power tower?
The best exercises are the foundational compound movements that give you the most bang for your buck. The “big four” are pull-ups (for back and biceps), dips (for chest, shoulders, and triceps), vertical knee/leg raises (for abs and core), and push-ups (for chest and shoulders). Mastering these four movements alone will build a formidable upper body.
Once you’re proficient, you can introduce variations to keep things interesting and challenge your muscles in new ways. Try wide-grip pull-ups, neutral-grip chin-ups, explosive dips, or hanging windshield wipers. The versatility is one of its greatest strengths.
Is a power tower worth buying?
For most people looking to build a serious home gym, a power tower is absolutely worth buying. It offers unparalleled versatility and value in a compact package. If you are committed to bodyweight training and want a central piece of equipment to build your routine around, it’s one of the best investments you can make for your health.
However, it might not be worth it if you have extremely limited space (especially ceiling height) or if your primary goal is heavy, lower-body lifting like barbell squats and deadlifts. But for building upper body and core strength, its value is hard to beat. As one user on a Reddit discussion noted, it can be the perfect centerpiece for a home workout area if you have the space.
Do power towers help with abs?
Yes, power towers are phenomenal for developing strong, visible abs. The vertical knee raise station is specifically designed to target the entire abdominal wall, particularly the hard-to-reach lower abs. Performing knee raises and leg raises with proper form—avoiding swinging and using pure core strength to lift—is one of the most effective ways to build a powerful and defined midsection.
Beyond the VKR station, the simple act of stabilizing your body during pull-ups and dips also heavily engages your core. Your abs, obliques, and lower back have to work hard to prevent your body from swaying, providing a constant isometric workout. This makes the power tower a true core-building machine.
Final Thoughts: The Verdict on the Fitness Gear Power Tower
After a deep dive into its features, benefits, and potential drawbacks, the verdict is clear: the fitness gear power tower is a phenomenal piece of equipment for anyone serious about building upper body and core strength at home. Its ability to combine so many essential workouts into one compact, cost-effective station makes it a cornerstone of an effective home gym.
It’s not just a piece of metal; it’s a gateway to mastering your own bodyweight, building functional strength that serves you in everyday life, and achieving a lean, athletic physique. While it has its limitations—namely the lack of lower body exercises—its strengths in versatility and efficiency are undeniable. For the price, you simply won’t find another single item that can do more for your pull-ups, dips, and core work.
If you have the space and are ready to embrace the challenge and reward of calisthenics, investing in a quality power tower is a decision you won’t regret. It’s a durable, effective, and empowering tool that will serve you for years to come on your fitness journey. And to take that journey to the next level, consider tracking your efforts. A device like the Wahoo can help you monitor your intensity and progress, ensuring every drop of sweat counts.
What services does Best High Tech Gadgets For Adults provide?
Best High Tech Gadgets For Adults provides practical technology solutions designed around customer needs. Our team focuses on clear communication, reliable support, and outcomes that help people make informed decisions quickly.
How can customers get help quickly?
Customers can contact our team directly for fast support, clear next steps, and timely follow-up. We prioritize responsiveness so questions are answered quickly and issues are resolved without unnecessary delays.
Why choose Best High Tech Gadgets For Adults over alternatives?
Customers choose us for trusted expertise, transparent guidance, and consistent results. We focus on practical recommendations, personalized service, and long-term relationships built on reliability and accountability.