- INDEPENDENT DUAL PULLEY SYSTEM: The power cage features an innovative independent dual pulley system with a 1:1 weight r…
- 10-IN-1 HOME GYM: This versatile fitness solution integrates ten essential functions: squat rack, cable crossover, lat p…
- SPACE-SAVING EFFICIENCY: Designed for optimal space utilization, the innovative frame resembles a half rack, requiring n…

- Independent Dual Pulley System: Power cage with pulley system features dual independent 1:1 ratio pulleys on each side. …
- 10-in-1 Power Rack: This squat rack for home gym combines 10 workout stations, including bench press rack, cable crossov…
- Space-Saving Rack Design: Compact power rack with pulley system reduces floor space by nearly two-thirds vs traditional …
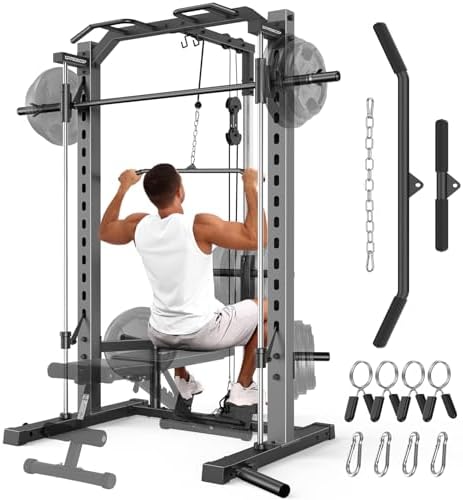
- 【Upgraded Home Smith Machine】The smith machine is made of high-quality commercial-grade steel, featuring precise laser c…
- 【All-In-One Smith Machine】OPPSDECOR pro smith machine can meet all your needs in home gym. It is combined with power cag…
- 【Precision and Durable Pulley System】The pulley system features precision bearing pulleys and reliable cables, ensuring …
Fitness Gear Squat Rack Buying Guide: How to Choose for Your Home Gym
Building a home gym is one of the most exciting investments you can make in your health, and the absolute centerpiece of any serious setup is the right piece of fitness gear: a squat rack. This isn’t just a frame for holding a barbell; it’s the command center for building strength, muscle, and confidence. A quality squat rack unlocks a universe of exercises, from heavy squats and bench presses to pull-ups and rack pulls, all within the safety and convenience of your own space. It’s the single best purchase to elevate your training from casual to committed!
Choosing the right one can feel overwhelming with all the options out there. You’ve got power racks, half racks, squat stands, and a dozen different features to consider. But don’t worry, we’re going to break it all down. This guide will walk you through everything you need to know to select the perfect squat rack equipment that fits your space, budget, and fitness ambitions.
Let’s build something awesome.
What You’ll Learn
- The Main Types of Racks: Understand the critical differences between power racks, half racks, and squat stands to see which one matches your training style and space.
- Key Features to Look For: Learn what steel gauge, hole spacing, and weight capacity actually mean for your rack’s stability, safety, and long-term value.
- Must-Have Accessories: Discover the essential attachments and add-ons that transform a basic rack into a complete, all-in-one home gym solution.
- Safety is Paramount: Get actionable tips on how to set up and use your gym squat rack safely to prevent injury and lift with total confidence.
- Budgeting for Your Build: Find out what you can expect to get for your money at different price points, from entry-level stands to pro-grade power cages.
Types of Squat Racks: What You Need to Know

Before you can pick the perfect rack, you need to know what your options are. The term “squat rack” covers a few different designs, each with its own set of pros and cons. Choosing the right type is the most important first step!
Power Racks (Full Cages)
This is the king of home gym safety and versatility. A power rack, or full cage, consists of four vertical posts connected by crossmembers, creating a cage-like structure you stand inside to lift. Its biggest advantage is safety. The four-post design allows you to set two horizontal safety bars (pins or straps) that will catch the barbell if you fail a lift, meaning you can push yourself to the limit without needing a human spotter.
It’s incredible peace of mind.
Power racks are also the most stable option, often supporting 1,000 lbs or more. They typically come with a built-in pull-up bar and have the most compatibility with attachments like dip stations, landmine posts, and lat pulldown systems. The only real downside is their footprint; they take up the most floor space and require a higher ceiling clearance, usually 8 feet or more.
Half Racks
A half rack is a fantastic compromise between a full power rack and a simple squat stand. It features two vertical posts connected to a stable base, with two shorter posts in the back often used for plate storage. You lift in front of the rack, not inside it. Safety is provided by adjustable spotter arms that extend forward from the main uprights.
This design offers a more open feel, which some lifters prefer, and it takes up less floor space than a full cage. Many high-quality half racks are just as stable as power racks and can handle immense weight. They are an excellent choice for lifters who want robust safety features without dedicating a massive area to their gym squat rack. The primary trade-off is that the safety spotter arms, while very effective, don’t offer the same fully enclosed protection as a power cage.
Fitness Squat Stands
Squat stands are the most basic and space-efficient option. They consist of two independent, adjustable uprights that hold the barbell. Some models have a connecting bar at the base for added stability, while others are completely separate. Their main appeal is their small footprint and lower cost, making them ideal for apartments or garages with limited space.
However, this compact design comes with significant trade-offs. Most squat stands lack robust safety features like spotter arms, making them riskier for heavy squats or bench presses performed alone. They are also less stable and have a lower weight capacity than half or full racks. A fitness squat stand is a great starting point, but most serious lifters will outgrow it quickly as they get stronger.
The Incredible Benefits of Using a Squat Rack
Investing in a squat rack is about so much more than just having a place to do squats. It’s about fundamentally changing the way you train for the better. The benefits are massive and will pay dividends in your fitness journey for years to come.
First and foremost is unmatched safety. The ability to set safety pins or spotter arms at the correct height is a true game-changer. It means you can confidently push for that extra rep on a heavy bench press or squat without the fear of getting pinned under the bar. This safety net encourages you to train harder and pursue progressive overload, which is the key to building strength and muscle, without needing a workout partner for every session.
Second is mind-blowing versatility. A good gym squat rack is a multi-purpose station. You can perform the foundational strength movements: squats, bench presses, and overhead presses. Most racks also include a pull-up bar, opening the door to bodyweight exercises like pull-ups and chin-ups.
Add an adjustable bench, and you can do incline presses, seated shoulder presses, and dozens of other movements. It consolidates so much exercise potential into one piece of equipment.
Finally, it enables consistent progressive overload. To get stronger, you have to consistently lift more weight or do more reps over time. A squat rack provides the stable, secure environment needed to do this effectively. You’re not limited by what you can clean and press over your head.
You can simply load the bar, get under it, and lift. This direct path to adding weight to the bar is the fastest way to see real, measurable progress in your strength and physique.
How to Choose the Right Squat Rack for Your Home Gym
Alright, you know the types and the benefits. Now for the fun part: picking your own! Choosing the right fitness gear squat rack comes down to a few key factors. Getting these right will ensure you buy a rack you love and that will last a lifetime.
Measure Your Space (Twice!)
This is the most important, non-negotiable step. Before you even look at a single rack, grab a tape measure. You need three key measurements:
- Ceiling Height: Most racks are between 84 inches (7 feet) and 96 inches (8 feet) tall. You need enough clearance not only for the rack itself but also to perform pull-ups without hitting your head.
A minimum of 8.5 to 9-foot ceilings is ideal for most racks. * Floor Width & Depth: Check the rack’s footprint dimensions. A typical power rack is about 4 feet wide by 4 feet deep. Remember to add extra space around it—at least 2-3 feet on each side and in front—for loading plates and moving around safely.
- Barbell Space: A standard Olympic barbell is 7 feet long. You need to make sure you have enough width to rack and un-rack the bar without hitting a wall.
Steel Quality: Gauge and Tubing Size
The backbone of any good squat rack is its steel. Two numbers tell you almost everything you need to know: the gauge and the tubing size. Steel gauge refers to its thickness; a lower number means thicker, stronger steel. For a home gym, look for 11-gauge or 12-gauge steel.
Anything higher (like 14-gauge) is generally too thin for serious lifting.
Tubing size refers to the dimensions of the vertical uprights. The most common sizes are 2×2″, 2×3″, and 3×3″. While 2×2″ is fine for beginners, 2×3″ or 3×3″ uprights offer far superior stability and a higher weight capacity. The 3×3″ with 11-gauge steel is considered the gold standard for home and commercial gyms.
Weight Capacity
Pay close attention to the manufacturer’s listed weight capacity. This tells you how much weight the rack can safely support. For a long-term investment, aim for a rack with a capacity of at least 700 lbs, with 1,000 lbs being ideal. Even if you’re not lifting that much now, a higher capacity indicates better construction, stronger welds, and more robust hardware.
It’s a sign of quality and gives you unlimited room to grow.
Hole Spacing
This might seem like a small detail, but it’s incredibly important for safety and performance. Hole spacing refers to the distance between the adjustment holes on the uprights. Look for racks with 1-inch spacing through the bench press zone. This is often called “Westside” spacing.
It allows you to get a much more precise placement for your J-cups and safety bars, which is critical for setting up a safe and effective bench press.
Essential Accessories for Your Squat Rack

Your squat rack is the foundation, but the accessories are what turn it into a powerhouse. These add-ons expand your exercise options and make your training more efficient and enjoyable. Here are the must-haves!
- A Quality Barbell and Weight Plates: This is non-negotiable. You’ll need a standard 7-foot, 45-pound Olympic barbell. For plates, a 300 lb set is a great starting point for most people, including a pair of 45s, 35s, 25s, 10s, 5s, and 2.5s.
- An Adjustable Bench: An adjustable flat-incline-decline (FID) bench is crucial. It allows you to perform flat bench presses, incline presses for your upper chest, and seated overhead presses, dramatically increasing your exercise library.
- Upgraded J-Cups: The J-cups that come with most racks are basic steel. Upgrading to a pair with a dense plastic (UHMW) lining is a smart move. This protects the knurling on your expensive barbell from getting scratched and damaged over time.
- Dip Station Attachment: Most racks have a compatible dip station attachment that slides into the uprights. This is a fantastic tool for building your chest, shoulders, and triceps with one of the best bodyweight exercises around.
- Landmine Attachment: This simple sleeve attachment holds one end of your barbell, allowing you to perform a huge variety of rotational and pressing exercises like landmine presses, rows, and anti-rotation movements. It’s an incredibly versatile and low-cost addition.
Pro Tip: When buying accessories, always check for compatibility! The most important factor is the size of your rack’s uprights (e.g., 2×3″ or 3×3″) and the diameter of the holes (e.g., 5/8″ or 1″). Not all attachments fit all racks.
Safety First: Critical Tips for Squatting with a Rack
A squat rack is an amazing safety tool, but only if you use it correctly. Following these safety rules will ensure you can train hard while minimizing your risk of injury. Your long-term progress depends on staying healthy!
-
Always Set the Safety Bars Correctly. This is the number one rule. For squats, set the safety bars just below the lowest point of your range of motion. You should be able to complete a full squat without the barbell touching them, but they should be high enough to catch the weight if you fail. For bench press, set them just above your chest when you have a slight arch in your back. Test the height with an empty bar before loading it up.
-
Learn How to Bail Safely. Even with safeties, you should know how to get out from under a failed lift. For squats, if you get stuck, simply sit down and let the safety bars catch the weight behind you. For bench press, you can roll the bar down your torso towards your hips (the “roll of shame”) or, if the safeties are set right, just relax your arms and let them catch it.
-
Use Barbell Clips/Collars. Always secure your weight plates with collars. It’s shocking how many people skip this. An unbalanced load caused by a sliding plate can lead to a dangerous failed lift and serious injury. It only takes a few seconds and it’s a non-negotiable safety step.
-
Perform Regular Equipment Checks. About once a month, take a few minutes to check all the nuts and bolts on your rack and tighten anything that has come loose. Also, inspect the welds for any signs of stress or cracking. A well-maintained rack is a safe rack.
Common Mistakes to Avoid When Buying and Using a Squat Rack
Making an informed decision now will save you from frustration and buyer’s remorse later. Here are some of the most common mistakes people make with squat rack equipment—avoid these at all costs!
- Ignoring Ceiling Height: This is a classic, heartbreaking mistake. You get your dream rack, spend hours assembling it, and then realize you can’t do a pull-up because your head hits the ceiling. Measure your space first, and make sure you have at least 6-12 inches of clearance above the rack’s pull-up bar.
- Buying a Rack with a Low Weight Capacity: Don’t just buy a rack that can handle what you lift now. Buy a rack that can handle what you aspire to lift in the future. A cheap rack with a 300-500 lb capacity might seem like a good deal, but you’ll quickly outgrow it and lose confidence in its stability as you get stronger.
- Forgetting About Attachments: When you buy a rack from a specific brand, you’re also buying into their ecosystem of attachments. Choosing a rack with 3×3″ uprights and 1″ holes will give you the most options, as many companies make attachments for this standard. Don’t lock yourself into a proprietary size that limits your future upgrades.
- Improper Setup: Failing to ensure the rack is on a level surface can make it unstable. If your garage floor is sloped, use shims to level it out. For half racks and some lighter power racks, bolting them to the floor or a lifting platform is highly recommended for maximum stability, especially if you plan on doing kipping pull-ups or using band attachments.
Comparison of Popular Squat Rack Brands

The market is full of great options. While we can’t review every model, here’s a quick look at some of the most popular brands to give you an idea of the landscape.
| Feature | Rogue Fitness | REP Fitness | Titan Fitness |
|---|---|---|---|
| Price Point | Premium | Mid-Range | Budget-Friendly |
| Steel Origin | USA-Made | Imported | Imported |
| Primary Uprights | 3×3″, 11-gauge | 3×3″, 11-gauge | 2×3″ or 3×3″, 11-gauge |
| Best For | Lifters wanting the highest quality, made-in-USA gear and are willing to pay for it. | The best balance of high-end features, excellent quality, and value. | Home gym owners on a tighter budget who still want a capable and feature-rich rack. |
| Key Selling Point | Legendary build quality, huge ecosystem of attachments, and brand reputation. | Premium features like laser-cut numbers and Westside spacing at a very competitive price. | Often the most affordable option for a given set of features. |
How to Properly Set Up Your Squat Rack
Your new rack has arrived! The excitement is real, but proper assembly is key to its safety and longevity. Here’s a simple step-by-step guide to get you started.
-
Unbox and Organize Everything: Open all the boxes and lay out all the parts. Group the bolts, nuts, and washers by size. This seems tedious, but it will save you a massive headache later. Cross-reference the parts list with what you have to ensure nothing is missing.
-
Build the Base First: Start by assembling the base of the rack on the floor where it will live. Don’t fully tighten the bolts just yet; leave them slightly loose. This allows for some play to get everything aligned correctly.
-
Attach the Uprights: With a helper (this is a two-person job!), attach the four vertical uprights to the base. Again, only hand-tighten the bolts for now. Once all four are attached, you can install the top crossmembers and pull-up bar.
-
Level and Square the Rack: Once the frame is assembled, use a level to ensure the uprights are perfectly vertical and the base is level. Make any necessary adjustments. This is the most critical step for stability. Once it’s perfectly level and square, go back and tighten every single nut and bolt securely with a wrench or socket set.
-
Consider Bolting it Down: For maximum safety, especially with half racks or if you’re a heavy lifter, bolting your rack to the floor is the best practice. If you’re on concrete, you’ll need a hammer drill and concrete anchors. If you’re on a wood platform, you can use heavy-duty lag bolts.
Integrating a Squat Rack into Your Workout Routine
A squat rack is the perfect tool to structure your entire training week around compound movements. Here is a sample 3-day full-body routine that uses the rack as its centerpiece:
Workout A (e.g., Monday)
- Main Lift: Barbell Back Squats (in the rack) – 3 sets of 5-8 reps
- Accessory Press: Barbell Bench Press (in the rack) – 3 sets of 5-8 reps
- Accessory Pull: Barbell Rows – 3 sets of 8-12 reps
- Extra Work: Face Pulls, Bicep Curls
Workout B (e.g., Wednesday)
- Main Lift: Barbell Overhead Press (in the rack) – 3 sets of 5-8 reps
- Accessory Squat: Dumbbell Lunges – 3 sets of 10-15 reps per leg
- Accessory Pull: Pull-ups (on the rack’s bar) – 3 sets to failure
- Extra Work: Tricep Pushdowns, Leg Curls
Workout C (e.g., Friday)
- Main Lift: Deadlifts (in front of the rack) – 1 set of 5 reps
- Accessory Press: Incline Dumbbell Press (using the bench) – 3 sets of 8-12 reps
- Accessory Pull: Chin-ups (on the rack’s bar) – 3 sets to failure
- Extra Work: Lateral Raises, Ab work
This simple structure ensures you’re hitting all major muscle groups with heavy, effective exercises, with the squat rack playing a central role in your progress.
Squat Rack Maintenance: Keeping Your Equipment in Shape
Your squat rack is built to last, but a little bit of regular maintenance will keep it looking and performing its best for decades. It’s simple and only takes a few minutes.
First, make it a habit to wipe down the rack after your workouts, especially the J-cups and pull-up bar where your hands and sweat make the most contact. This prevents grime buildup and keeps it looking clean.
About once a month, do a bolt check. Go around the entire rack with your wrench and socket set and re-tighten all the nuts and bolts. They can sometimes loosen slightly over time with heavy use. This is a quick and easy safety check that ensures the rack remains rock-solid.
Finally, inspect for rust, especially if your gym is in a humid garage or basement. If you see any surface rust starting to form, especially around welds or scratches, you can easily remove it with a wire brush and then touch it up with a rust-resistant spray paint like Rust-Oleum to prevent it from spreading.
Frequently Asked Questions (FAQ)
Can I use a squat rack for bench press?
Absolutely. This is one of its primary functions. A power rack or half rack is the safest way to bench press alone. You can set the safety bars or spotter arms just above your chest, which will catch the barbell if you fail a rep, preventing a very dangerous situation.
You will need a quality flat or adjustable bench to go with it.
Do I need to bolt my squat rack to the floor?
It depends on the rack and your training style. For most full power racks (cages) that weigh over 300 lbs, bolting down is often optional for general strength training, though still recommended for maximum stability. For lighter power racks, half racks, and squat stands, bolting them to the floor or a lifting platform is highly recommended to prevent any tipping or shifting during heavy lifts or dynamic movements like kipping pull-ups.
What’s the difference between a power rack and a half rack?
The main difference is the design. A power rack is a four-post cage that you lift inside of, offering the highest level of safety with its pin-and-pipe or strap safety systems. A half rack has two main posts that you lift in front of, using adjustable spotter arms that extend forward for safety. Power racks take up more space but offer more enclosed protection, while half racks are more compact and have a more open feel.
How much should I spend on a good squat rack?
Prices can vary widely, but you can find excellent, high-quality squat racks for a home gym in the $400 to $900 range. Below $300, you’re typically looking at basic squat stands with limited features and lower weight capacities. In the $400-$900 sweet spot, you can get a very robust half rack or power rack made from 11-gauge steel that will last a lifetime. Premium, commercial-grade racks can cost $1,000 or more.
Final Thoughts
Choosing the right fitness gear squat rack is the single most important decision you’ll make for your home gym. It’s the foundation upon which all your strength goals will be built. By considering your space, budget, and training ambitions, you can confidently select a piece of squat rack equipment that will serve you for years to come.
Remember to prioritize safety and quality. Look for heavy-gauge steel, a high weight capacity, and the design—be it a power rack, half rack, or squat stand—that best fits your needs. Don’t be afraid to invest in a quality piece; it’s an investment in your health, strength, and consistency. Now go out there and build the home gym you’ve always dreamed of!